Open sidebar
Issuers Guide
This guide explains the various pages and features that are available to a user that has "Issuer" permissions within the Institute of Coding badging website.
Issuer Administration
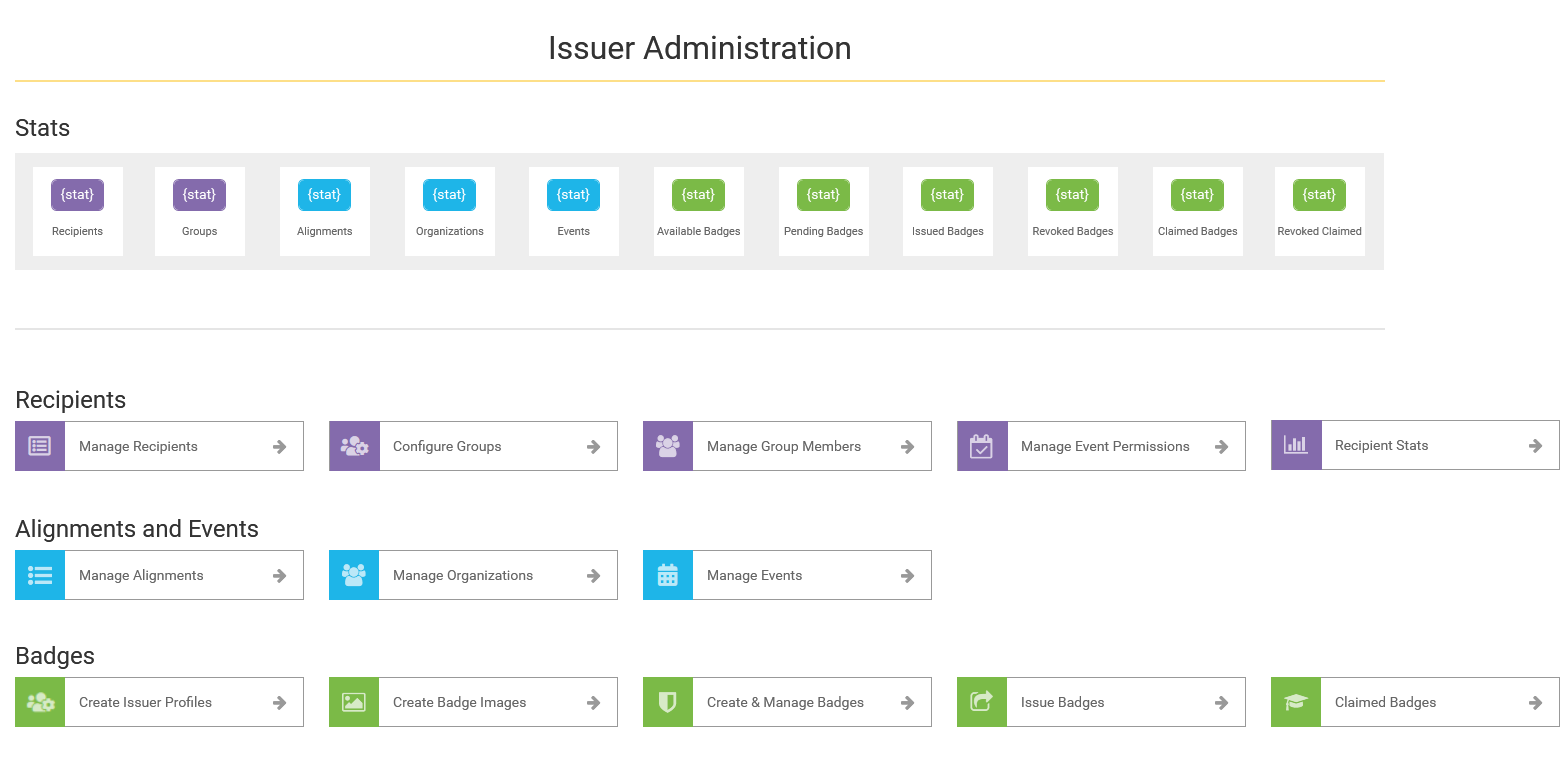
When logging in with issuer permissions, this is the first screen that will be visible. From here the user can manage their recipients, configure groups, manage group members, manage the permissions of the recipients in events manage alignments, manage organizations, manage events, manage issuer profiles, create badge images, manage badges, issue badges and manage claimed badges.
Manage recipients
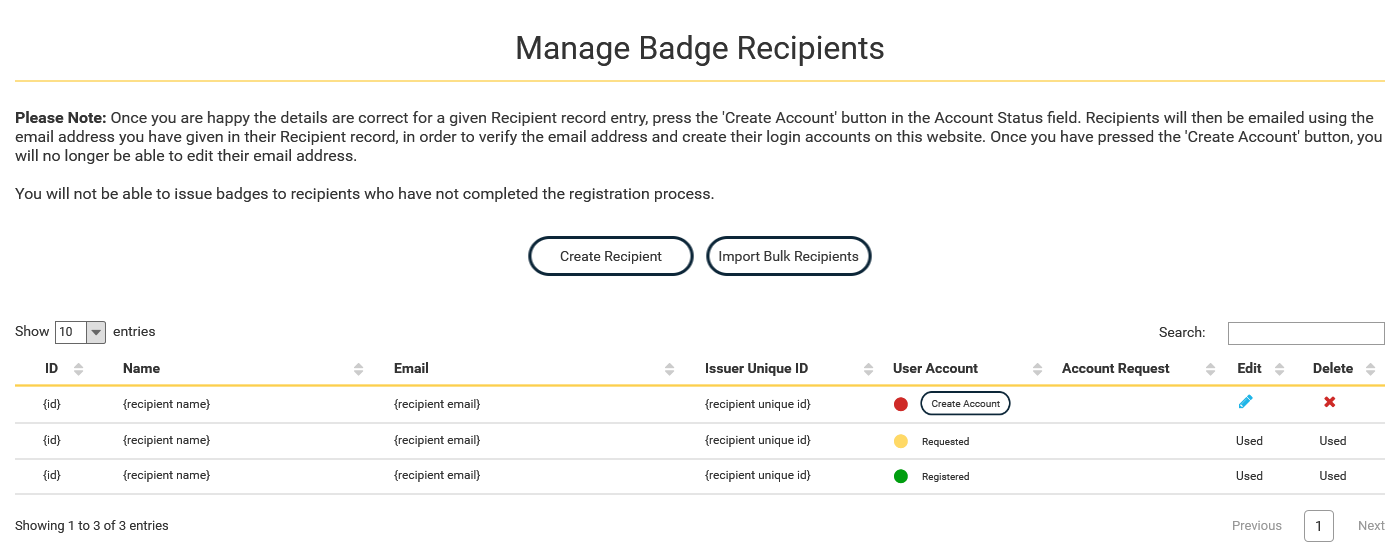
From this page the issuer will be able to manage the recipients that will be receiving the badges.
The issuer will be able to add new badge recipients and edit or delete existing ones.
Manage recipients - Create
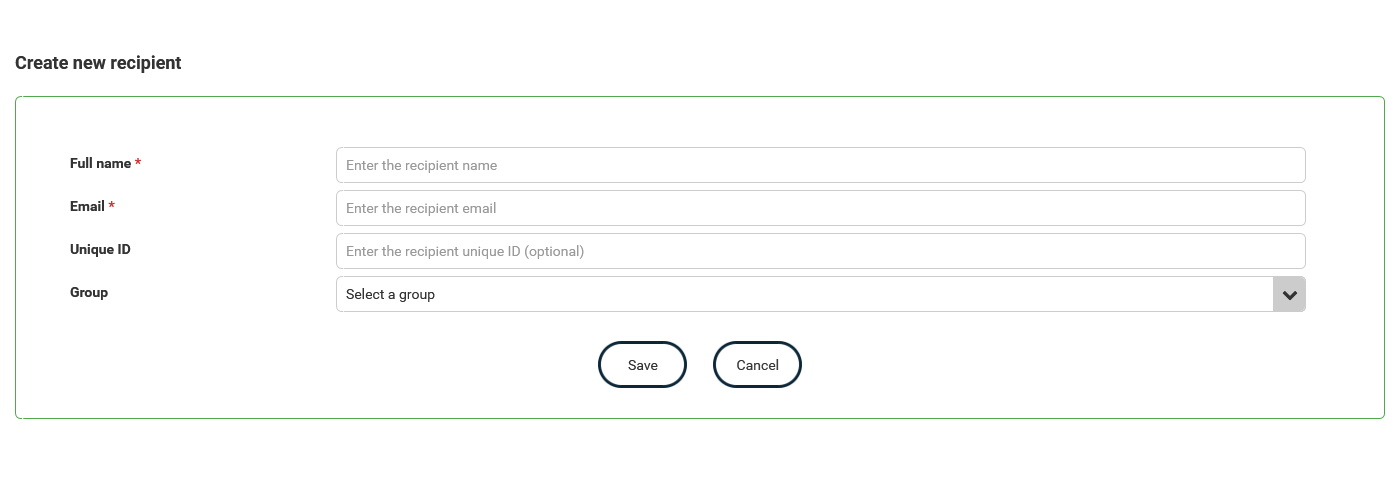
Clicking the "Create Recipient" button will expand a form at the top of the page with the relevant fields for adding new recipients individually.
Full name and email address are mandatory fields. The unique ID field is not mandatory. This field is in case the issuer has an ID/reference number for the recipient that they wish to log against them.
Clicking "Save" will add the new recipient, whilst clicking "Cancel" will collapse the form.
Manage recipients - Bulk create
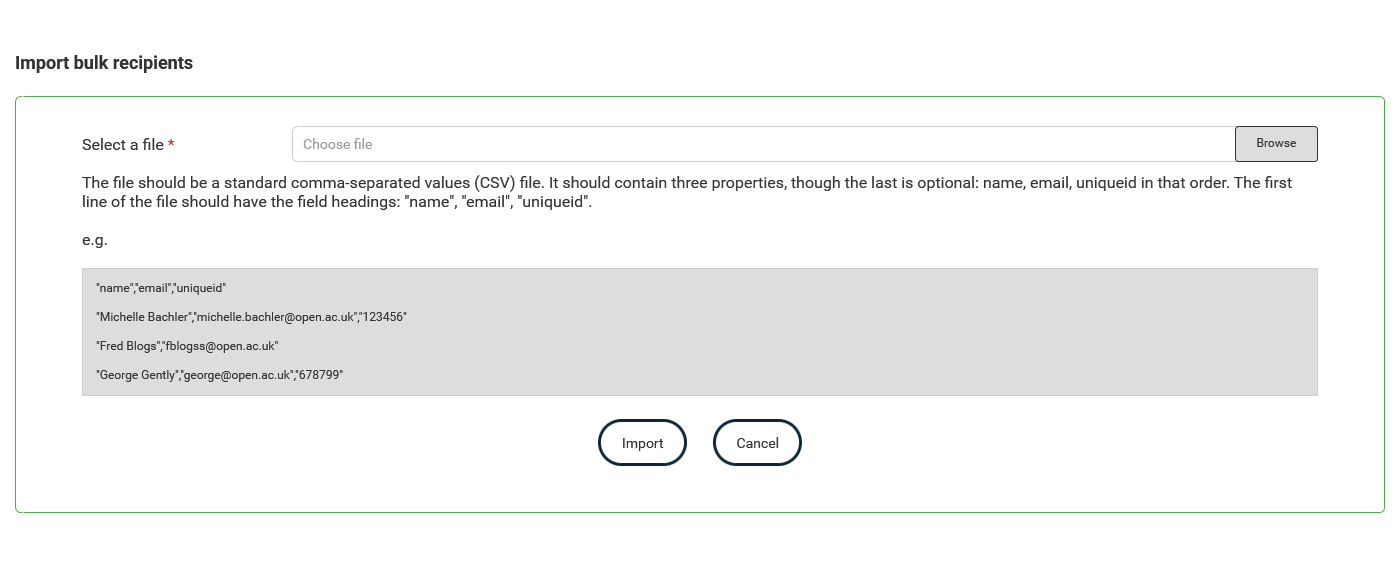
Clicking the "Import Bulk Recipient" button will expand a form at the top of the page with instructions on what is required to bulk import badge recipients, rather than adding them individually.
As per the instructions, a .csv file with the details should be uploaded.
Clicking "Import" will add the badge recipients from the bulk import, whilst clicking "Cancel" will collapse the form.
Note: The issuer will be informed if any badge recipients in the import file were unable to be added and why.
Manage recipients - Edit
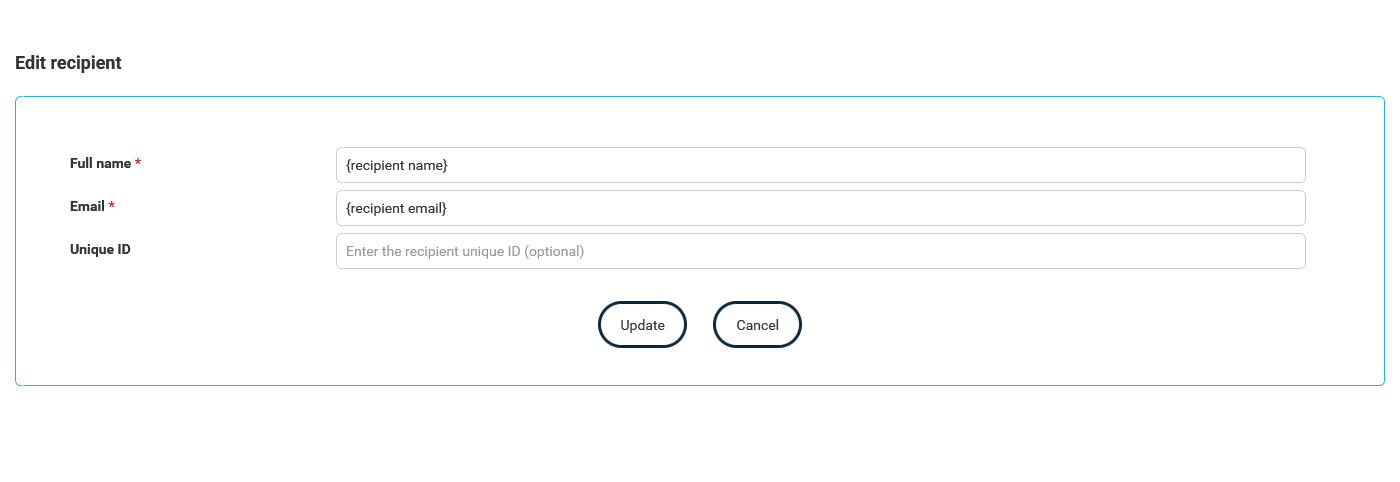
Clicking the button will expand a form above the table with the same fields that were available when adding an individual recipient. However, rather than the fields being blank, they will show the information held for the recipient that is being edited.
Clicking "Update" will update the record with the new information, whilst clicking "Cancel" will collapse the form.
Note: once a badge has been issued to a recipient the details of that recipient cannot be edited as they have been used in the issuing process. A new badge recipient entry would need to be added if details about a recipient change over time.
Manage recipients - Delete
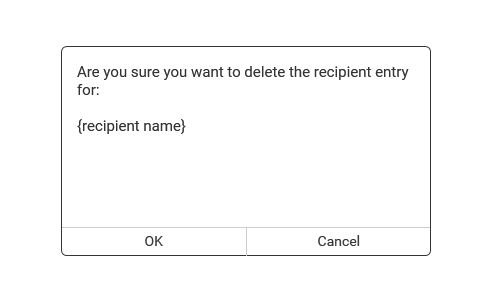
Clicking the button will display a pop up. This will be for the issuer to confirm they are wanting to delete the selected badge recipient.
Clicking "OK" will remove them, whilst clicking "Cancel" will close the pop up with no further action taken.
Note: once a badge has been issued to a recipient the details of that recipient cannot be deleted as they have been used in the issuing process.
Manage recipients - Create account
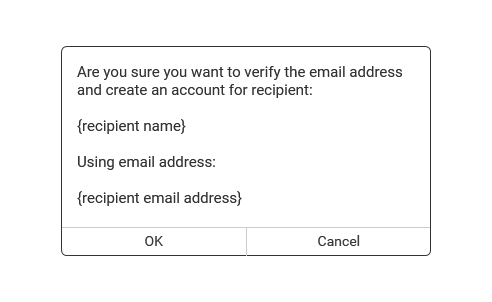
Although a badge recipient may exist in the table, they may not yet have a user account active against them.
If they do not have an active user account in the User Account column there will be a red circle with a "Create Account" button.
The issuer will need to click "Create Account" against the recipient. A pop up will appear asking the issuer to confirm that they want to create an account.
Clicking "OK" will send an email to the recipient, asking them to log in and set a new password. Clicking "Cancel" will close the pop up with no further action taken.
If the issuer has completed the above already, but the recipient has yet to set up their user account then in the User Account column it will show a yellow circle with a button to "Resend Email" if the recipient for some reason can't find the original account setup email and wants to complete registration.
If the user has set up their user account, then in the User Account column it will show a green circle with the status of "Registered".
If badges are being auto issued through badging stations at events, for example, recipients can be issued badges without having registered accounts on the system. In this situation, when recipients receive badging emails they will have a link to request an account on the system. If this happens, the issuer will be emailed to say a request has come through, and the "Account Request" column of the table will indicate which users have requested accounts. The issuer can then click the "Create Account" button as usual.
Configure groups
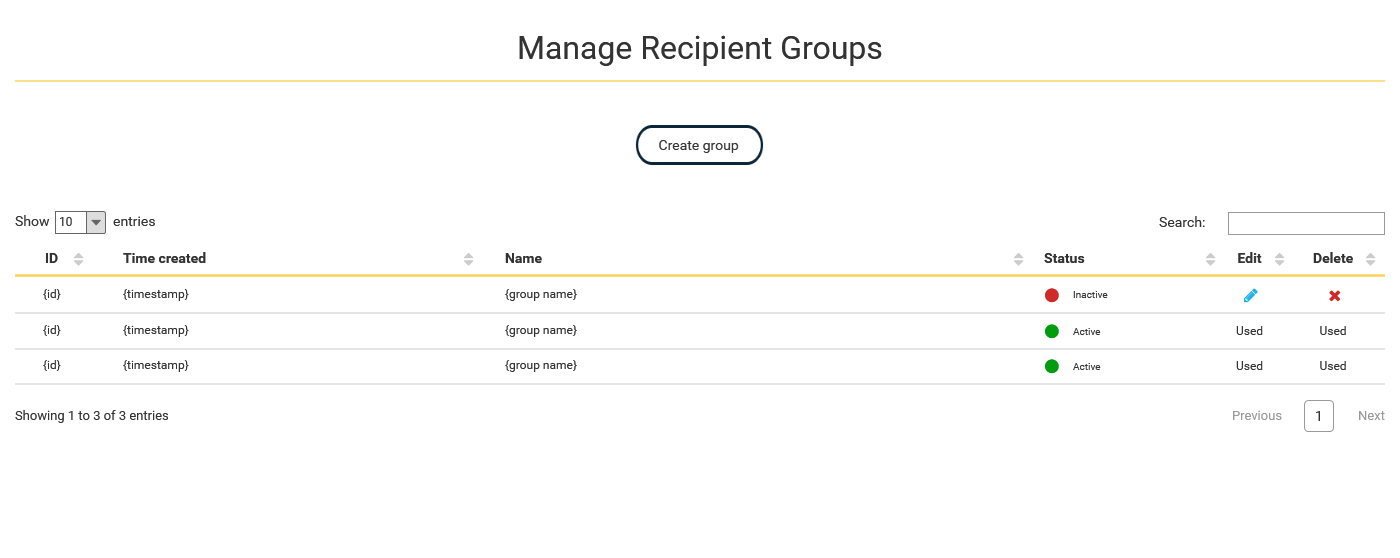
From this page the issuer will be able to manage the groups that recipients can be assigned to.
The issuer will be able to add new groups and edit or delete existing ones.
Configure groups - Create
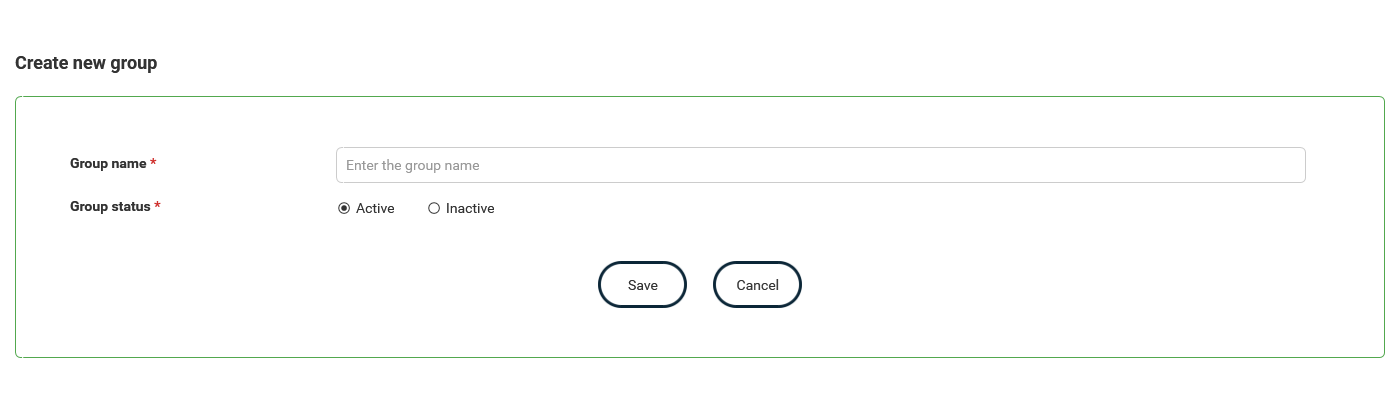
Clicking the "Create group" button will expand a form at the top of the page with the relevant fields for adding a new group.
Group name is mandatory, as is the status of the group. Active groups will be visible in other sections of the website, inactive ones are only visible on this page.
Clicking "Save" will add the new group, whilst clicking "Cancel" will collapse the form.
Configure groups - Edit
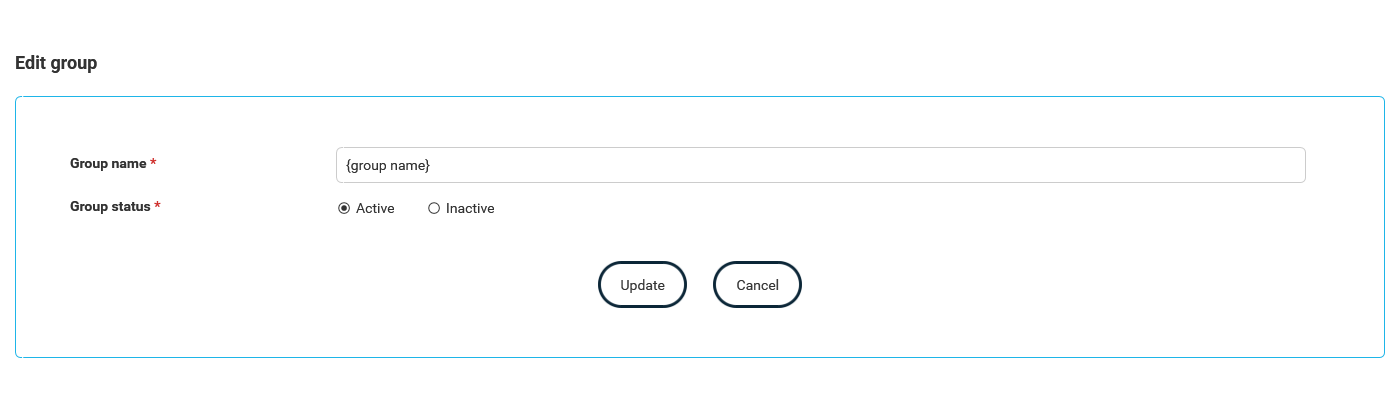
Clicking the button will expand a form above the table with the same fields that were available when creating a new group. However, rather than the fields being blank, they will show the information held for the group that is being edited.
Clicking "Update" will update the record with the new information, whilst clicking "Cancel" will collapse the form.
Configure groups - Delete
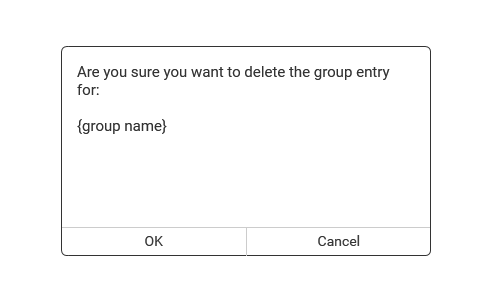
Clicking the button will display a pop up. This will be for the issuer to confirm they are wanting to delete the selected group.
Clicking "OK" will remove the group, whilst clicking "Cancel" will close the pop up with no further action taken.
Manage group members
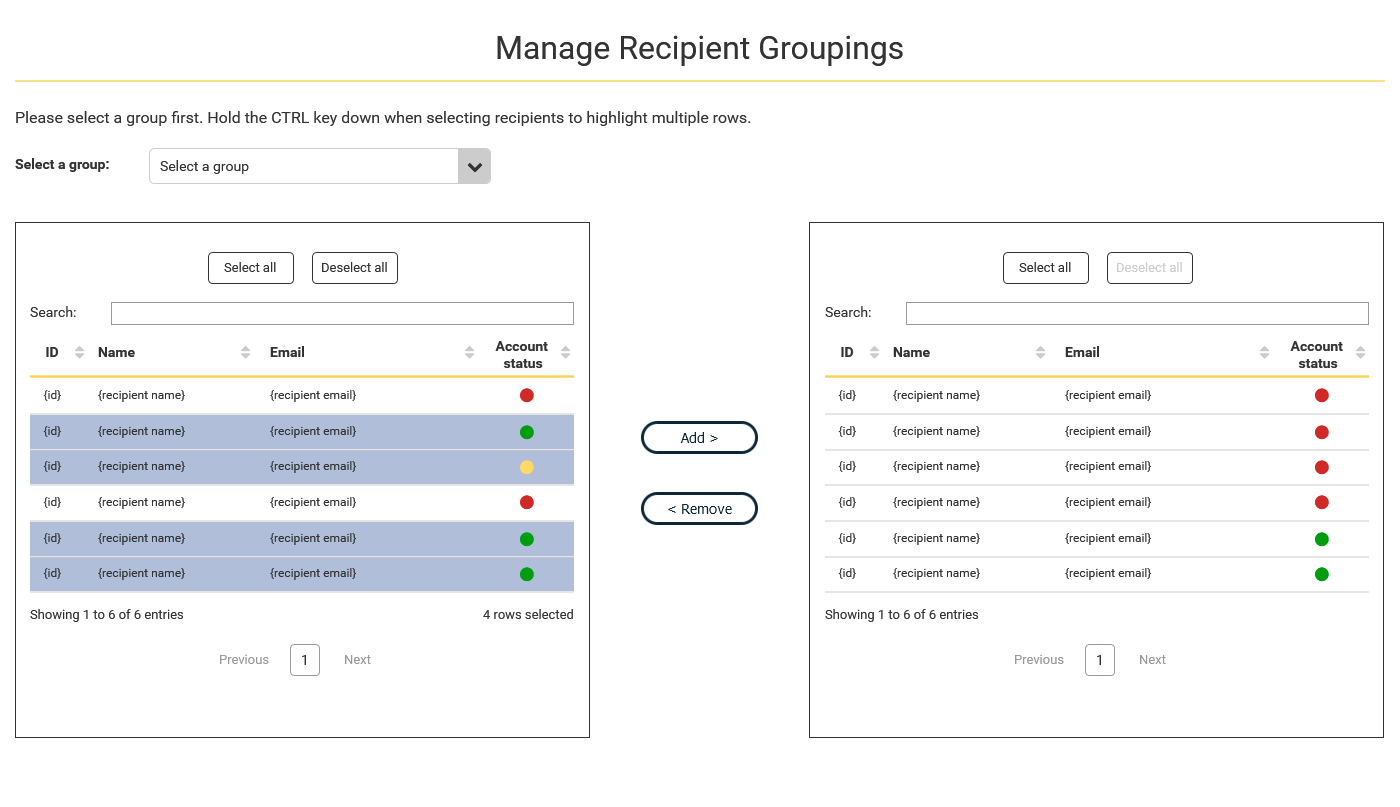
From this page the issuer will be able to add or remove recipients from groups. Recipients can be in a multiple of groups.
The left hand table holds all the recipients that are linked to the issuer account that is logged into view this page. The right hand table will appear empty on page load.
Once a group has been selected the left hand table will update to show recipients who have not yet been added to the selected group. The other table will show all recipients that have been added to that group previously.
The status against the recipients is based on whether they have a user account. This is a traffic light system which will reflect the status of the account in the Manage badge recipients page.
Note: Recipients without confirmed email addressess cannot be issued a badge. So recipients who have not completed account registration will not appear in the list of recipients who can be issued a badge on the 'Manage Badge Issuing' page, even if you have added them to a group and select that group when issuing.
Manage group members - Add
Select recipients from the left hand table, by clicking on the rows. Holding CTRL and clicking will allow for multiple recipients to be selected. Alternatively the "Select all" or "Deselect all" buttons at the top of the tables can be used. The selected rows will show with a blue background.
Once the recipients have been selected click the "Add >" button to move them into the group, that is selected in the dropdown.
The recipients will now show up in the right hand table, and will no longer be selectable in the left hand table for that group.
Manage group members - Remove
Select recipients from the right hand table, by clicking on the rows. Holding CTRL and clicking will allow for multiple recipients to be selected. Alternatively the "Select all" or "Deselect all" buttons at the top of the tables can be used. The selected rows will show with a blue background.
Once the recipients have been selected click the "< Remove" button to remove them from the selected group.
The recipients will now show up in the left hand table, and will no longer be in the table for that group.
Manage event permissions
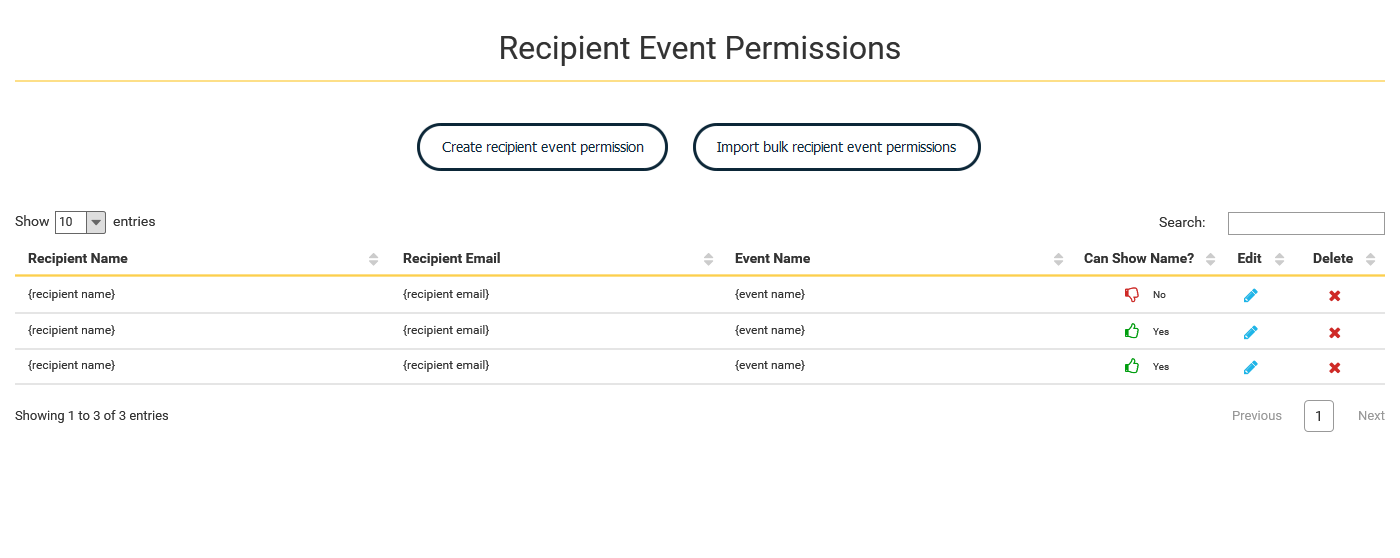
This screen is to manage the visibility of a recipient on the leaderboard screen. Due to GDPR regulations this allows the delegates to allow or disallow their name being displayed on the leaderboard, which may be visible at an event when collecting badges.
These permissions are configured per event. Therefore, if a recipient had been to a previous event and are attending a new one, they will need to confirm if they are happy to display their name at the new event even if they had agreed for the previous event.
From this screen the issuer can add, edit or delete Manage event permissions.
Manage event permissions - Create
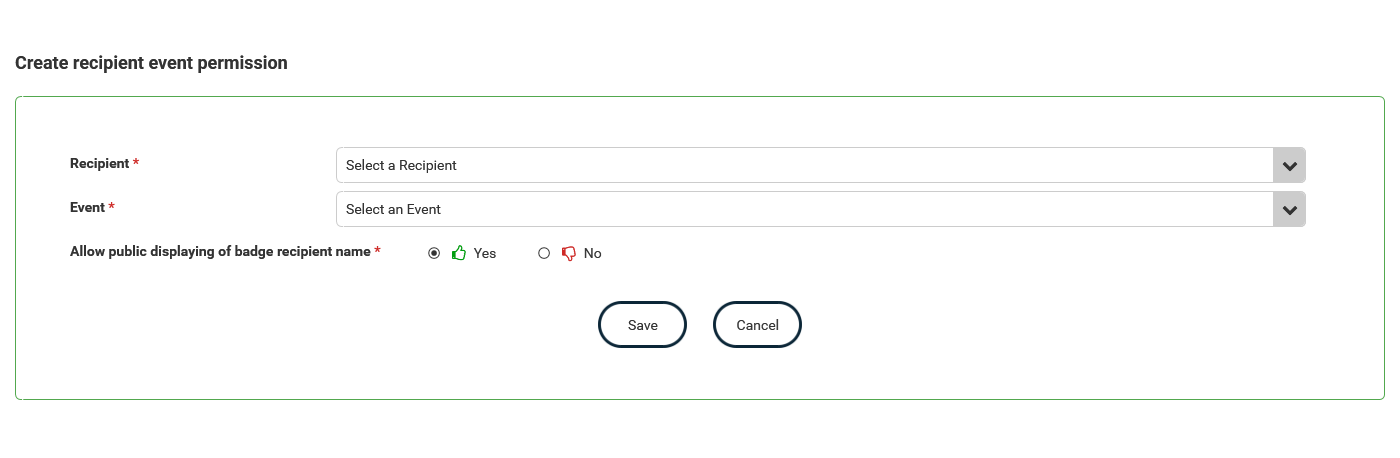
Clicking the "Create Recipient Event Permission" button will expand a form at the top of the page with the relevant fields for adding recipient permissions per event individually.
All fields are mandatory, and the issuer will be required to select the recipient name from a dropdown list as well as the event they are attending from the dropdown list. There are then two options to select from, "yes" or "no", based on whether the recipient wishes to display their name or not on the leaderboard.
Clicking "Save" will add the permission record, whilst clicking "Cancel" will collapse the form.
Manage event permissions - Bulk create
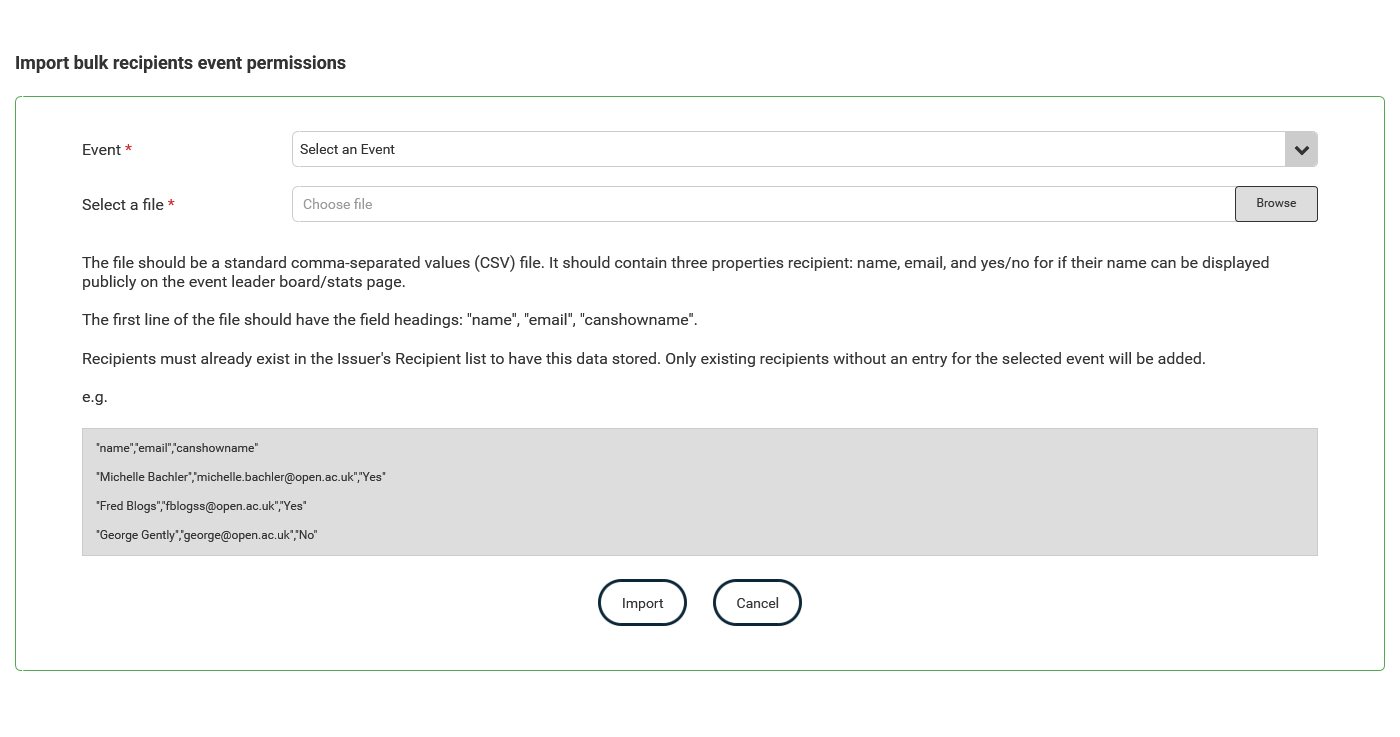
Clicking the "Import Bulk Recipient Event" button will expand a form at the top of the page with instructions on what is required to bulk import recipient permissions, rather than adding them individually.
As per the instructions, a .csv file with the details should be uploaded.
Clicking "Import" will add the recipient permissions from the bulk import, whilst clicking "Cancel" will collapse the form.
Note: Recipients will need to have been entered onto the system through the Recipient Management area before any bulk upload or recipient permissions is done. The Issuer will be told of any recipient permissions that could not be added.
Manage event permissions - Edit

Clicking the button will expand a form above the table with the same fields that were available when adding an individual recipient event permission. However, rather than the fields being blank, they will show the information held for the recipient that is being edited.
Clicking "Update" will update the record with the new information, whilst clicking "Cancel" will collapse the form.
Manage event permissions - Delete
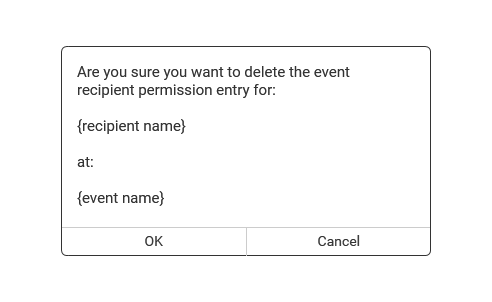
Clicking the button will display a pop up. This will be for the issuer to confirm they are wanting to delete the permission for the selected recipient.
Clicking "OK" will remove it, whilst clicking "Cancel" will close the pop up with no further action taken.
Recipient Stats
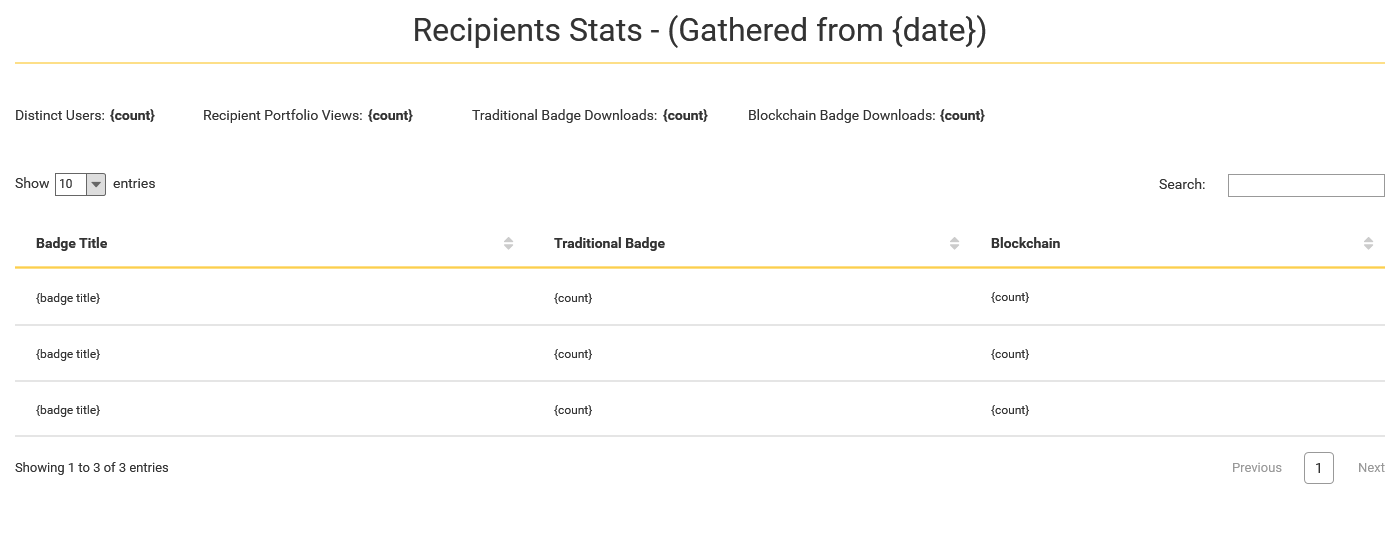
This screen is a stats view of the recipients created by the logged in issuer.
It shows stats for the badges for the number that have been viewed, and downloaded.
Manage Alignments
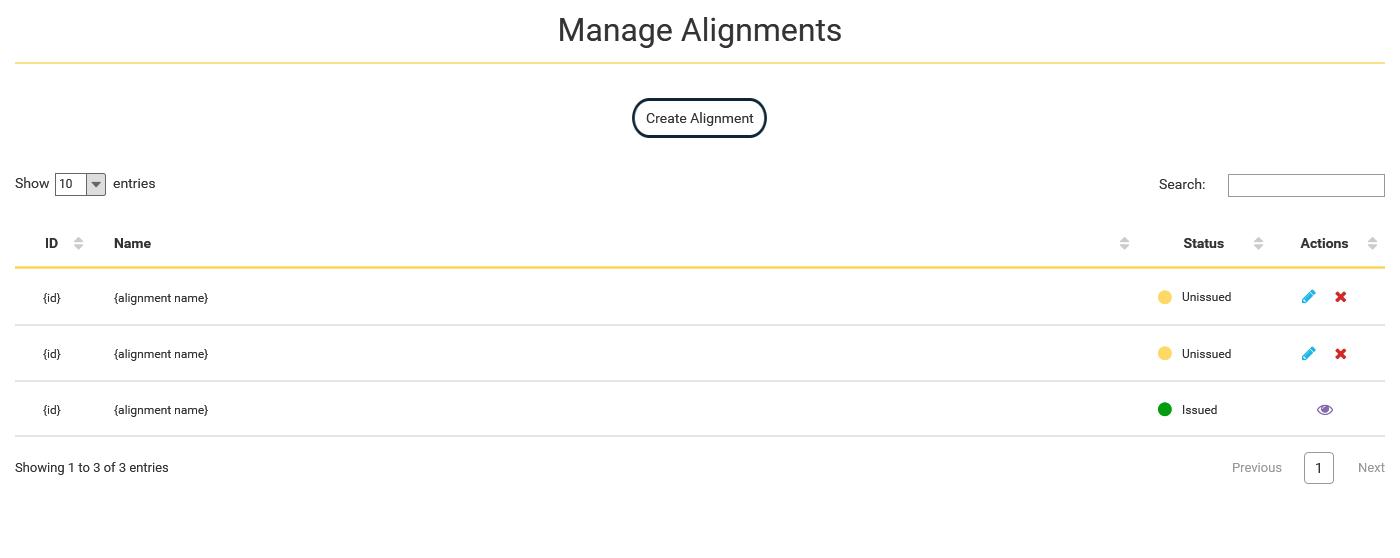
Clicking "Manage Alignments" on the issuer admin page will bring the user to this page.
The issuer will be able to create a new alignment, edit or delete existing ones.
The status flag will reflect whether the alignment has been used against a badge that has been issued.
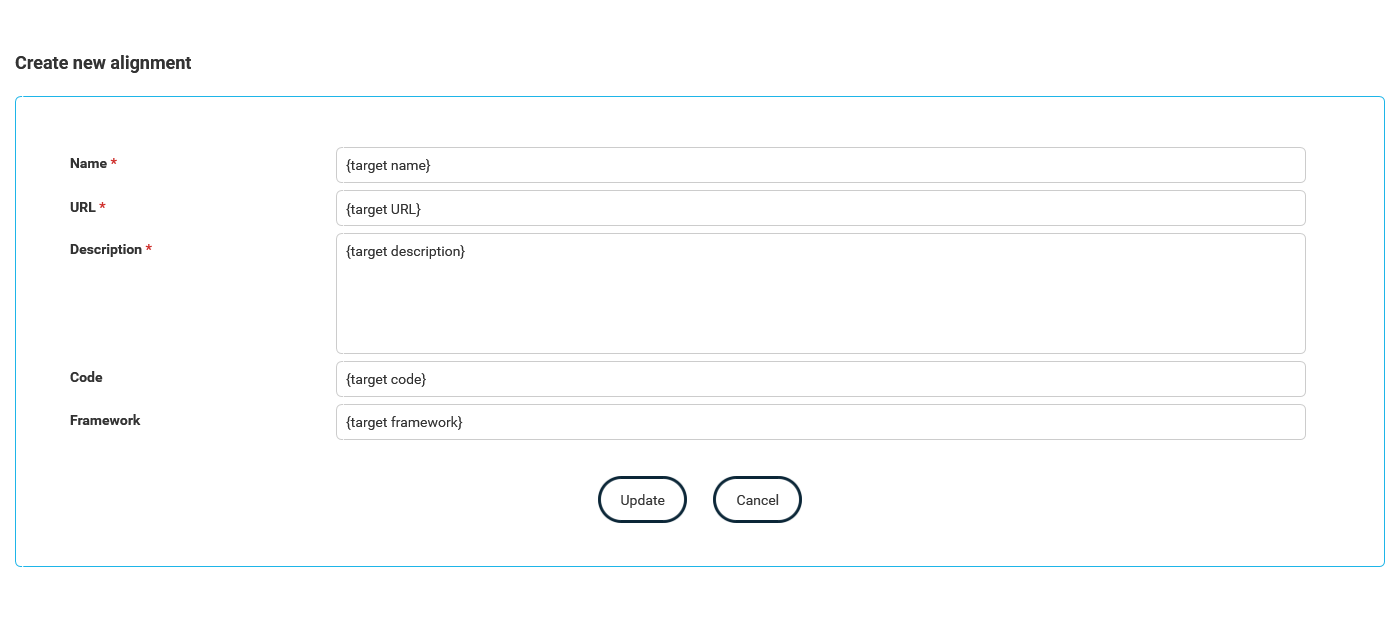
Manage Alignments - Create
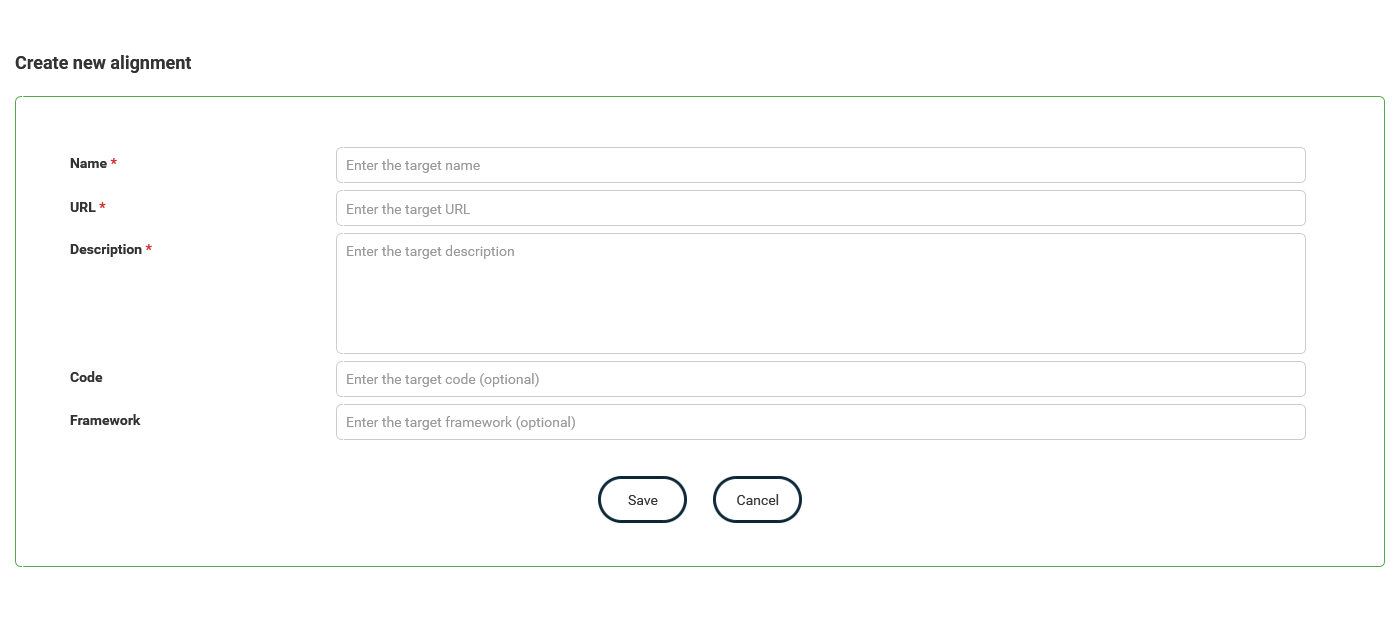
Clicking the "Create Alignment" button will expand a form at the top of the page with the relevant fields for adding a new alignment.
Name, URL and description for the alignment are mandatory fields. The rest are optional.
Clicking "Save" will add the new alignment, whilst clicking "Cancel" will collapse the form.
Manage Alignments - View
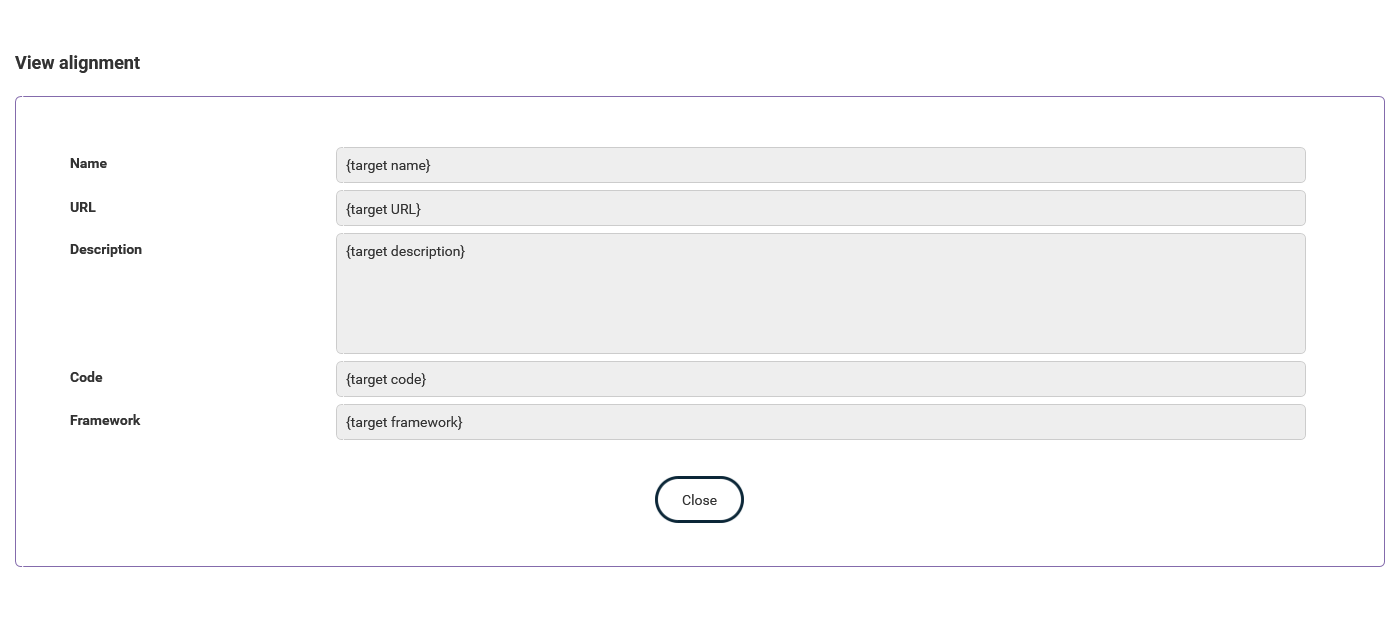
This button will only be available if a badge this has been linked to has been issued.
Clicking the button will expand a form at the top of the page with read only fields, displaying the data held for that alignment.
Clicking "Close" will collapse the form.
Manage Alignments - Edit
This button will only be available if a badge this has been linked to has not been issued. As once the badge has been issued the linked information cannot be amended.
Clicking the button will expand a form above the table with the same fields that were available when creating a new alignment. However, rather than the fields being blank, they will show the information held for the group that is being edited.
Clicking "Update" will update the record with the new information, whilst clicking "Cancel" will collapse the form.
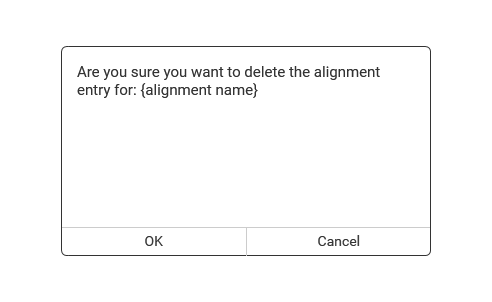
Manage Alignments - Delete
This button will only be available if a badge this has been linked to has not been issued. As once the badge has been issued the linked information cannot be deleted.
Clicking the button will display a pop up. This will be for the user to confirm they are wanting to delete the selected alignment.
Clicking "OK" will remove the alignment, whilst clicking "Cancel" will close the pop up with no further action taken.
Manage Organizations
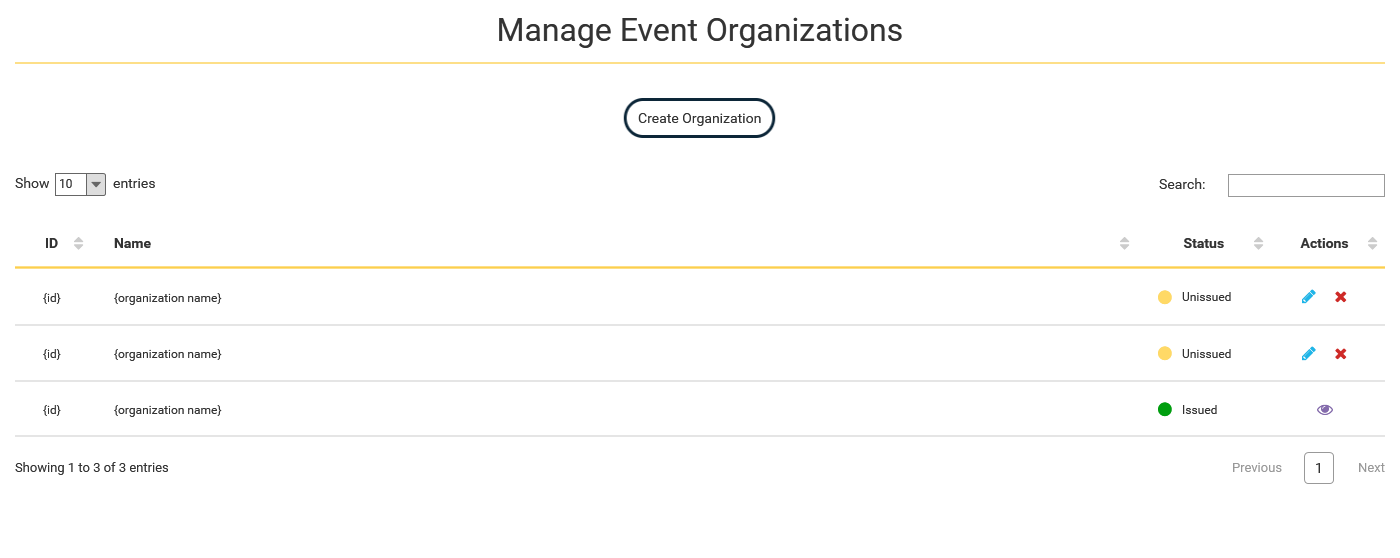
Clicking "Manage Organizations" on the issuer admin page will bring the user to this page.
The issuer will be able to create a new organization, edit or delete existing ones.
The status flag will reflect whether the organization has been used against a badge that has been issued.
Manage Organizations - Create
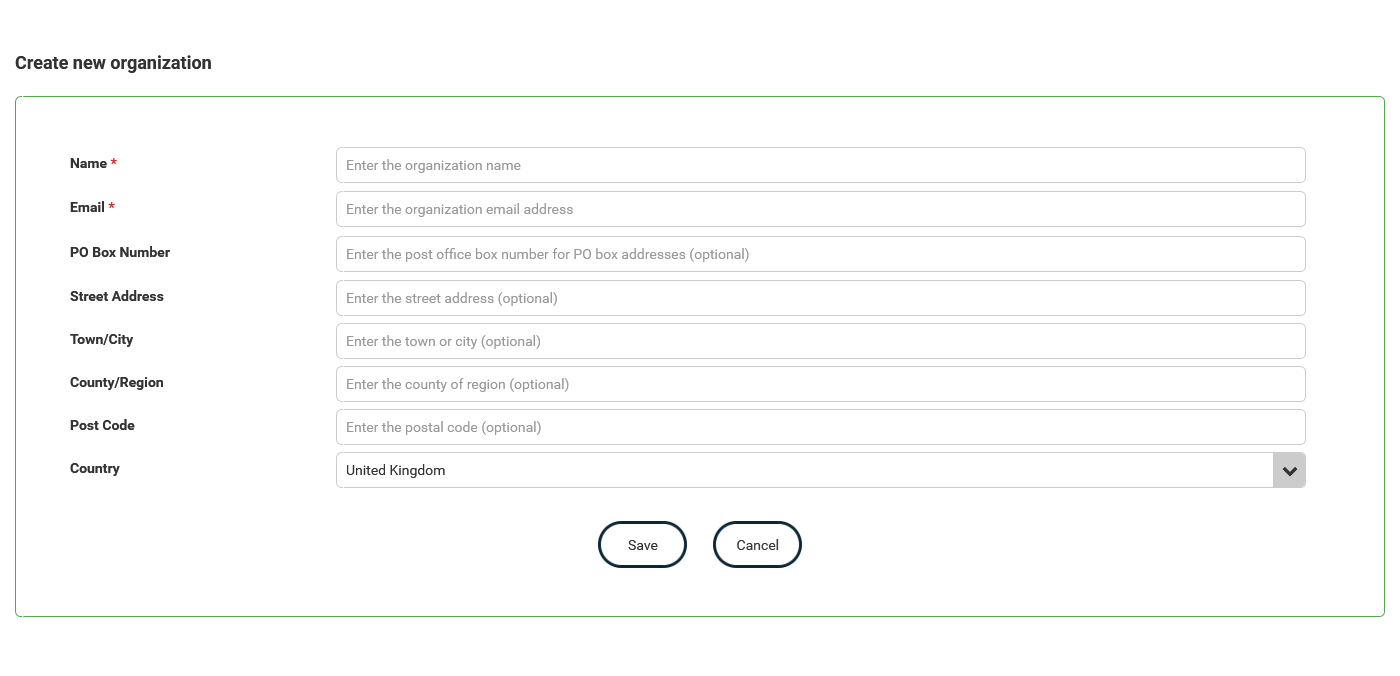
Clicking the "Create Organization" button will expand a form at the top of the page with the relevant fields for adding a new organization.
Name and email address for the organization are mandatory fields. The rest are optional.
Clicking "Save" will add the new organization, whilst clicking "Cancel" will collapse the form.
Manage Organizations - View
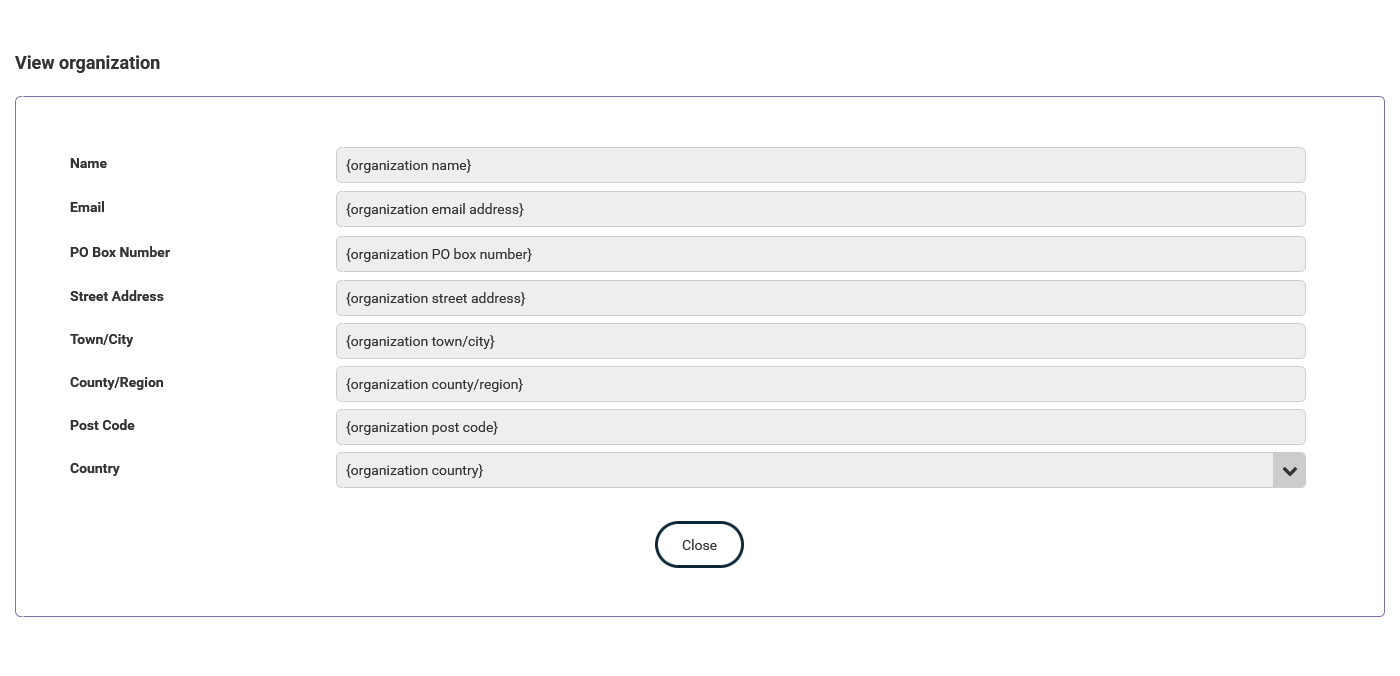
This button will only be available if a badge this has been linked to has been issued.
Clicking the button will expand a form at the top of the page with read only fields, displaying the data held for that organization.
Clicking "Close" will collapse the form.
Manage Organizations - Edit
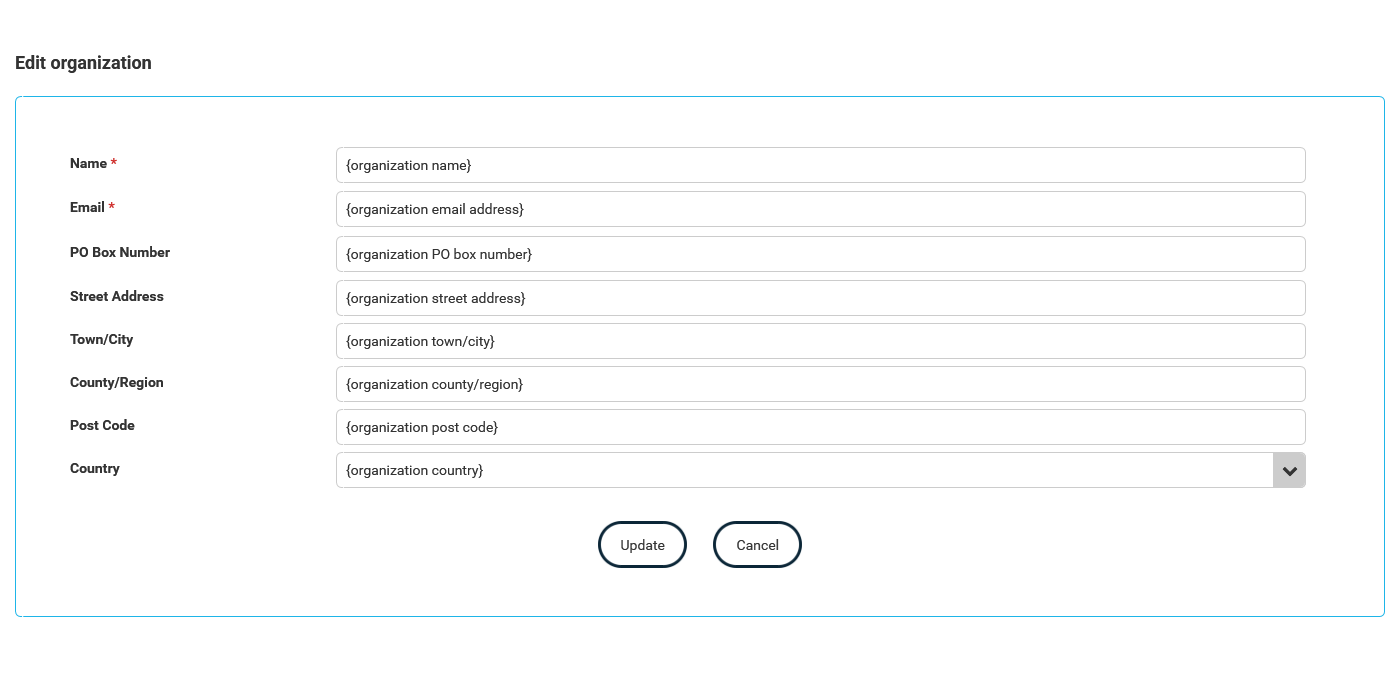
This button will only be available if a badge this has been linked to has not been issued. As once the badge has been issued the linked information cannot be amended.
Clicking the button will expand a form above the table with the same fields that were available when creating a new organization. However, rather than the fields being blank, they will show the information held for the group that is being edited.
Clicking "Update" will update the record with the new information, whilst clicking "Cancel" will collapse the form.
Manage Organizations - Delete
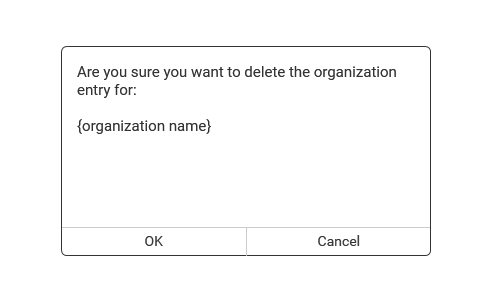
This button will only be available if a badge this has been linked to has not been issued. As once the badge has been issued the linked information cannot be deleted.
Clicking the button will display a pop up. This will be for the user to confirm they are wanting to delete the selected organization.
Clicking "OK" will remove the organization, whilst clicking "Cancel" will close the pop up with no further action taken.
Manage Events
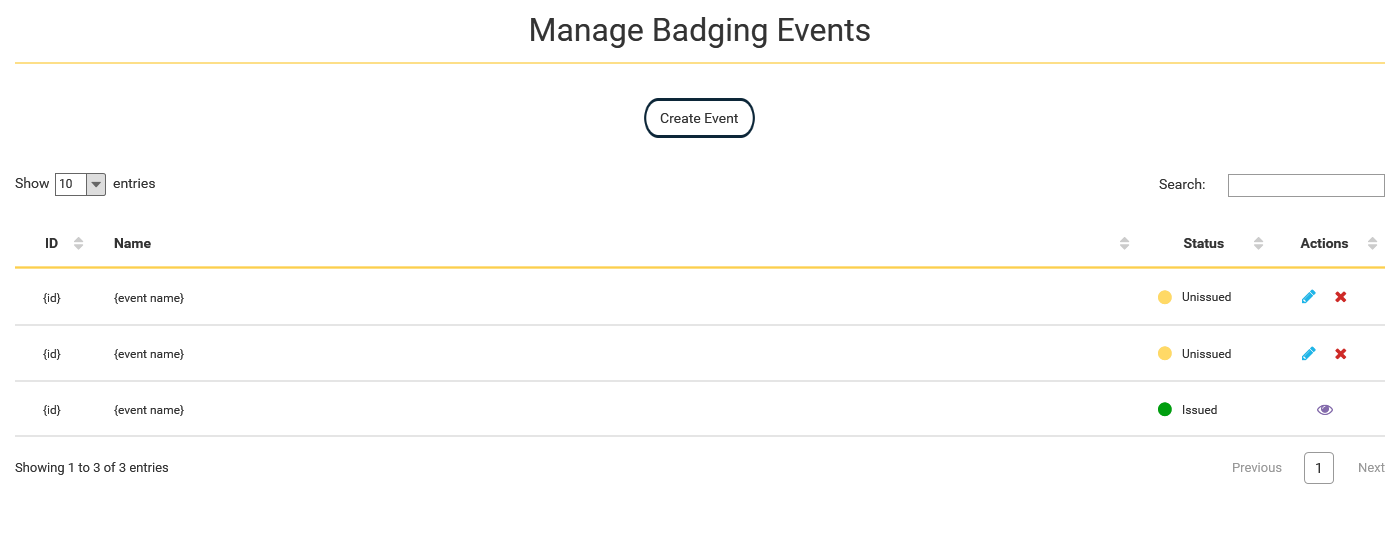
Clicking "Manage Events" on the issuer admin page will bring the user to this page.
The issuer will be able to create a new event, edit or delete existing ones.
The status flag will reflect whether the event has been used against a badge that has been issued.
Manage Events - Create
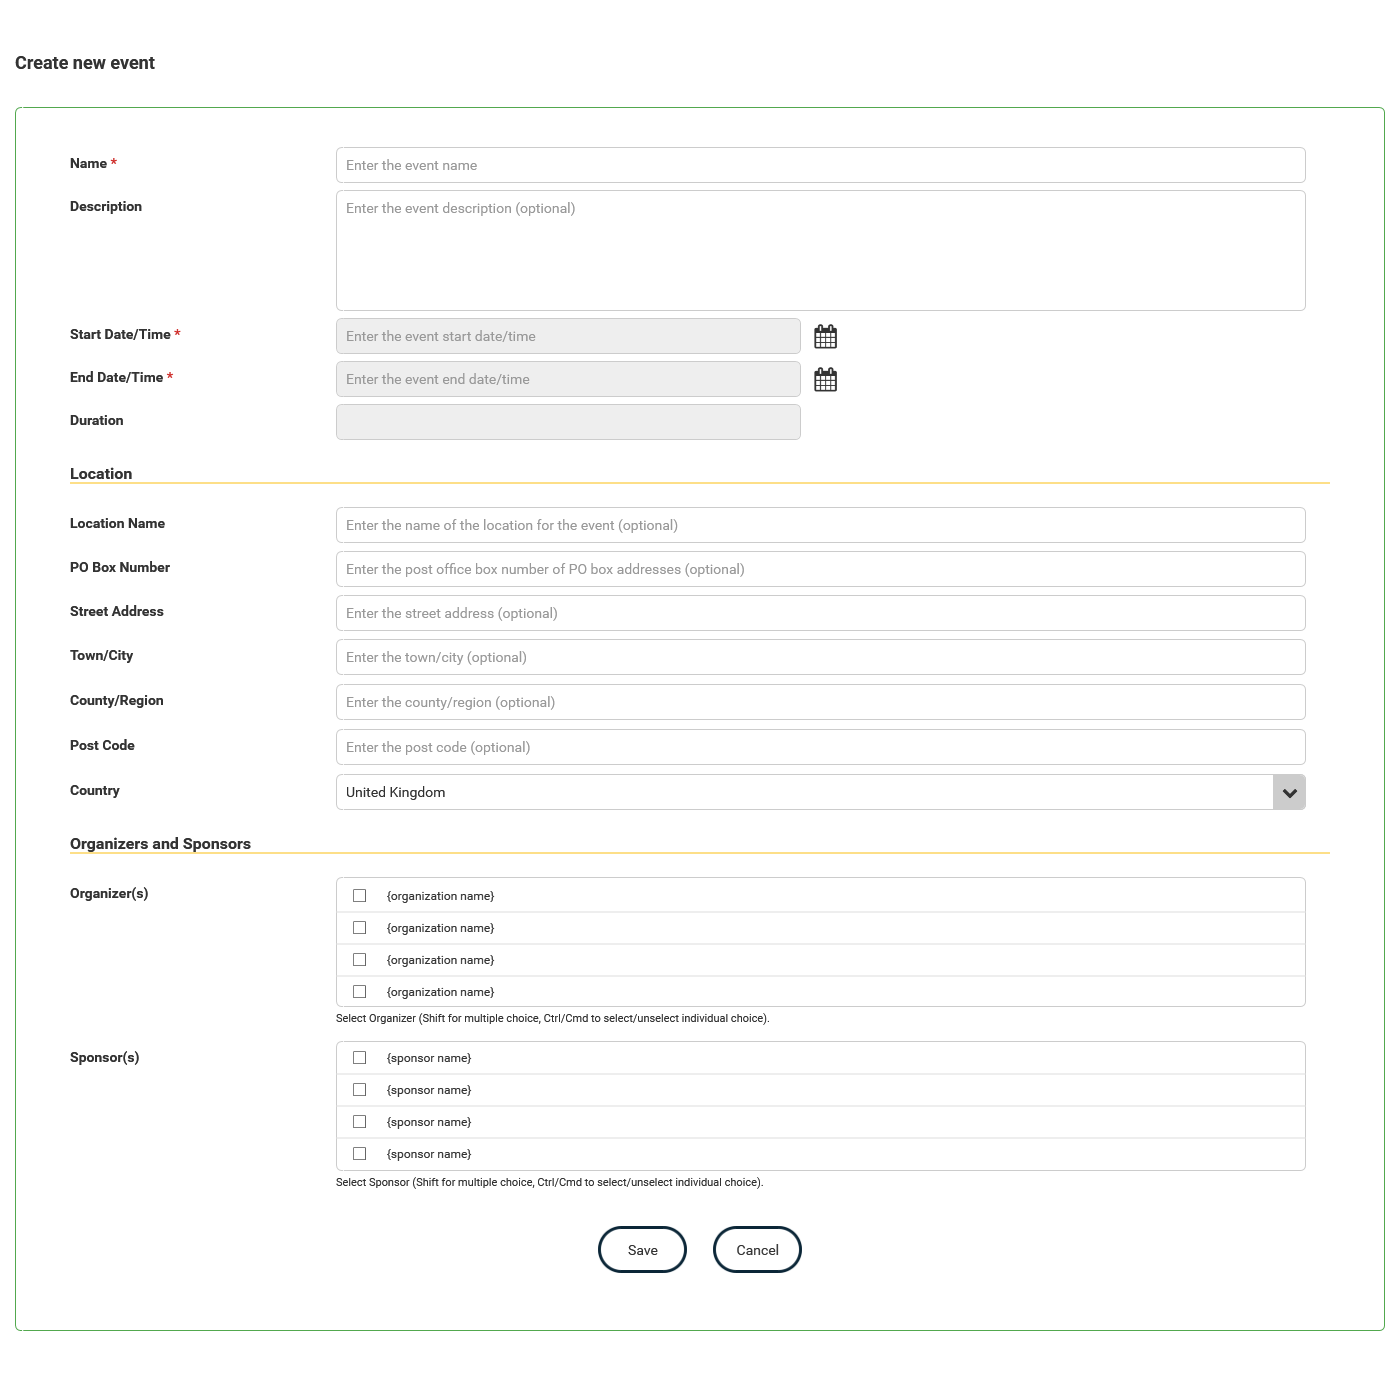
Clicking the "Create Event" button will expand a form at the top of the page with the relevant fields for adding a new event.
Name, start date/time and the end date/time for the event are mandatory fields. The rest are optional.
Clicking "Save" will add the new event, whilst clicking "Cancel" will collapse the form.
Manage Events - View
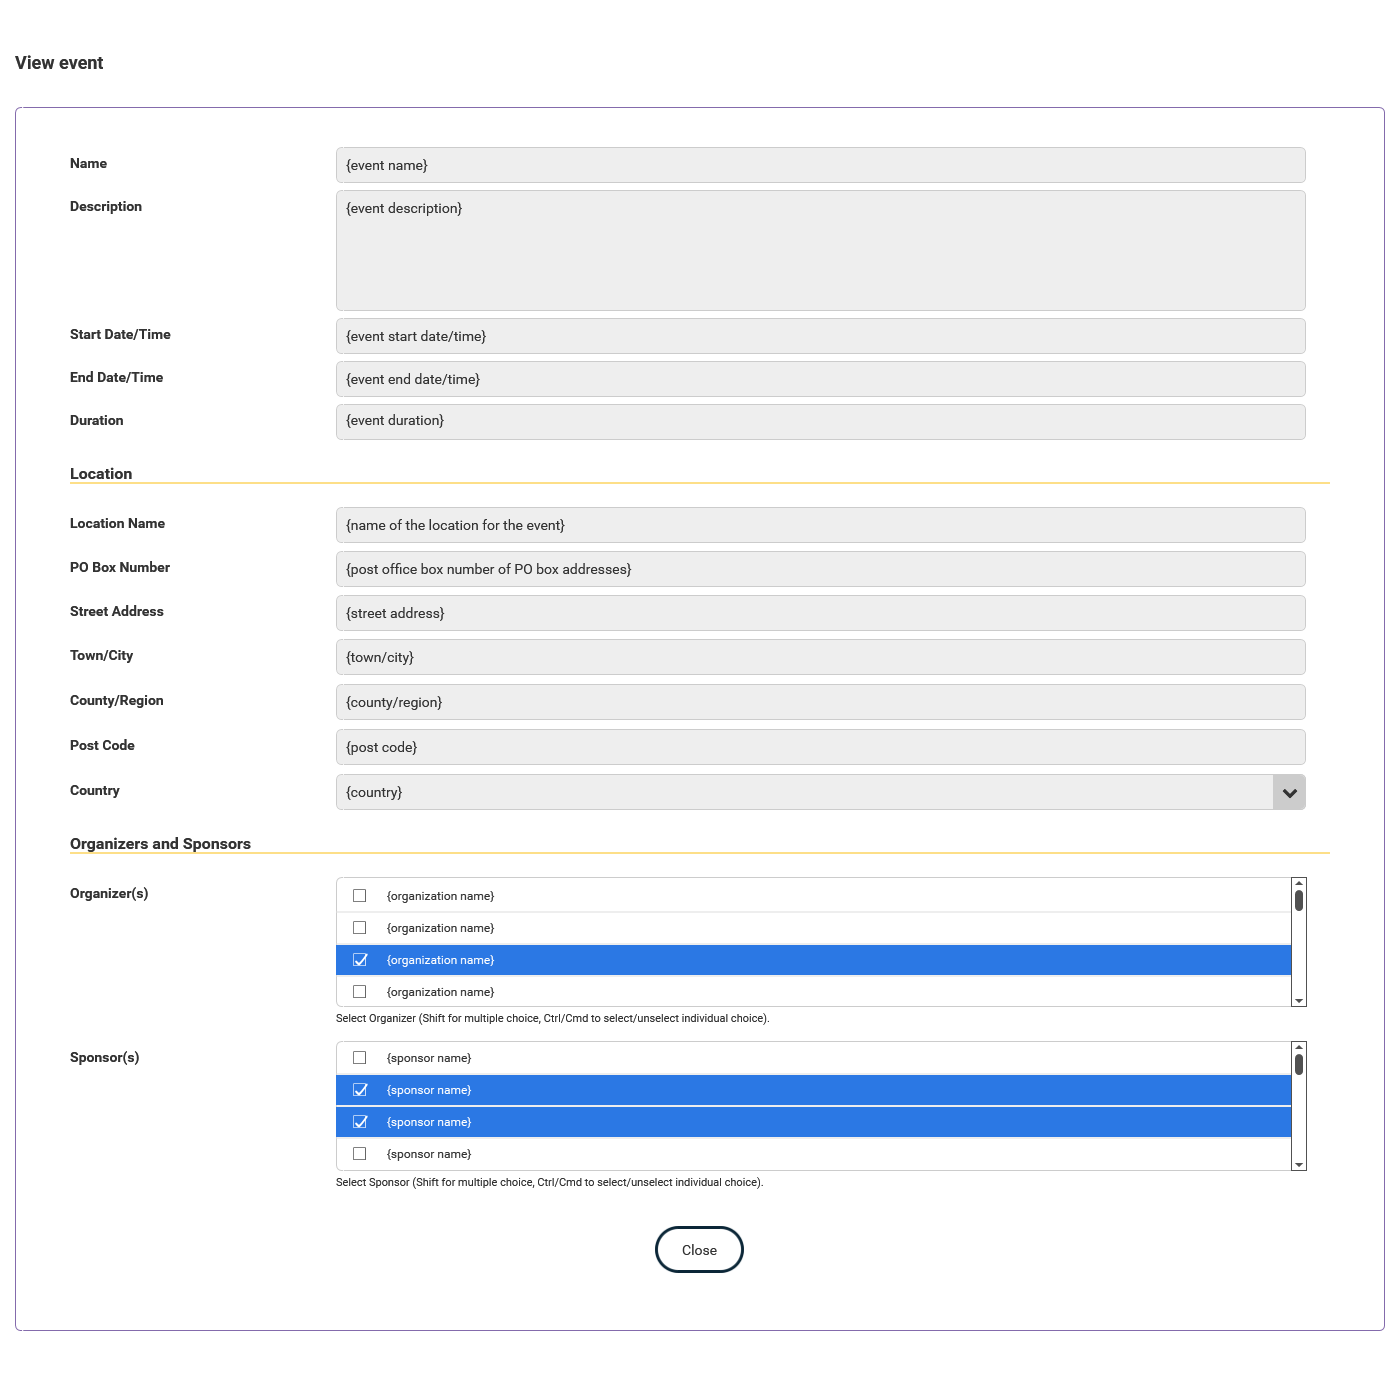
This button will only be available if a badge this has been linked to has been issued.
Clicking the button will expand a form at the top of the page with read only fields, displaying the data held for that event.
Clicking "Close" will collapse the form.
Manage Events - Edit
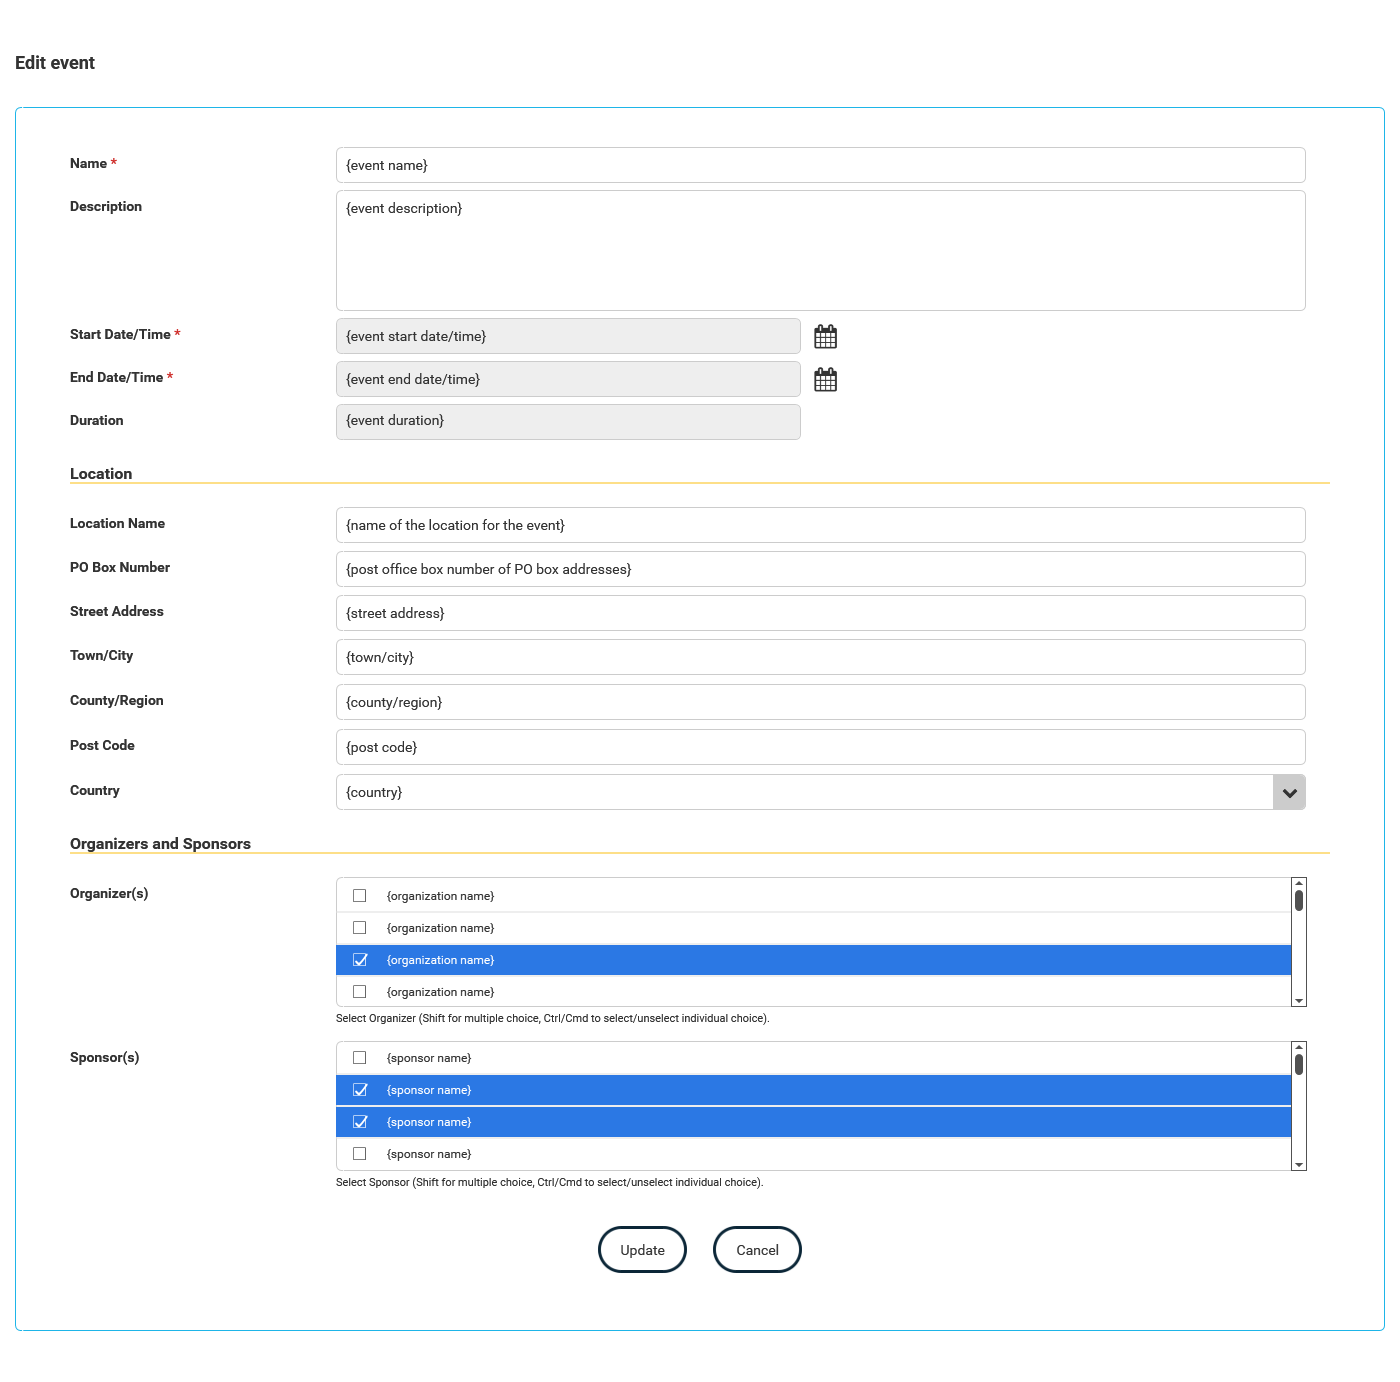
This button will only be available if a badge this has been linked to has not been issued. As once the badge has been issued the linked information cannot be amended.
Clicking the button will expand a form above the table with the same fields that were available when creating a new event. However, rather than the fields being blank, they will show the information held for the group that is being edited.
Clicking "Update" will update the record with the new information, whilst clicking "Cancel" will collapse the form.
Manage Events - Delete
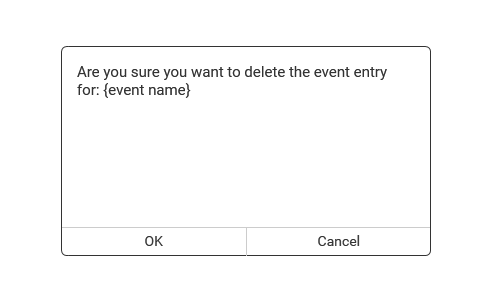
This button will only be available if a badge this has been linked to has not been issued. As once the badge has been issued the linked information cannot be deleted.
Clicking the button will display a pop up. This will be for the user to confirm they are wanting to delete the selected event.
Clicking "OK" will remove the event, whilst clicking "Cancel" will close the pop up with no further action taken.
Manage Issuer Profiles
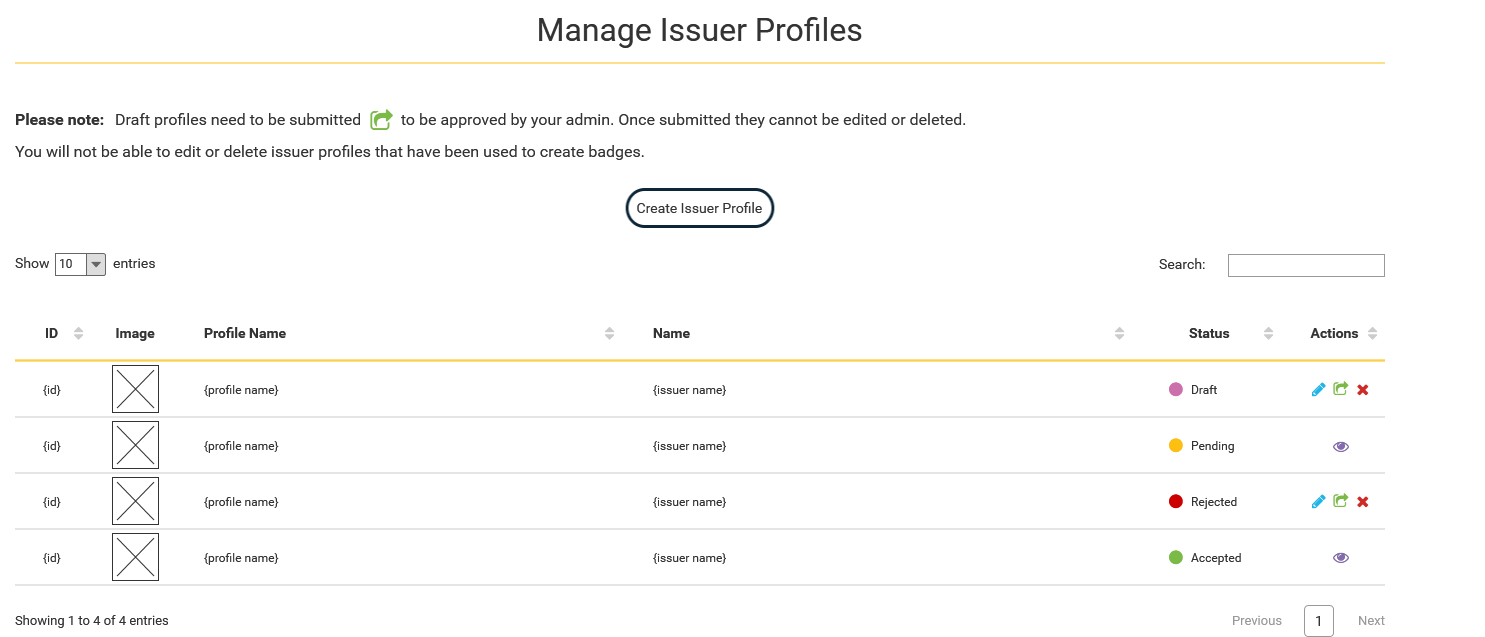
Manage Issuer Profiles - Create
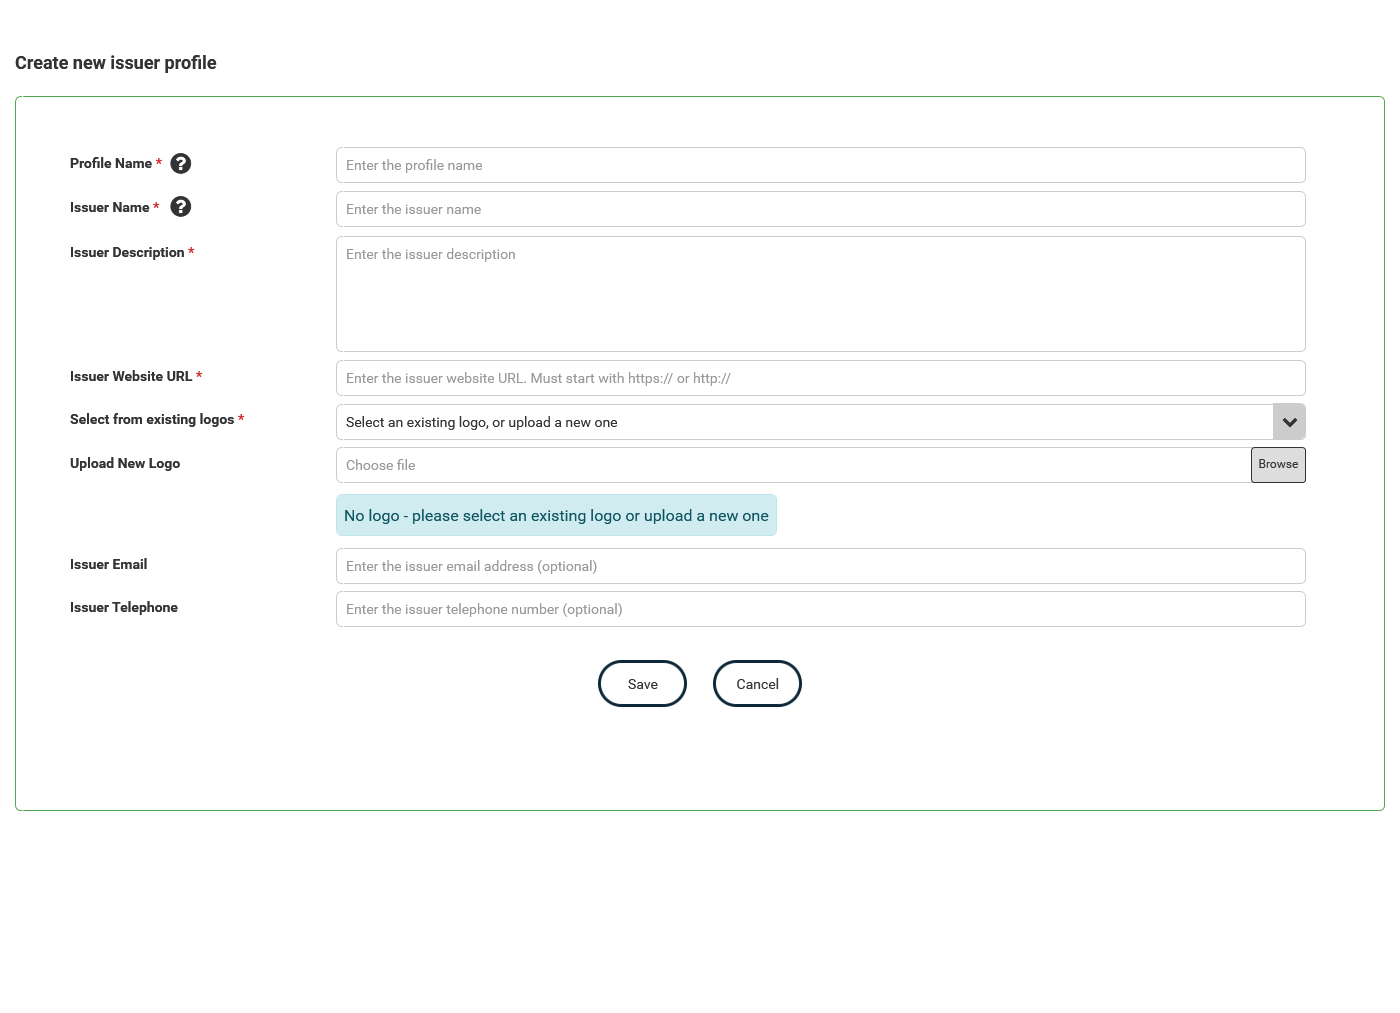
Clicking the "Create Issuer Profile" button will expand a form at the top of the page with the relevant fields for adding a new profile for the issuer.
Profile name, issuer name, issuer description, issuer website URL and a logo are mandatory fields. The rest are optional.
Logos can be uploaded, or if there is an existing profile then that logo can be used.
Clicking "Save" will add the new issuer profile, whilst clicking "Cancel" will collapse the form.
When a profile has been added, it will have the status of "draft". Whilst still a draft profile the user can edit or delete it.
If the profile is completed as desired, this can then be submitted to the admin for them to approve. If submitted the profile will have the status of "pending"; the issuer will not be able to edit or delete the profile when it is in this status.
When the profile is submitted an email will be sent to the admin to alert them to a profile being ready to be reviewed.
Manage Issuer Profiles - View
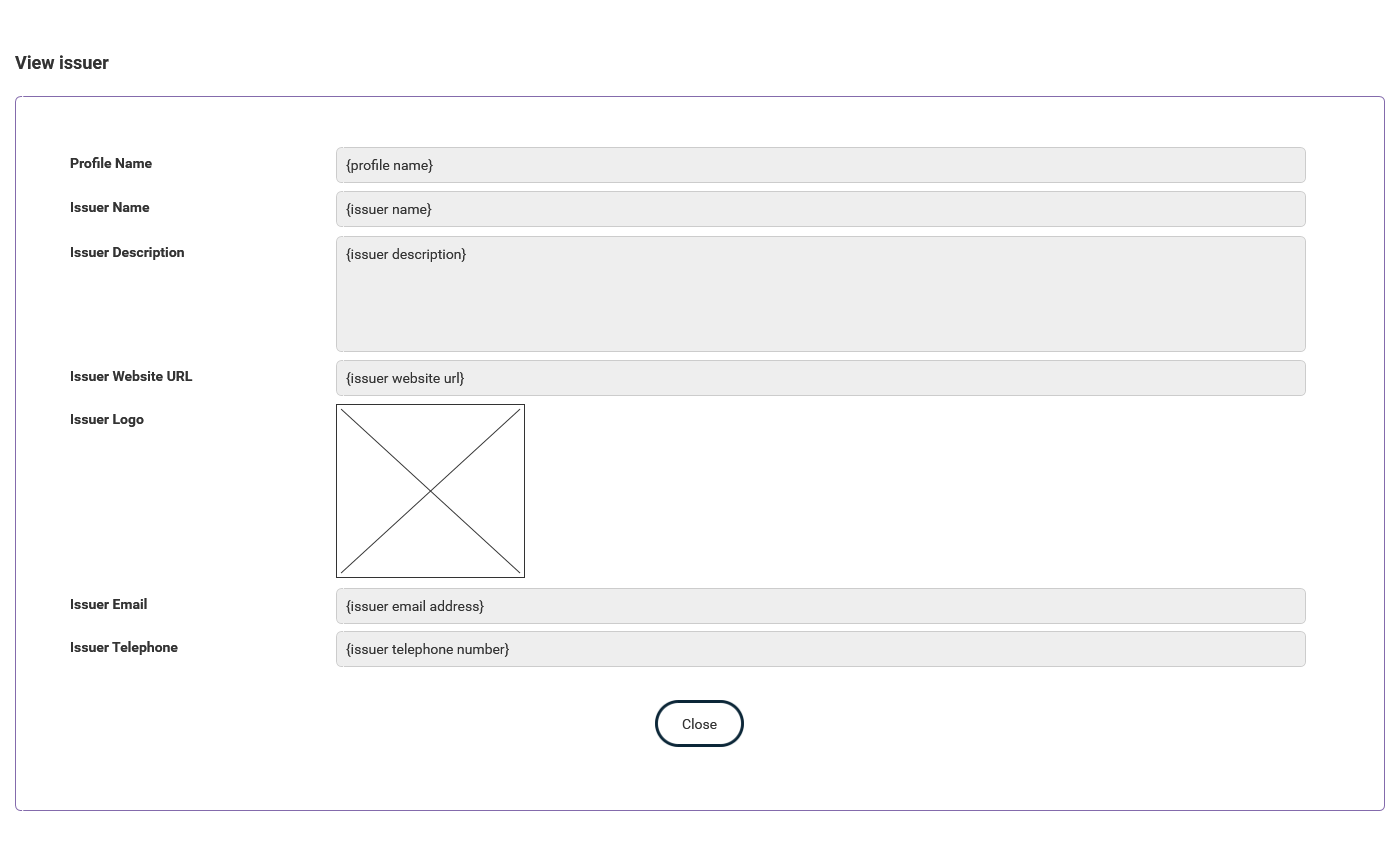
This button will only be available if a profile this has been linked to has been accepted.
Clicking the button will expand a form at the top of the page with read only fields, displaying the data held for that event.
Clicking "Close" will collapse the form.
Manage Issuer Profiles - Edit
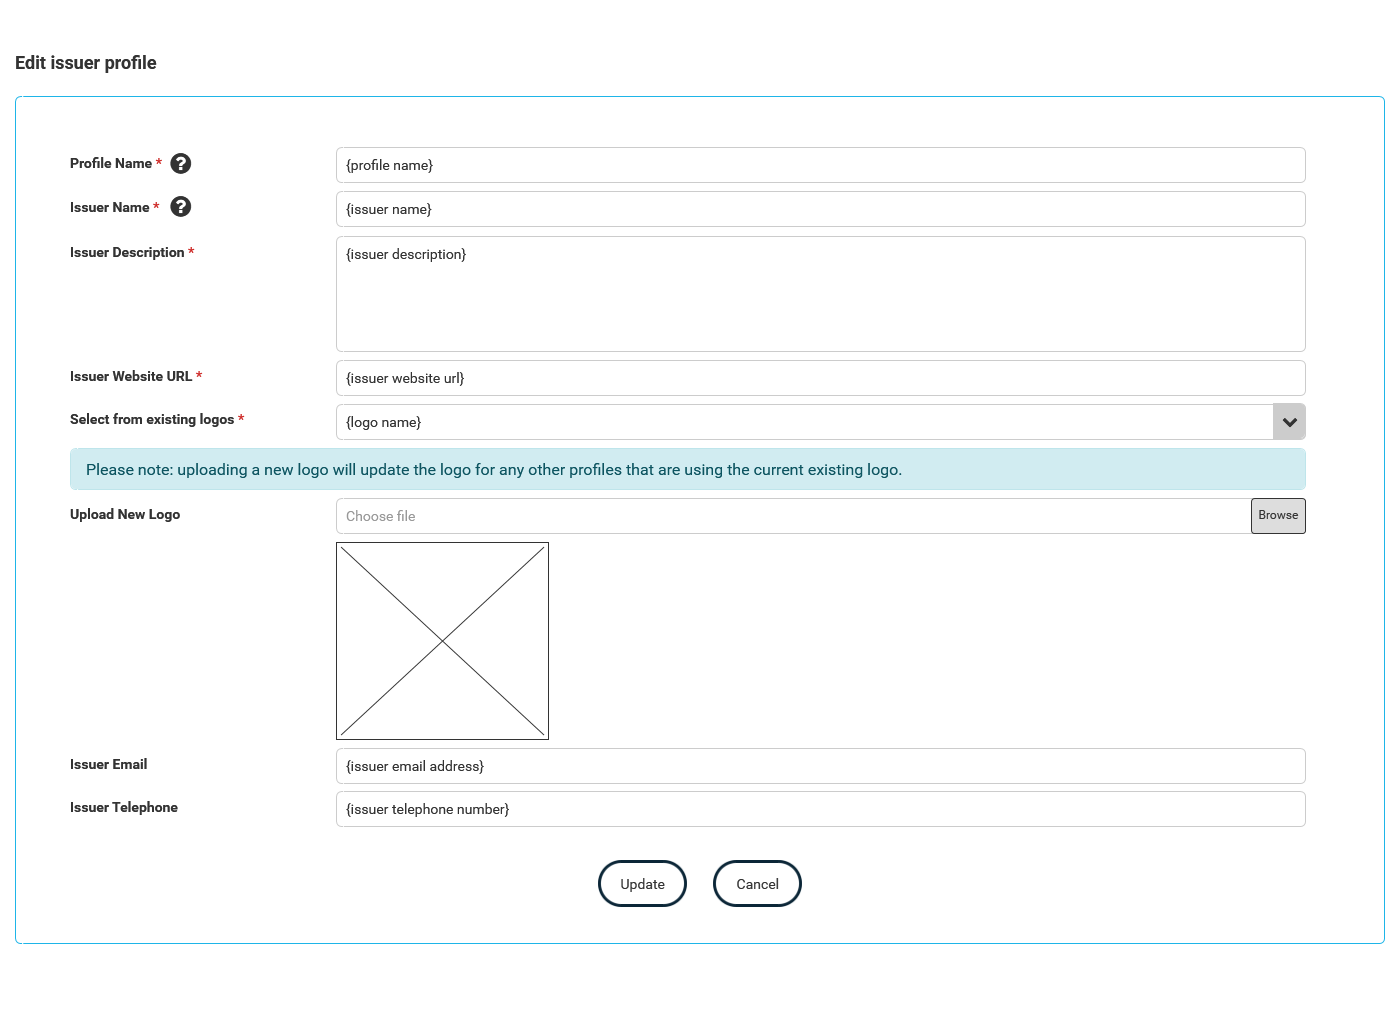
This button will only be available if this profile has not been accepted or pending. As once the profile has been accepted it cannot be amended.
Clicking the button will expand a form above the table with the same fields that were available when creating a new profile. However, rather than the fields being blank, they will show the information held for the profile that is being edited.
Clicking "Update" will update the record with the new information, whilst clicking "Cancel" will collapse the form.
Manage Issuer Profiles - Delete

This button will only be available if this profile status is not accepted or pending.
Clicking the button will display a pop up. This will be for the user to confirm they are wanting to delete the selected profile.
Clicking "OK" will remove the profile, whilst clicking "Cancel" will close the pop up with no further action taken.
Create Badge Images
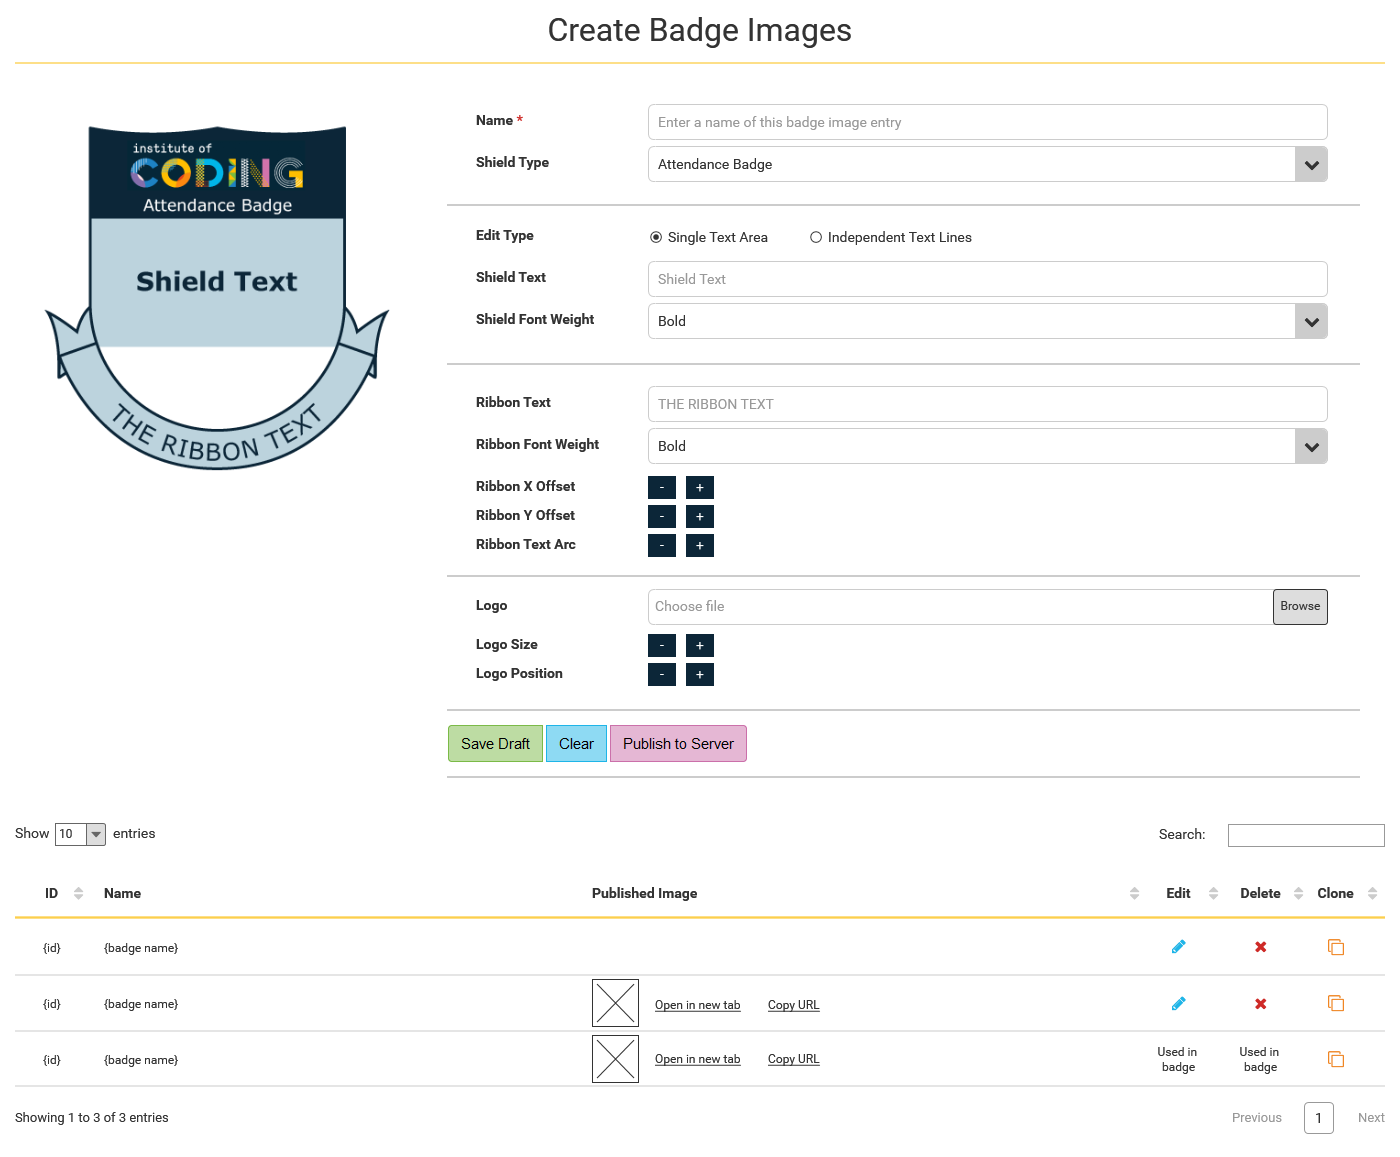
Create Badge Images - Save Draft
When creating a new badge image, it is mandatory to add a name for the badge. All other fields should be filled in as necessary.
If needed, clicking "Clear" will clear the form down so new badge image information can be entered.
Once the form is complete, the user can then click "Save Draft", which is required before the badge can be published for use. A line will then show in the table relating to this new badge draft that has just been created.
A draft badge will show in the table with no information in the "Published Image" column.
Create Badge Images - Publish
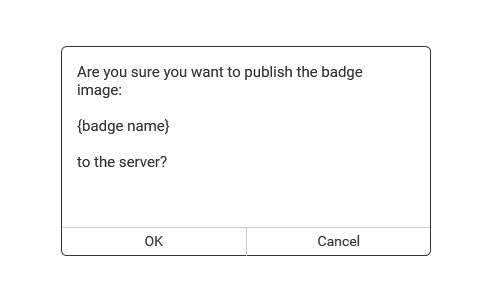
A badge can be published straight after a draft has been saved, by clicking "Publish to Server". Alternatively, clicking on an unpublished badge and then clicking "Publish to Server" is how to publish badges at a later date.
Once a badge has been published the image will appear in the "Published Image" column. Ther will be 2 links beside the image, one to open the badge image at full size in a new browser tab, and one to copy the URL directly to the clipboard so the URL can be pasted wherever necessary. It will also then be available to select on the badge creation form.
Create Badge Images - Edit
This button will only be available if a badge this has been linked to has not been issued. As once the badge has been issued the image cannot be amended.
Clicking the button will populate the original form with all the information for the badge image that is to be amended.
It is possible to edit a badge image that has been published, but not yet issued, but the user will be required to republish the image after updating it. A pop up will highlight this to the user too.
Clicking "Update Draft" will update the record with the new information, whilst clicking "Clear" will reset the form.
Create Badge Images - Delete
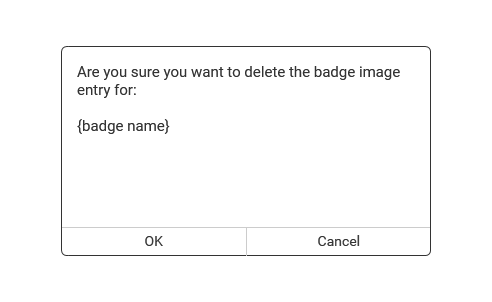
This button will only be available if a badge this has been linked to has not been issued. As once the badge has been issued the image cannot be deleted.
Clicking the button will display a pop up. This will be for the user to confirm they are wanting to delete the selected badge image.
Clicking "OK" will remove the image, whilst clicking "Cancel" will close the pop up with no further action taken.
Create Badge Images - Clone
Clicking the button will populate the form with the same information of the badge cloned. This will allow the user to create a new badge without having to fill in all the details again for a similar badge.
This will be saved as a new draft, or the form can be cleared.
Manage Your Badges

Clicking "Manage Badges" on the issuer admin page will bring the user to this page.
The issuer will be able to Create, View, Edit or Delete badges.
The status flag will reflect whether the badge is a draft, pending, rejected or finalised badge. Only finalised badges can be issued to badge recipients.
Manage Badges - Create
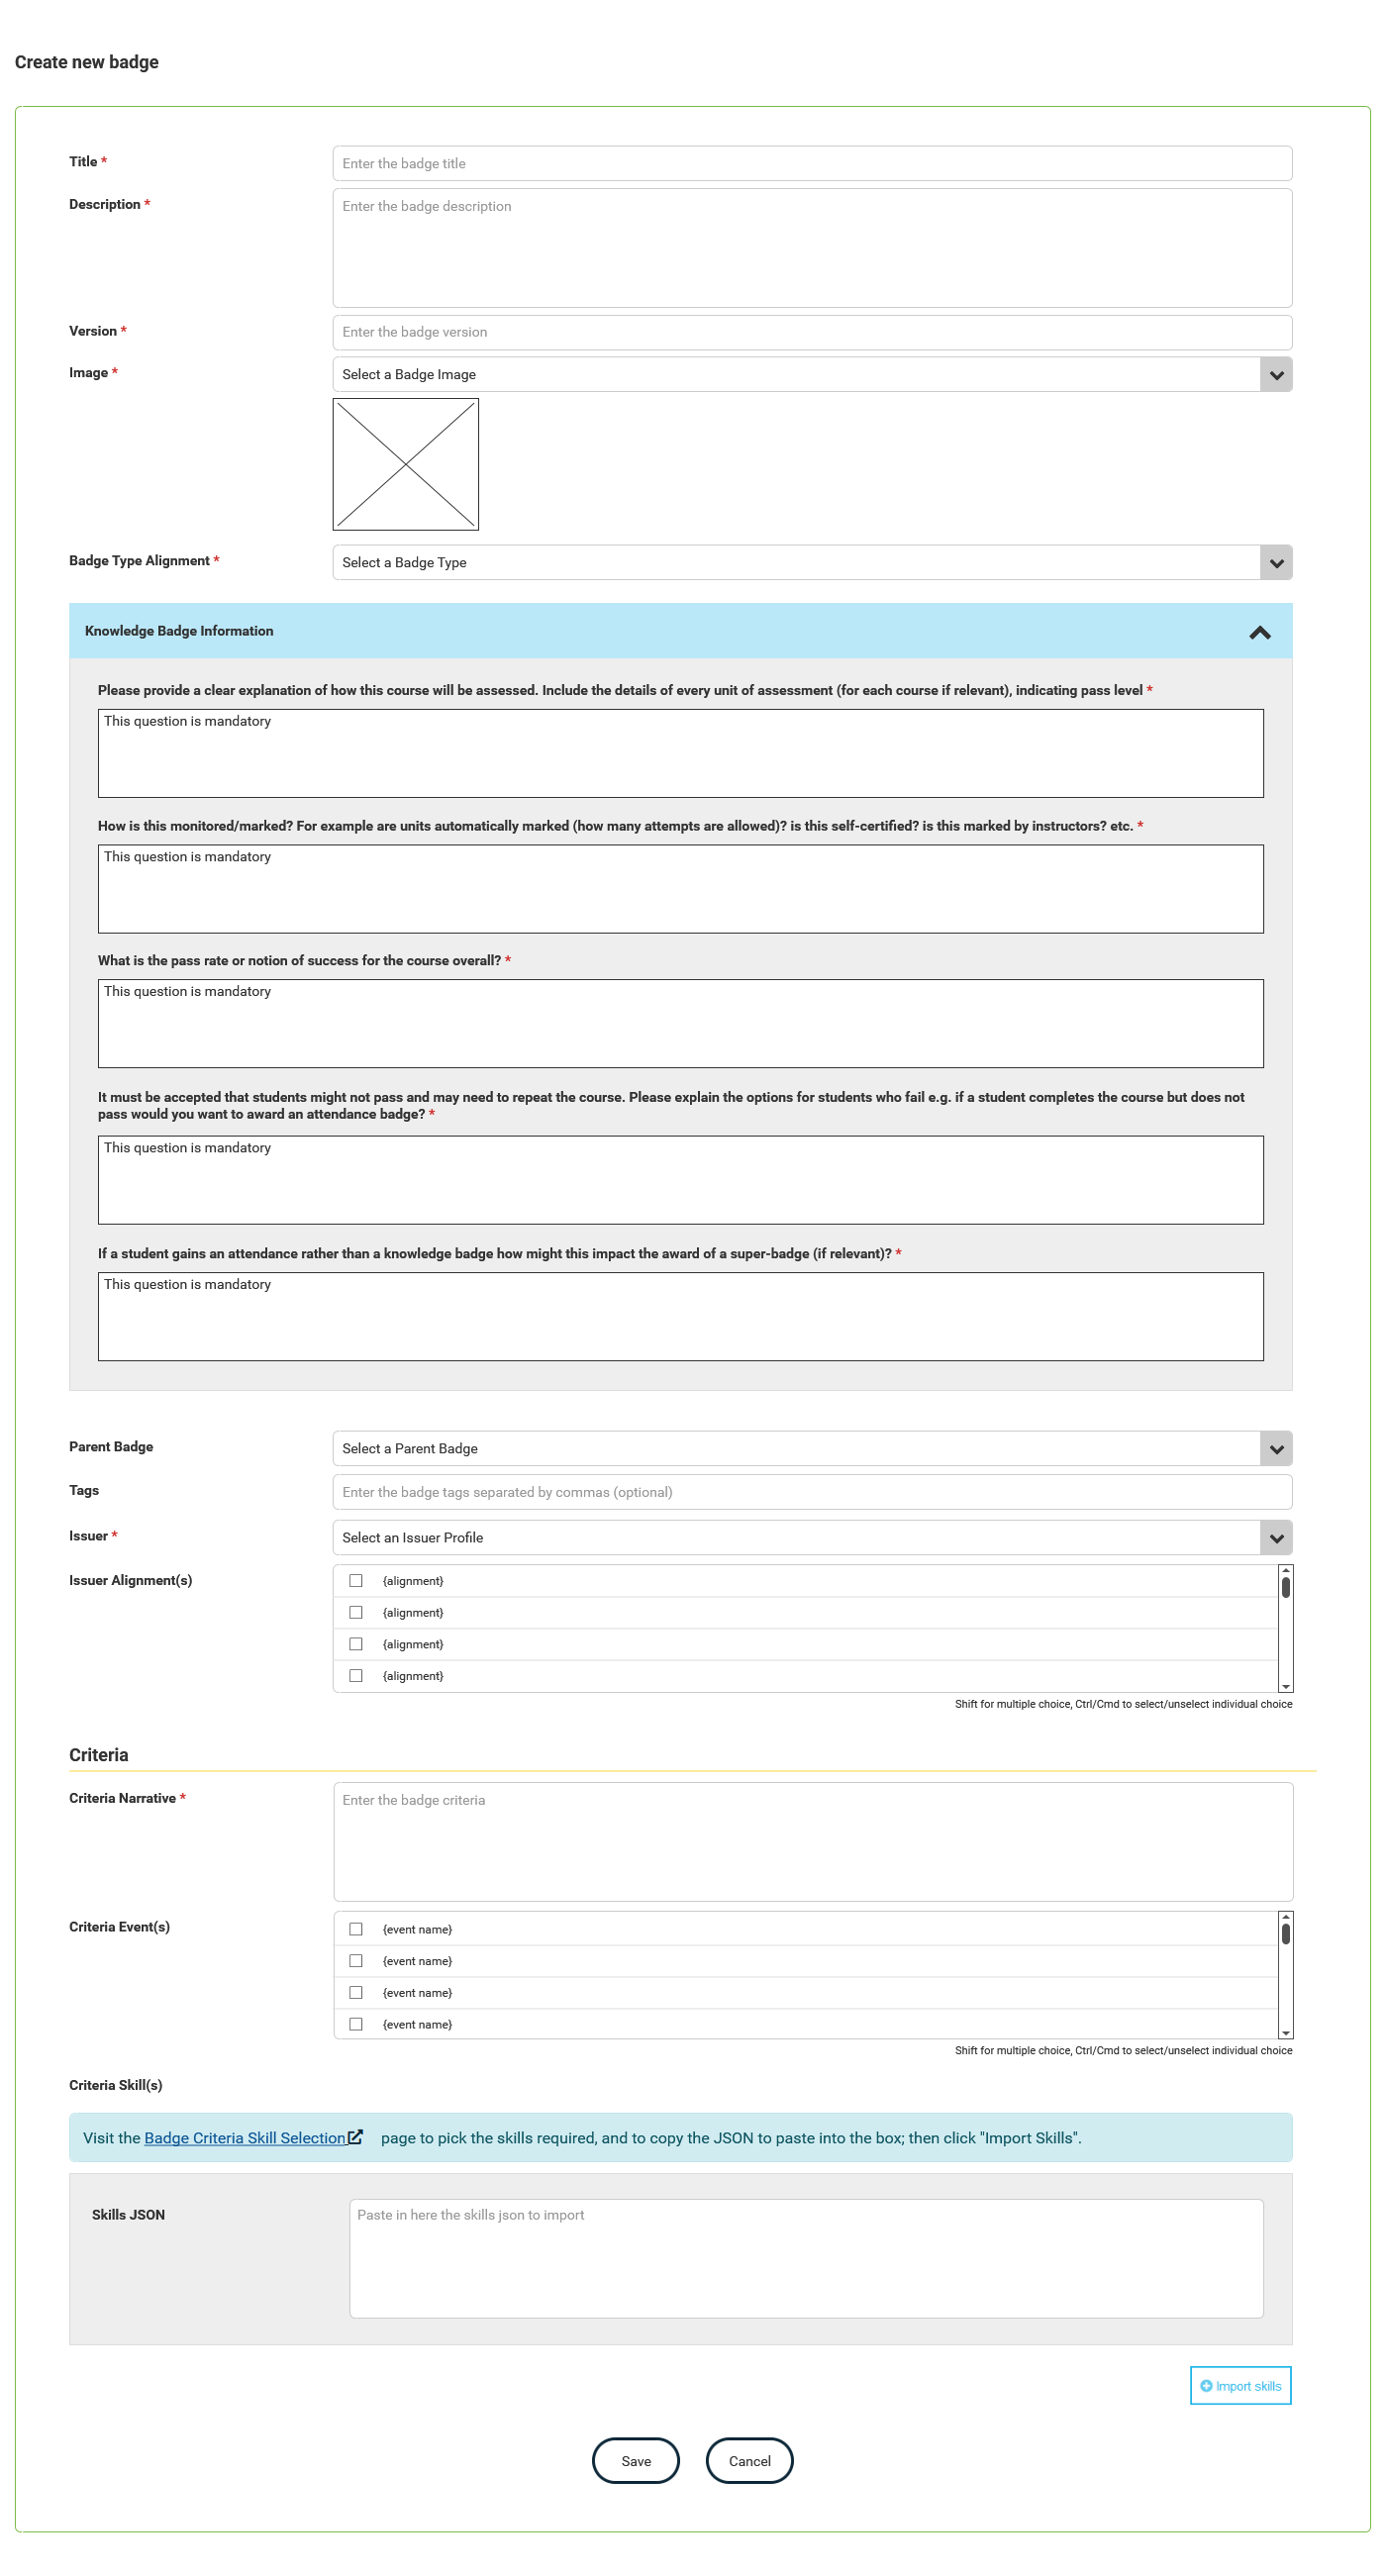
Clicking the "Create Badge" button will expand a form at the top of the page with the relevant fields for adding a new badge.
Title, description, image, badge type, version, issuer and criteria for the badge are mandatory fields. The rest are optional.
The images list is pulled from the badge images that the issuer has previously created. However, if they are not published or have been used already they will not show in the list.
If a badge type alignment of "knowledge" is selected, then the user will be required to answer some additional questions about the badge. These are for the admin to refer to when the badge has been submitted, but they will not be stored against the badge JSON, so not visible to the public.
Clicking "Save" will add the new badge, whilst clicking "Cancel" will collapse the form.
When a badge has been added, it will have the status of "draft". Whilst still a draft badge the user can edit or delete the badge.
If the badge is as required, this can then be submitted to the admin for them to approve. If submitted the badge will have the status of "pending"; the issuer will not be able to edit or delete the badge when it is in this status.
When the badge is submitted an email will be sent to the admin to alert them to a badge being ready to be reviewed.
Manage Badges - Manage Qualifying Badges
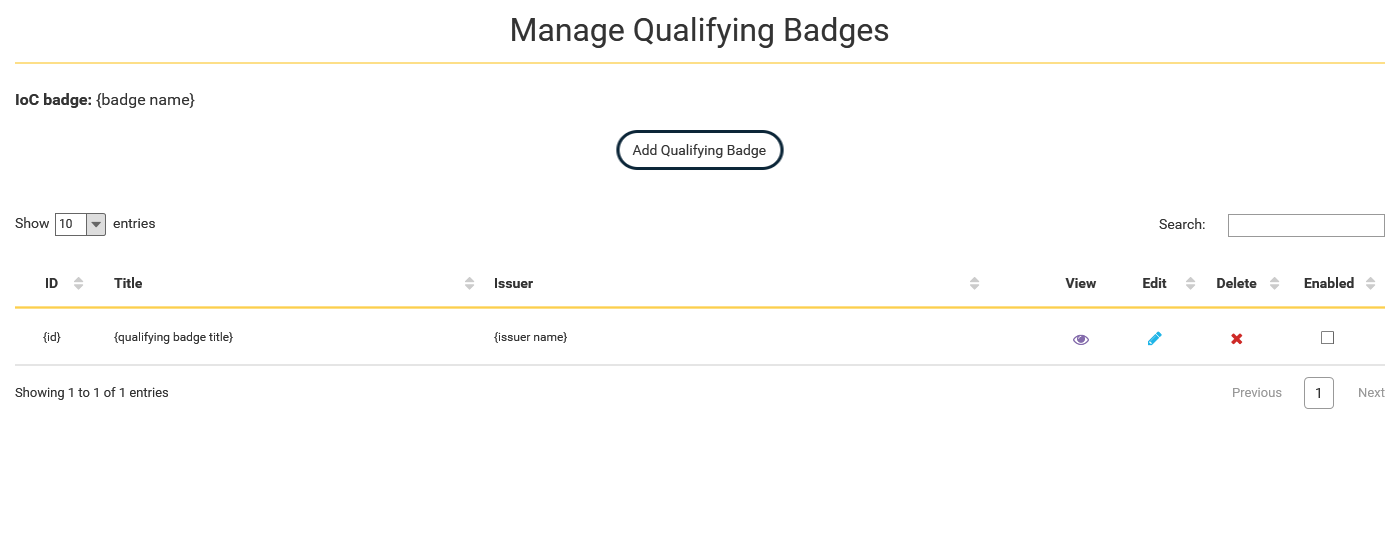
Clicking the button against a badge in the table on the Manage Badges page will direct the user to this page.
The issuer will be able to create a qualifying new badge, edit or delete existing ones.
Using qualifying badges is a way to link a non-IoC Open Badge to an IoC Open Badge. Allowing the recipient to claim the IoC equivalent for their portfolio.
Note: The qualifying badge must be in the Open Badge format - https://www.imsglobal.org/sites/default/files/Badges/OBv2p0Final/index.html.
Manage Badges - Manage Qualifying Badges - Add
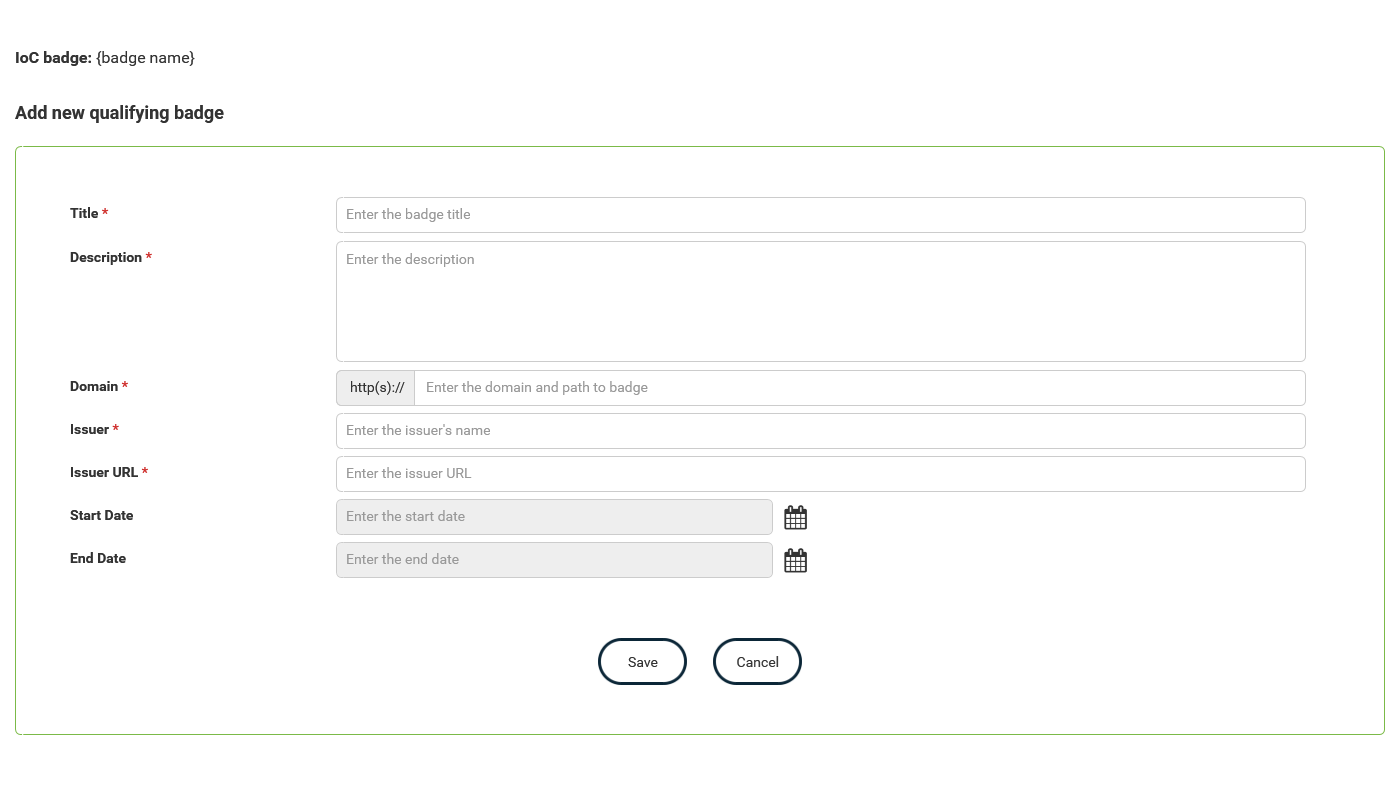
Clicking the "Add Qualifying Badge" button will expand a form at the top of the page with the relevant fields for adding a new qualifying badge.
Title, description, domain, issuer and issuer URL for the qualifying badge are mandatory fields. The rest are optional.
Clicking "Save" will add the new qualifying badge, whilst clicking "Cancel" will collapse the form.
Important: It is vitally important that the information added to the form matches the text exactly as it appears in the external qualifying badge that the recipient will upload. If it does not, then recipients will not be able to claim the related IoC badge, as the details entered on this form will be matched exactly to the data extracted from the badge.
The start and end dates are additional fields that allow some time-based controls on when a qualifying badge can be used to claim an IoC badge. These dates are compared against the issue date given in the uploaded qualifying badge. Only if the issue date of the uploaded badge falls between the start and end dates given, can the recipient claim the related IoC badge. If these date fields are not completed the issue date of the qualifying badge is ignored and only the other fields are compared.
Manage Badges - Manage Qualifying Badges - View
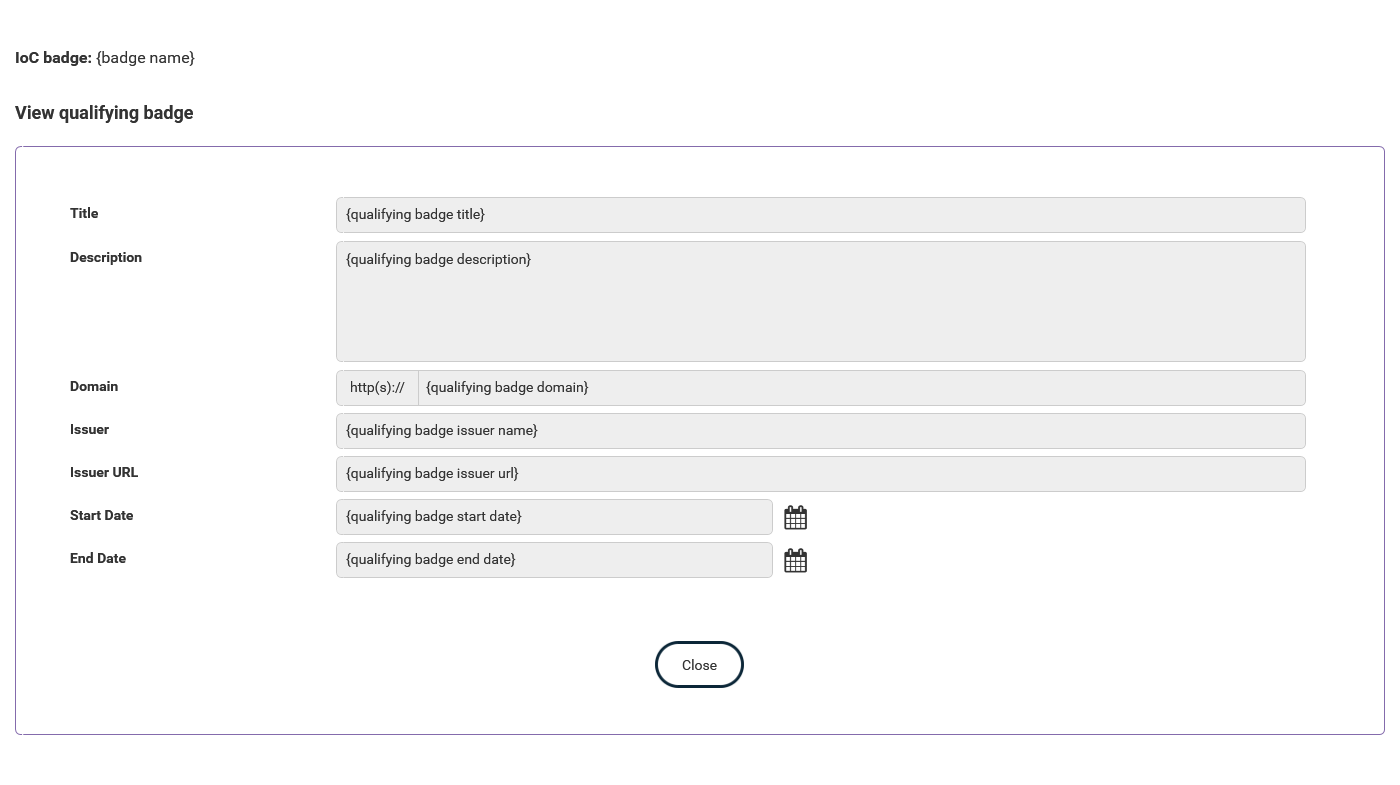
Clicking the button will expand a form at the top of the page with read only fields, displaying the data held for that qualifying badge.
Clicking "Close" will collapse the form.
Manage Badges - Manage Qualifying Badges - Edit
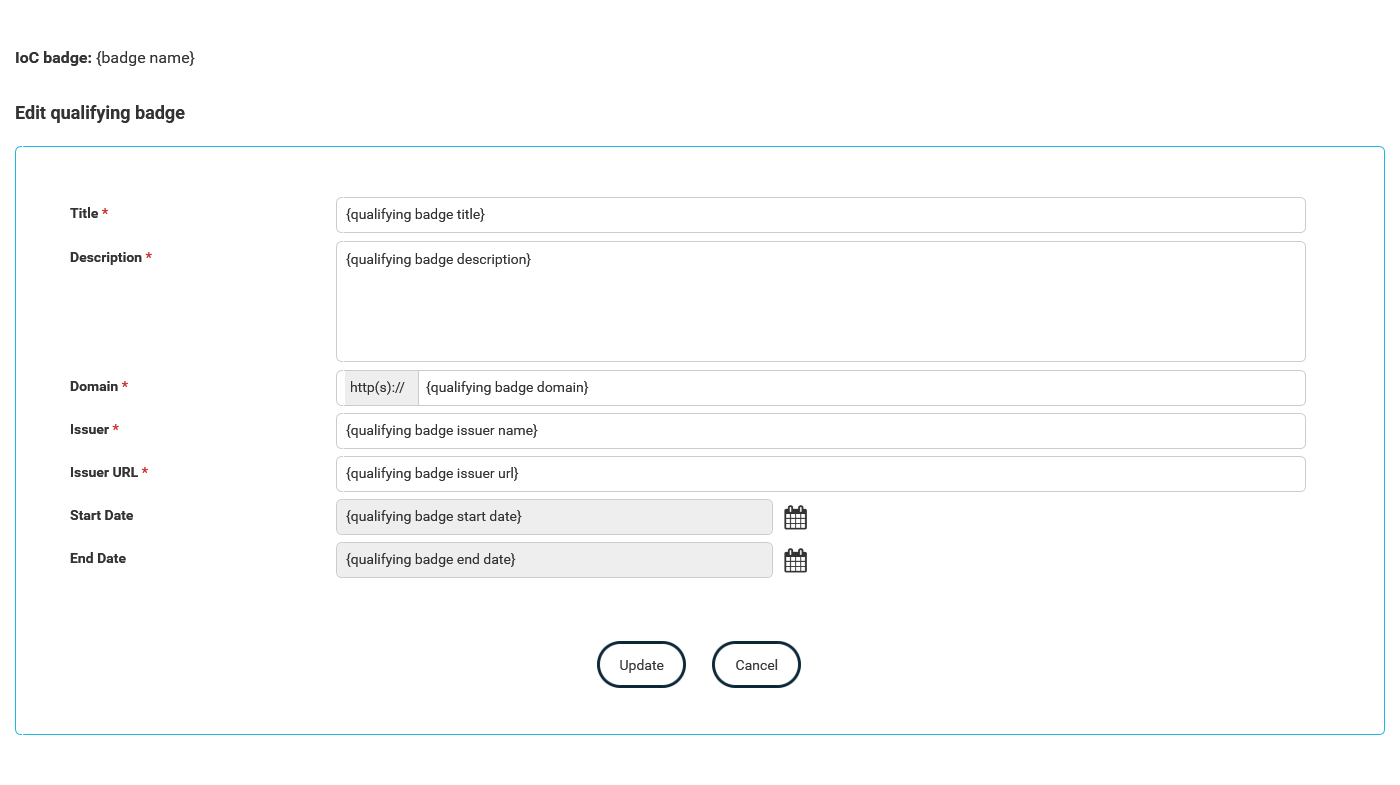
This button will only be available if a badge this has been linked to has not been used. As once the badge has been issued the linked information cannot be amended.
Clicking the button will expand a form above the table with the same fields that were available when creating a new qualifying badge. However, rather than the fields being blank, they will show the information held for the qualifying badge that is being edited.
Clicking "Update" will update the record with the new information, whilst clicking "Cancel" will collapse the form.
Manage Badges - Manage Qualifying Badges - Delete
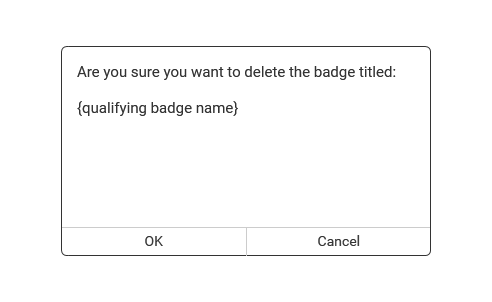
This button will only be available if a badge this has been linked to has not been used. As once the badge has been issued the linked information cannot be deleted.
Clicking the button will display a pop up. This will be for the user to confirm they are wanting to delete the selected qualifying badge.
Clicking "OK" will remove the qualifying badge, whilst clicking "Cancel" will close the pop up with no further action taken.
Manage Badges - Manage Qualifying Badges - Enabled
A checkbox will appear in the "Enabled" column per row. If this is checked, then the qualifying badge is flagged as enabled. This means a recipient can claim this badge. If they have a badge that qualifies.
If unchecked a recipient will not be able to claim this badge.
Manage Badges - View
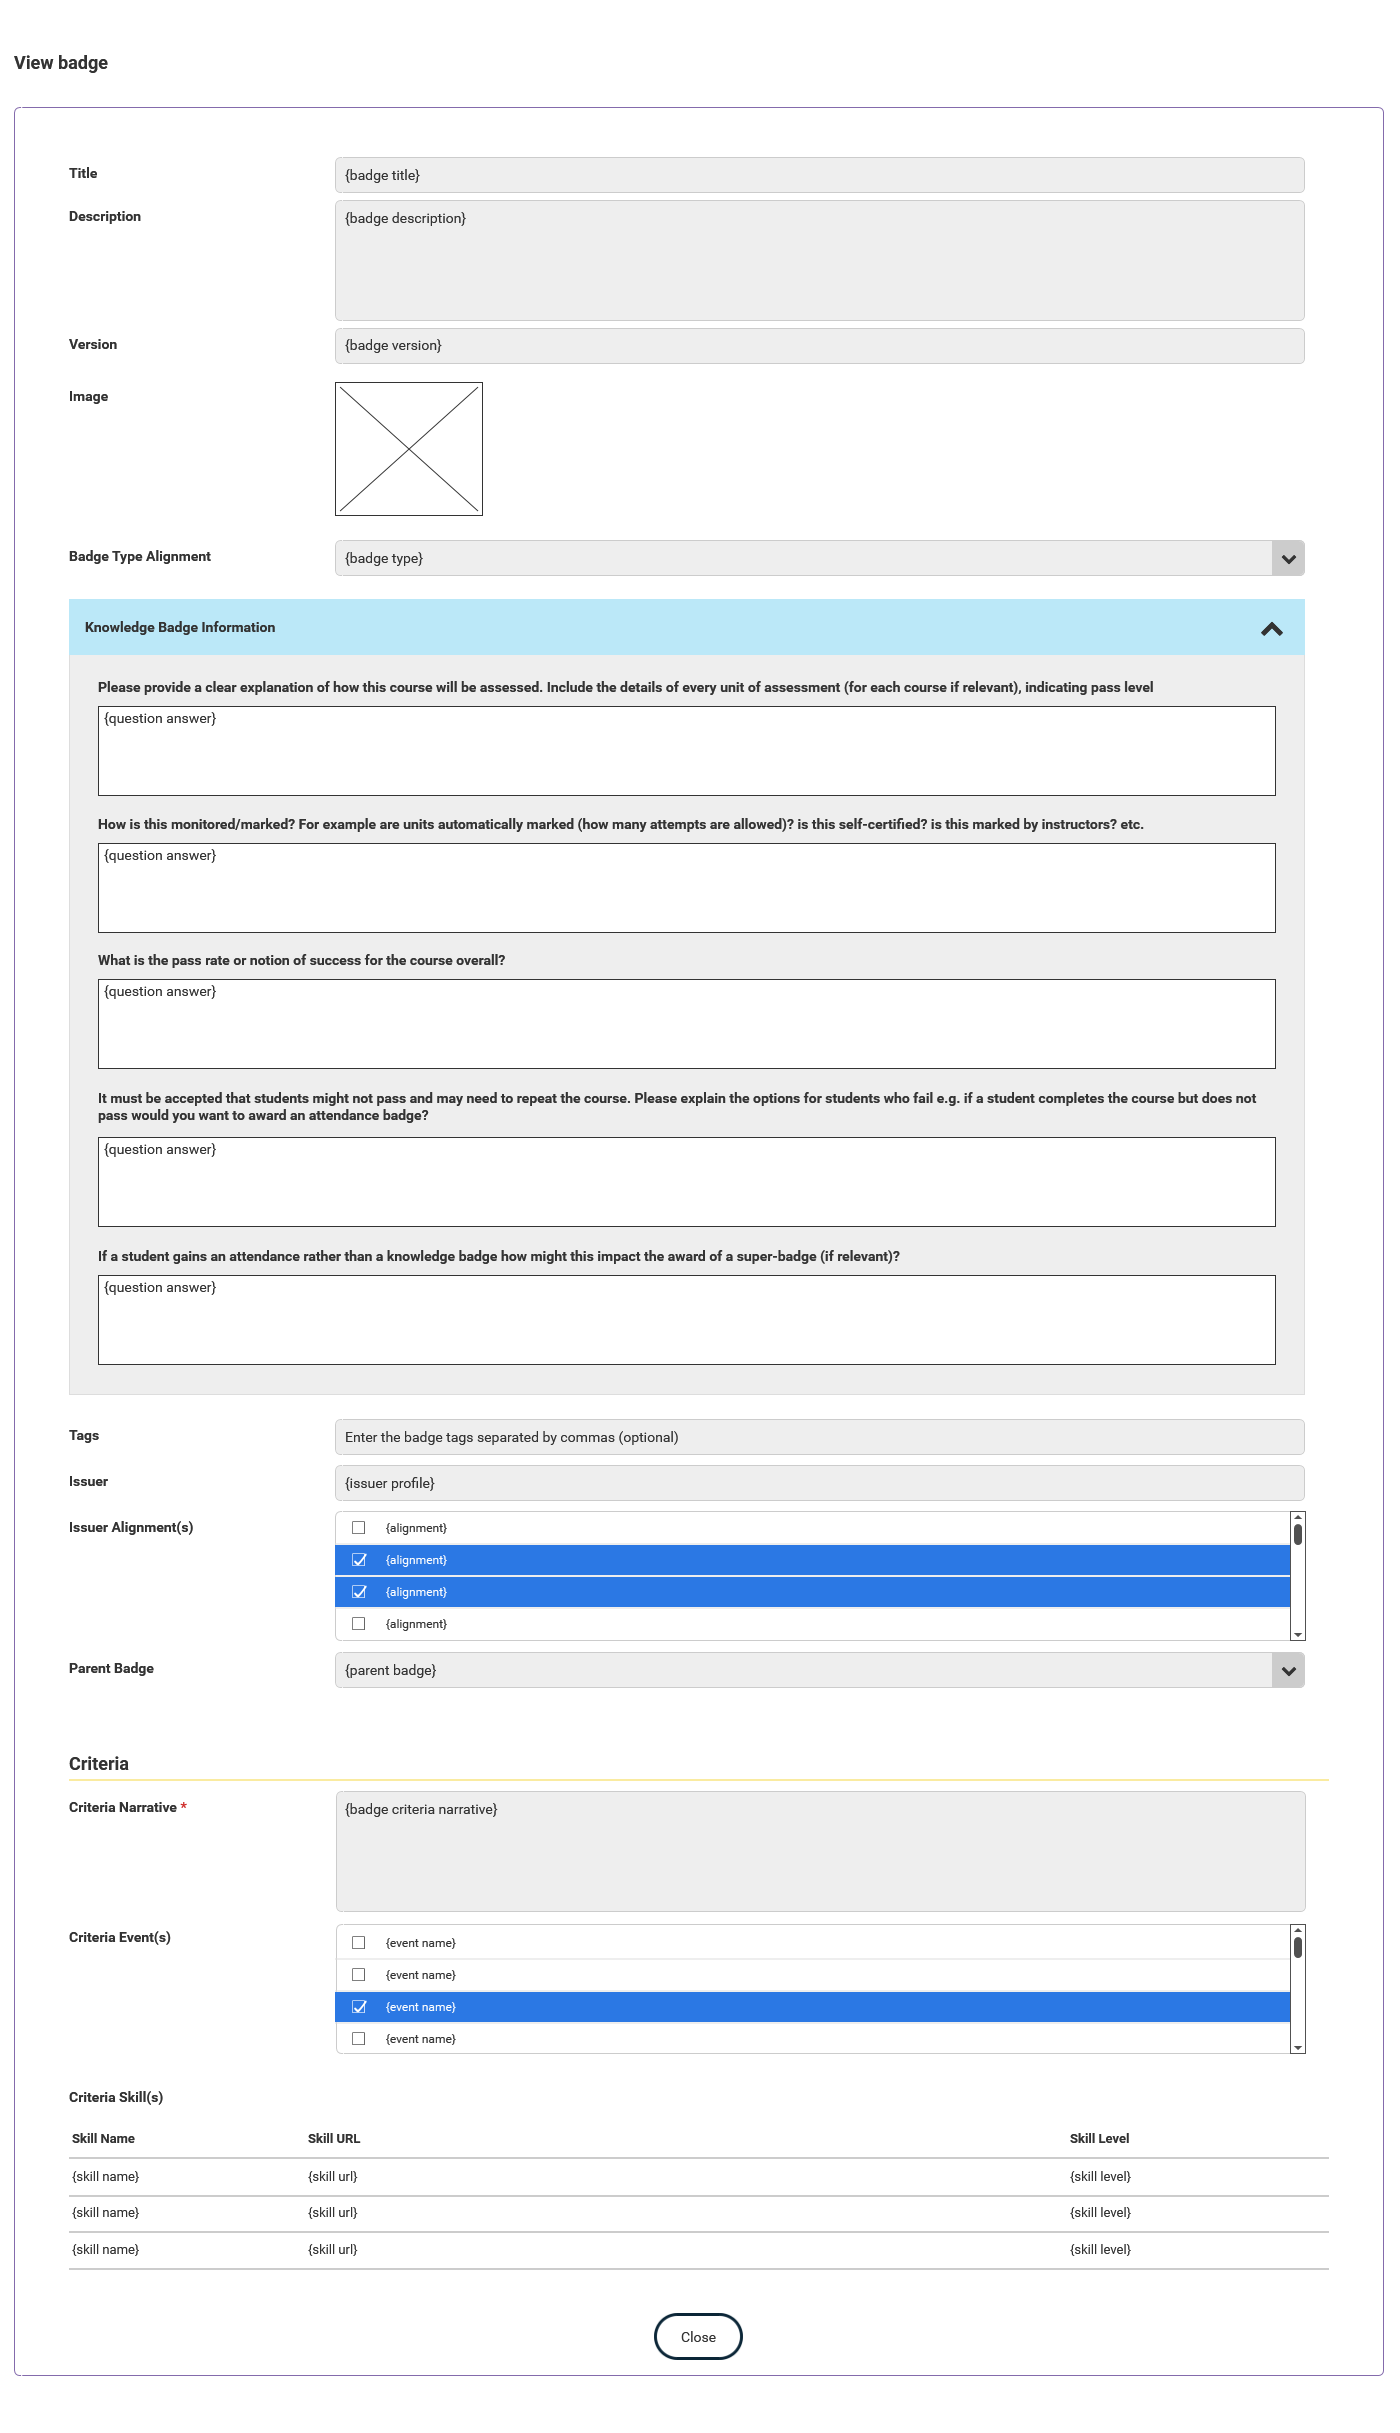
This button will only be available if a badge this has been linked to has been finalized.
Clicking the button will expand a form at the top of the page with read only fields, displaying the data held for that event.
Clicking "Close" will collapse the form.
Manage Badges - Edit
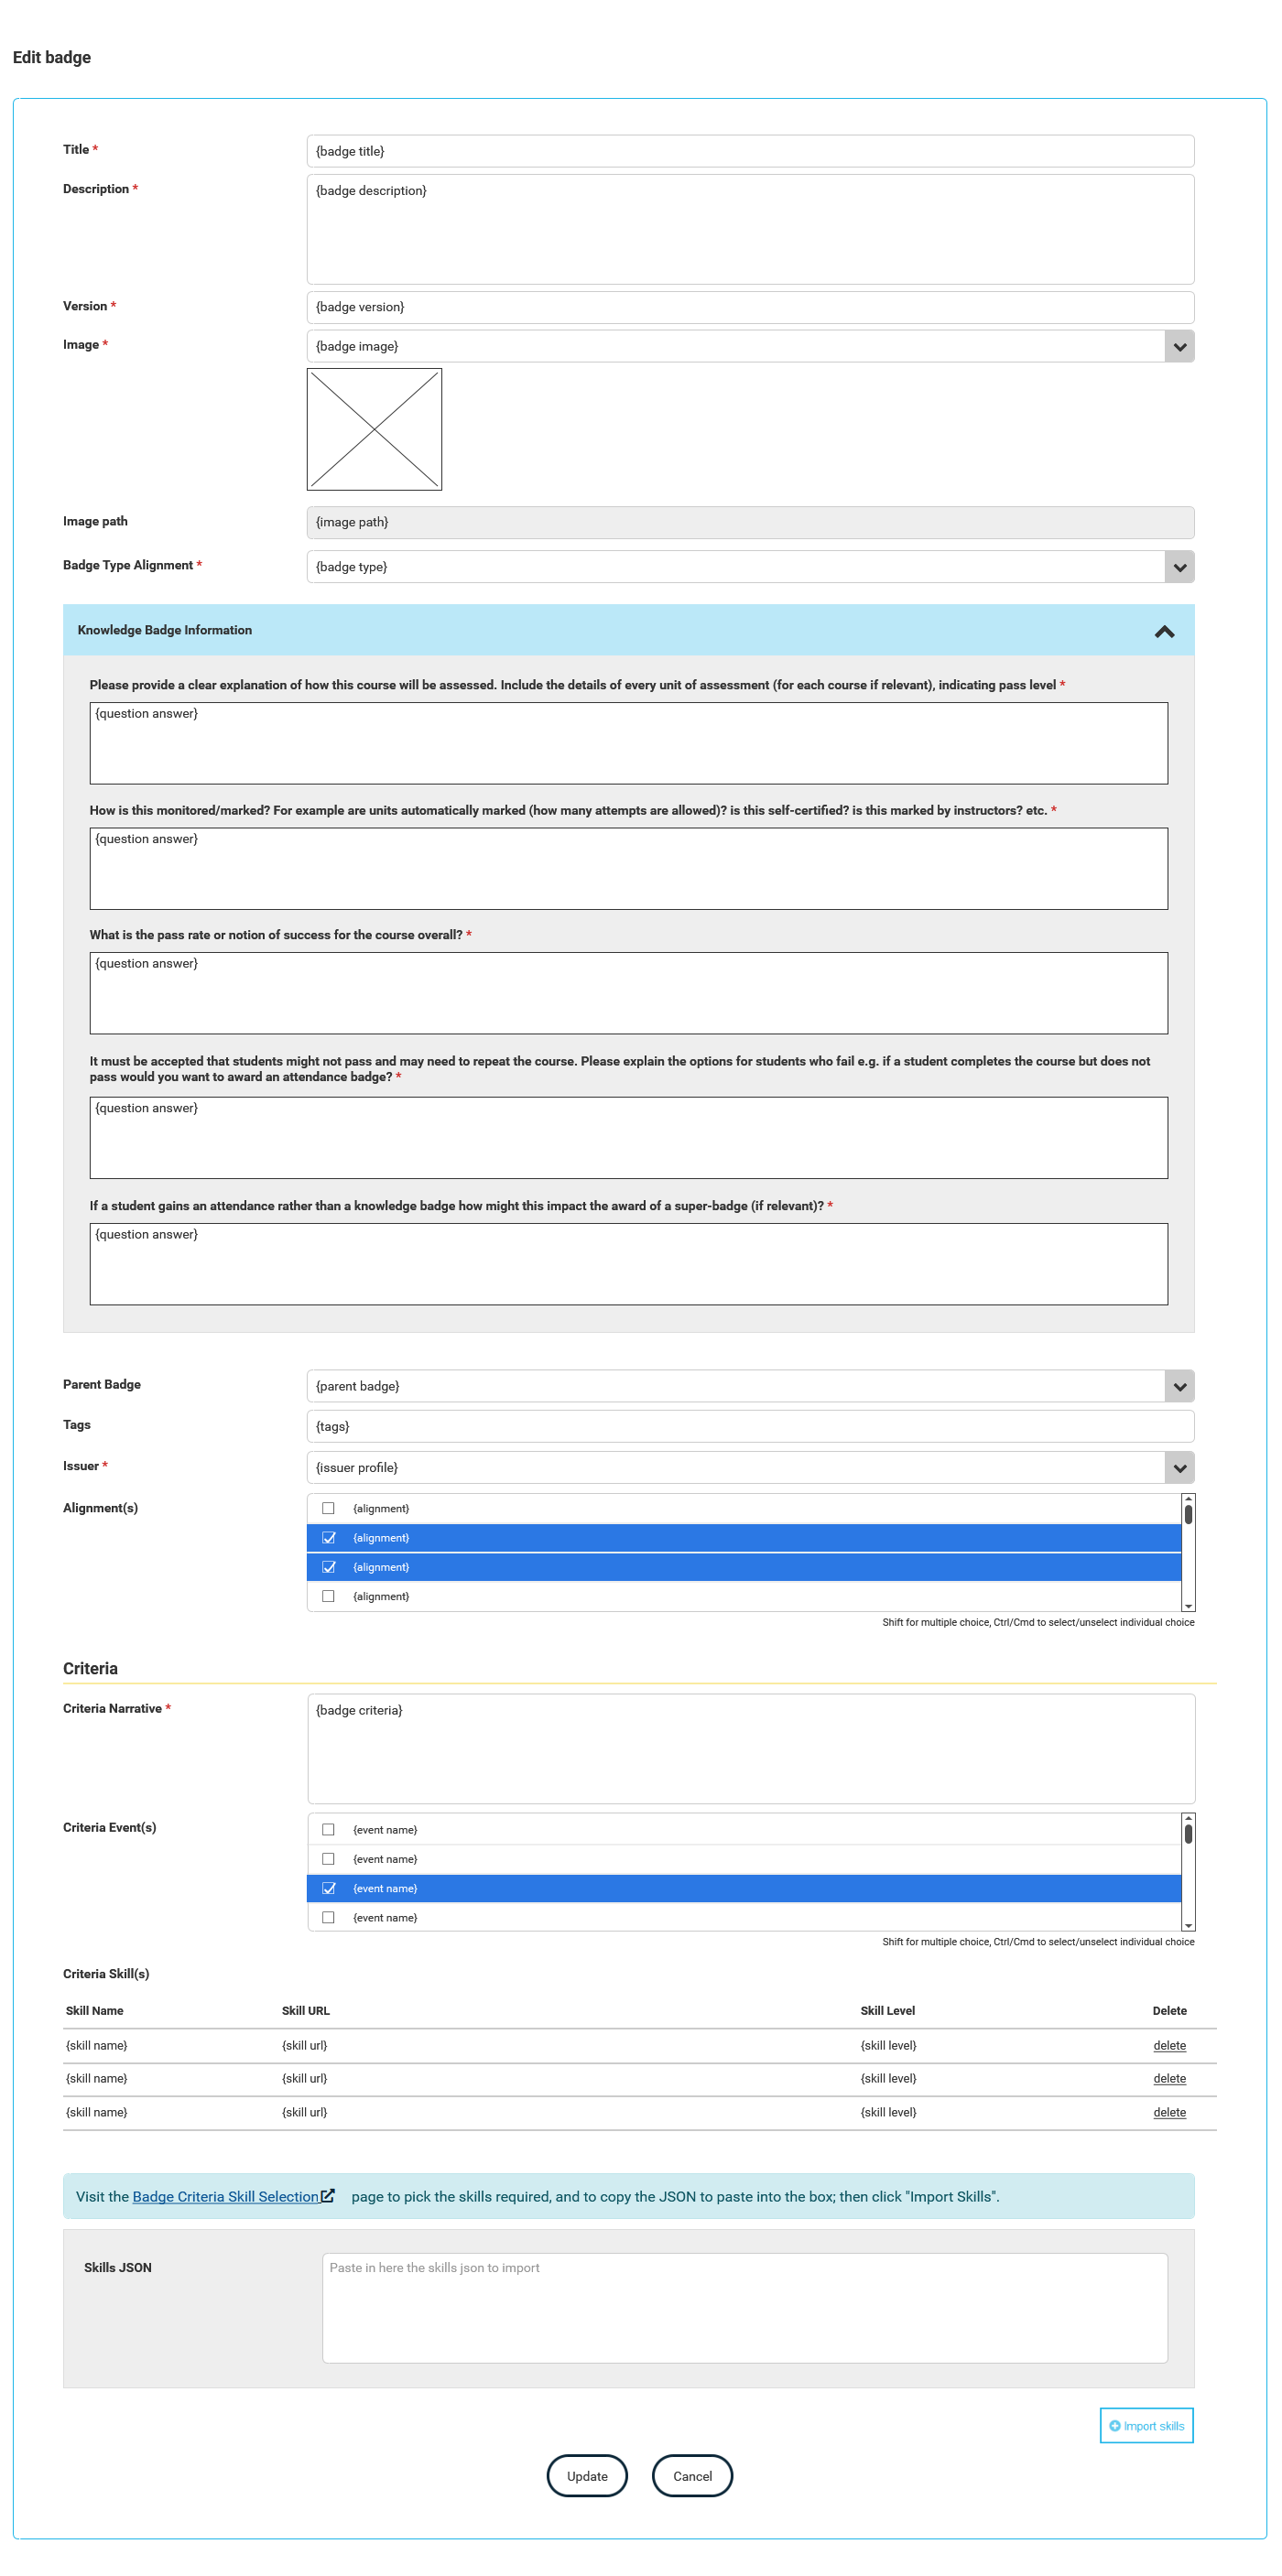
This button will only be available if this badge has not been finalized or pending. As once the badge has been finalized it cannot be amended.
Clicking the button will expand a form above the table with the same fields that were available when creating a new badge. However, rather than the fields being blank, they will show the information held for the badge that is being edited.
Clicking "Update" will update the record with the new information, whilst clicking "Cancel" will collapse the form.
Manage Badges - Delete
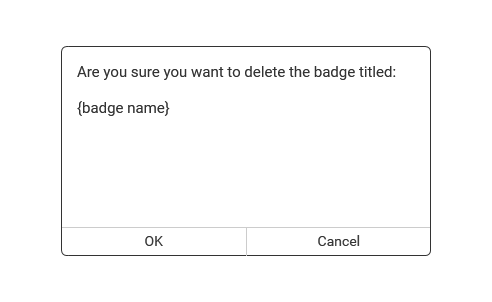
This button will only be available if this badge has not been issued, finalised or pending. As once the badge has been issued it cannot be deleted.
Clicking the button will display a pop up. This will be for the user to confirm they are wanting to delete the selected badge.
Clicking "OK" will remove the badge, whilst clicking "Cancel" will close the pop up with no further action taken.
Manage badge issuing
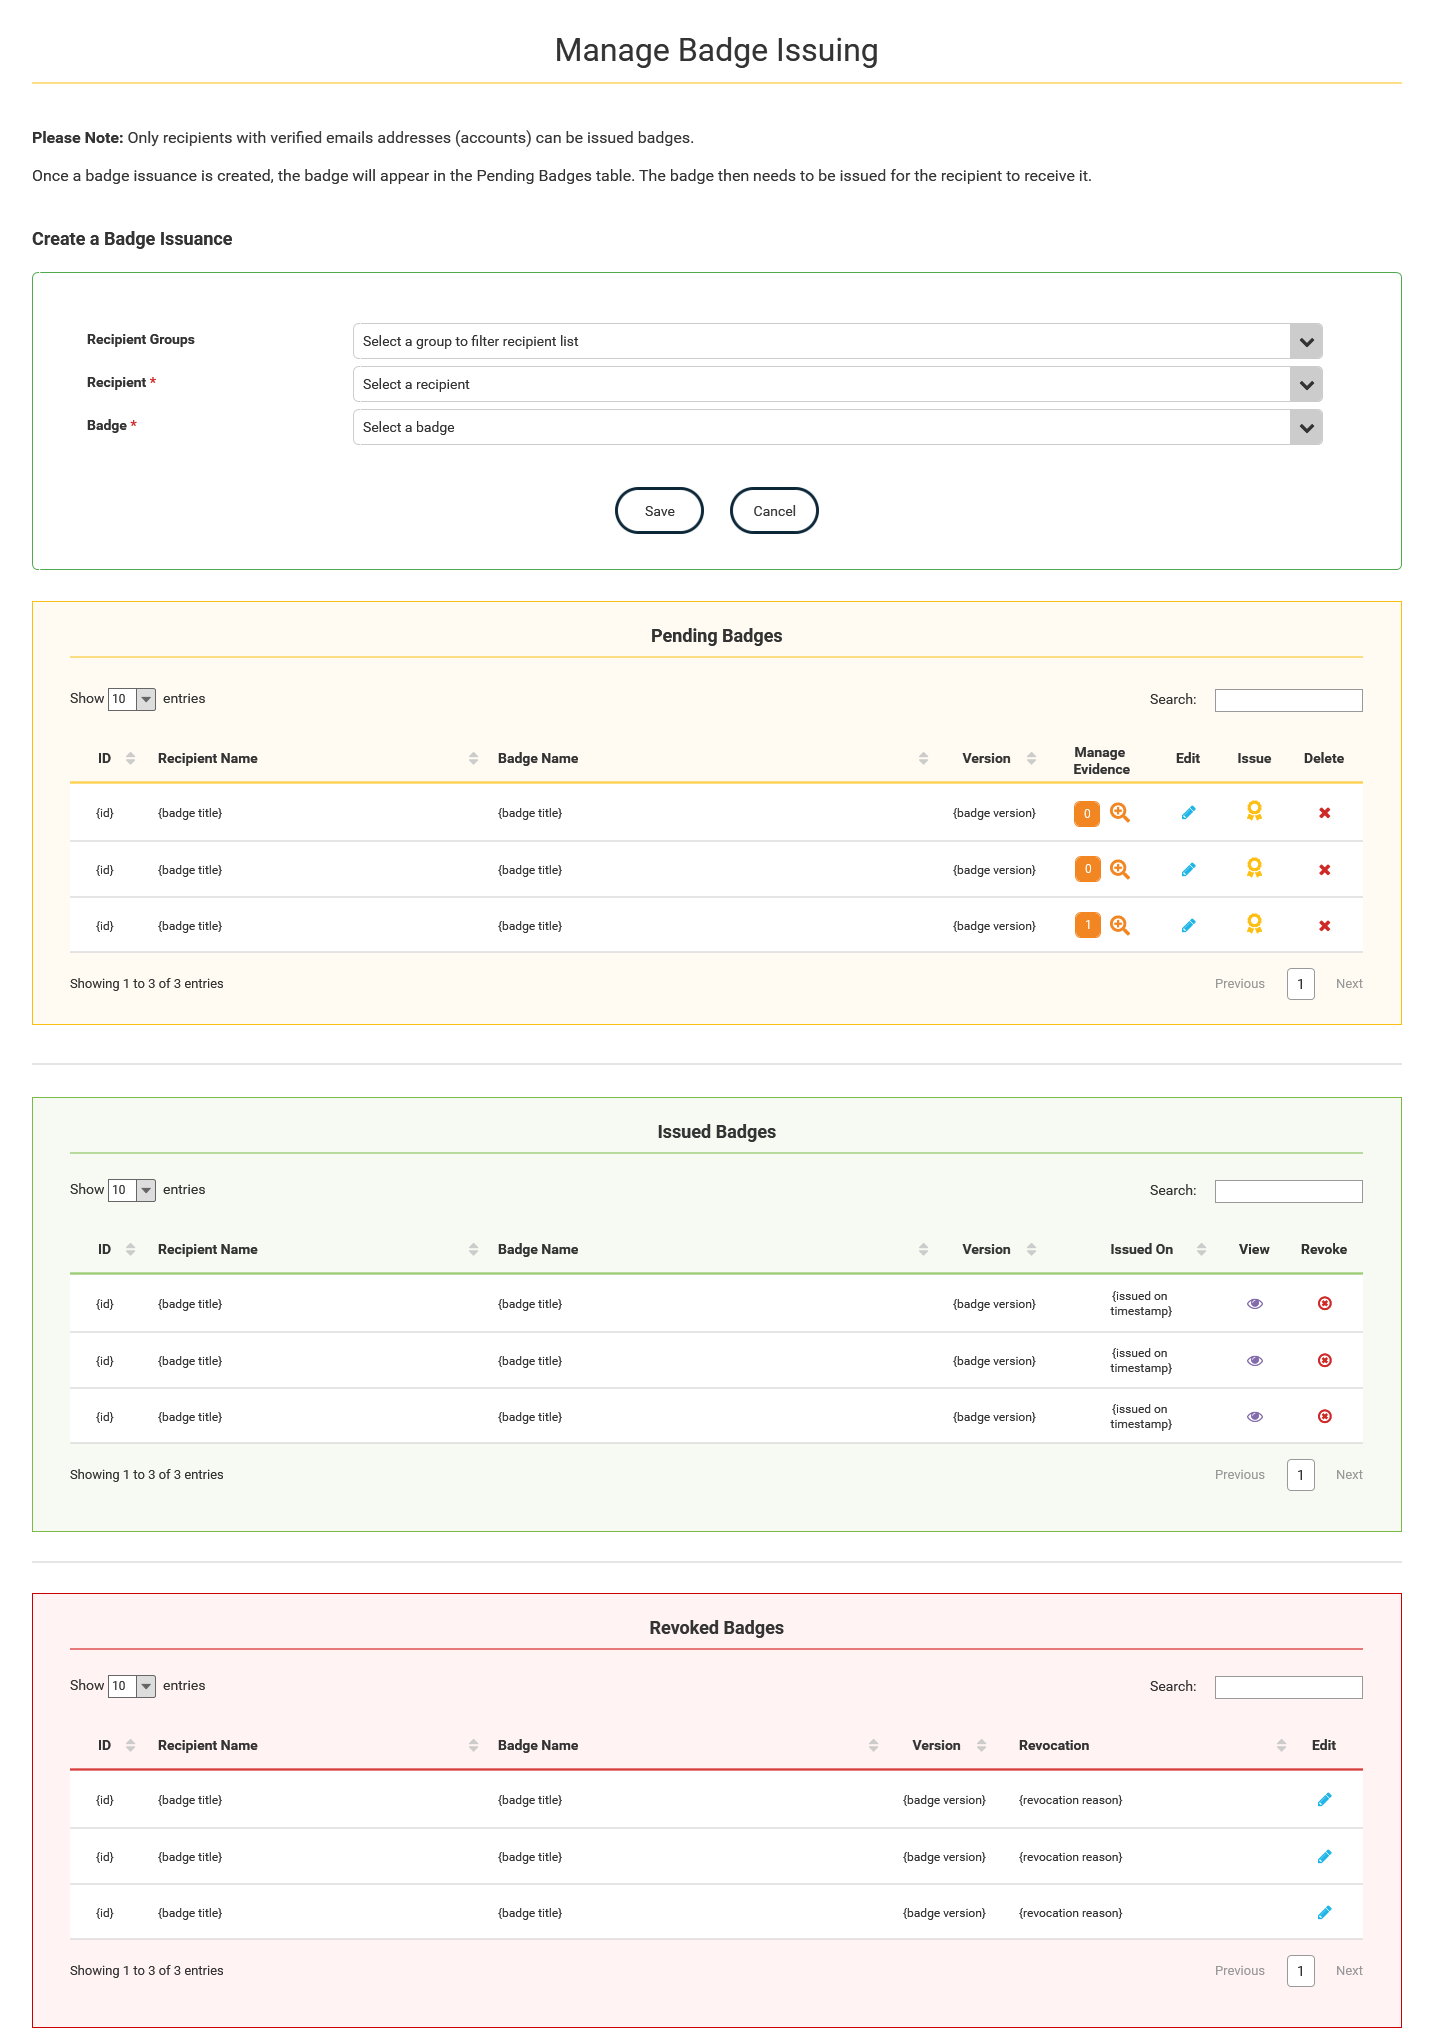
From this screen the issuer will be able to initialise a badge issuance to a recipient, add evidence to a badge issuance, and then issue a badge. They will also be able to revoke badges that have already been issued.
The information will be displayed in 3 different tables: Pending, Issued and Revoked.
On initial load of the page, a form at the top of the page will show for "Create a Badge Issuance". The issuer will be required to select a recipient name and then the badge they wish to issue to the recipient.
A dropdown at the top of the form will allow the issuer to select a group, which will filter the recipient name list to only show recipients within that group; narrowing down the list rather than having to scroll through the recipients.
Only recipients with accounts, and therefore verified email addresses, will appear in the recipient name dropdown list.
Clicking "Save" will add this record to the Pending Badge Issuances table.
Only one of each badge can be issued to a recipient. Therefore, if the badge has been issued already, or revoked, they cannot re-issued that badge to the same recipient.
Manage badge issuing - Pending
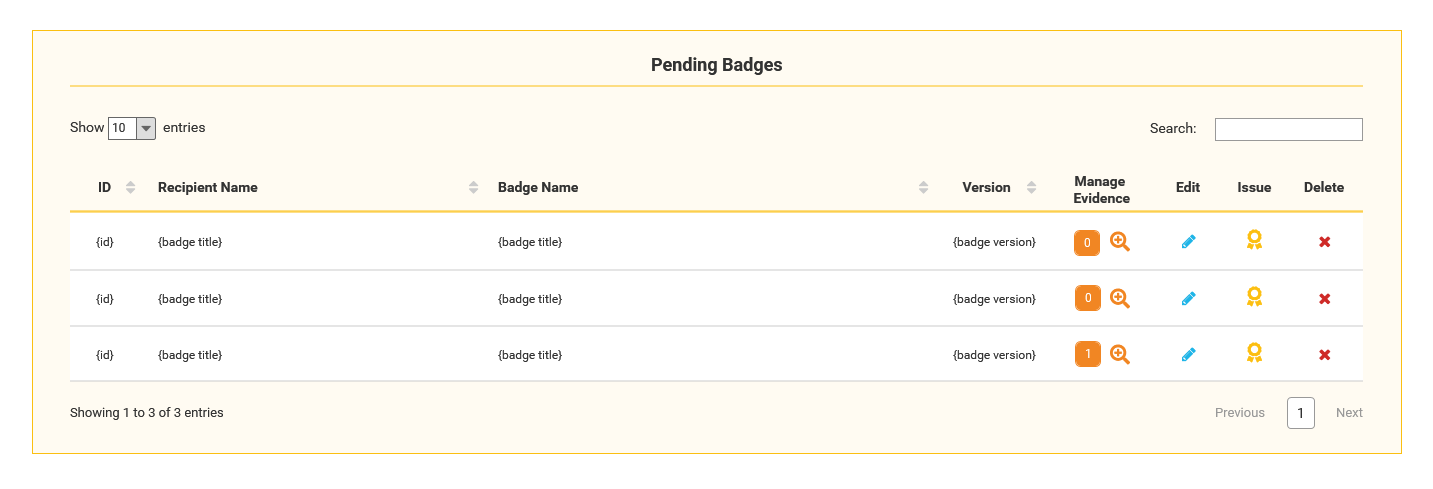
This section on the Manage badge issuing page displays all the badge issuances that the issuer has initialised through the "Create a Badge Issuance" form.
Actions available in this section are edit, manage evidence, issue and delete.
Manage badge issuing - Pending - Manage evidence
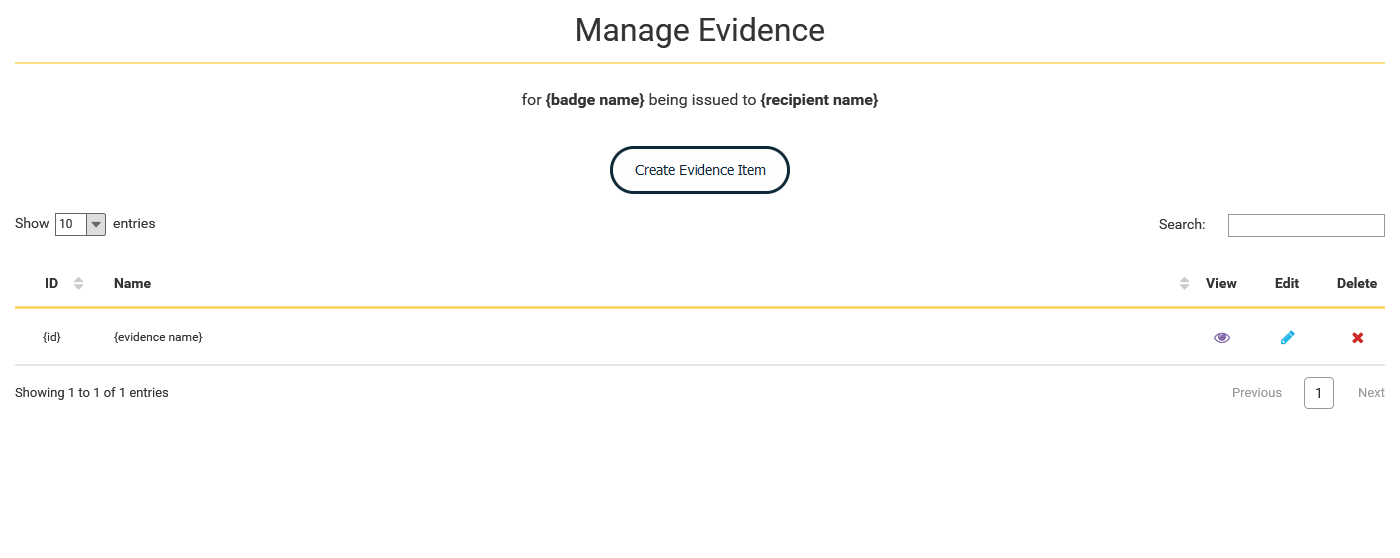
Evidence can be added to a pending badge issuance by clicking the evidence button , which will bring the issuer to this page.
From here the issuer can upload new evidence, or view, edit or delete existing evidence.
Manage badge issuing - Pending - Manage evidence - Create
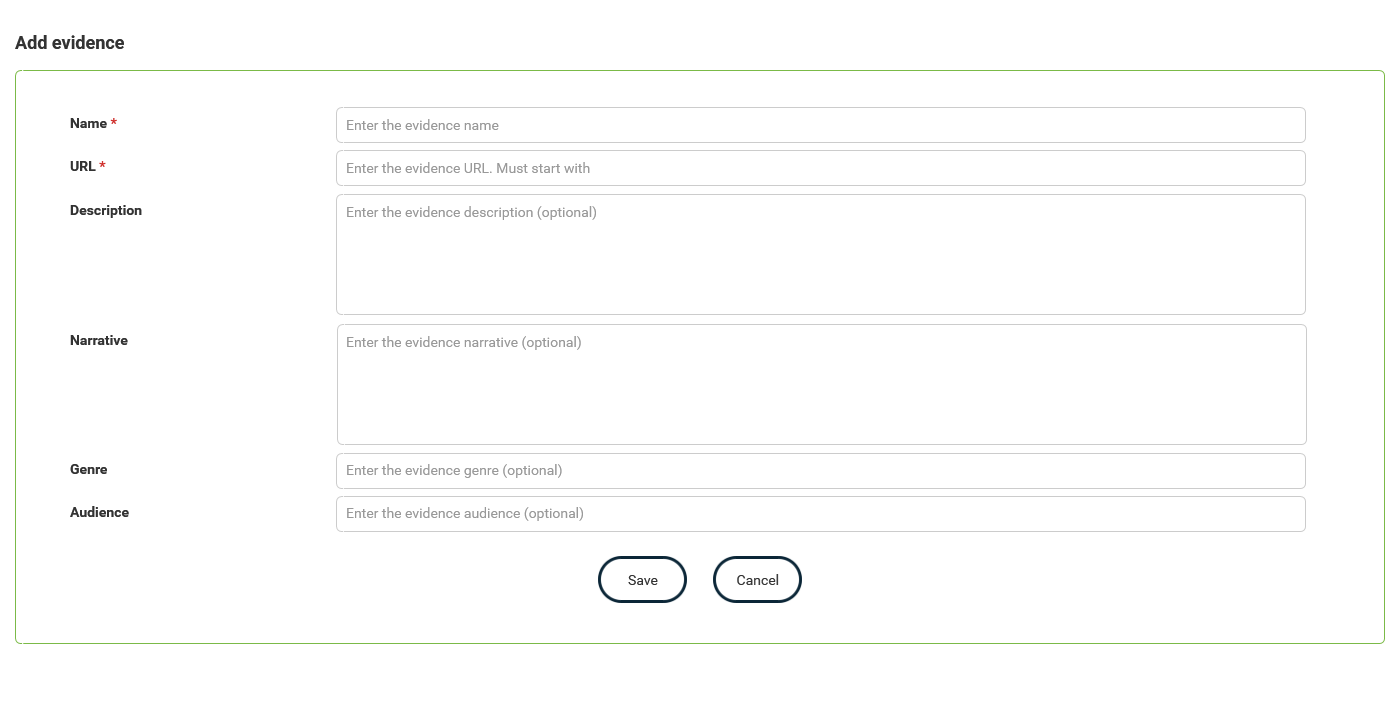
Clicking "Create evidence item" will expand a form above the table for the issuer to complete with the relevant information required for the evidence to be created.
A name and a URL for the evidence are mandatory. The URL must start with http:// or https:// to be valid.
Clicking "Add Evidence" will add a record against the pending issued badge. "Cancel" will close the form.
Manage badge issuing - Pending - Manage evidence - View
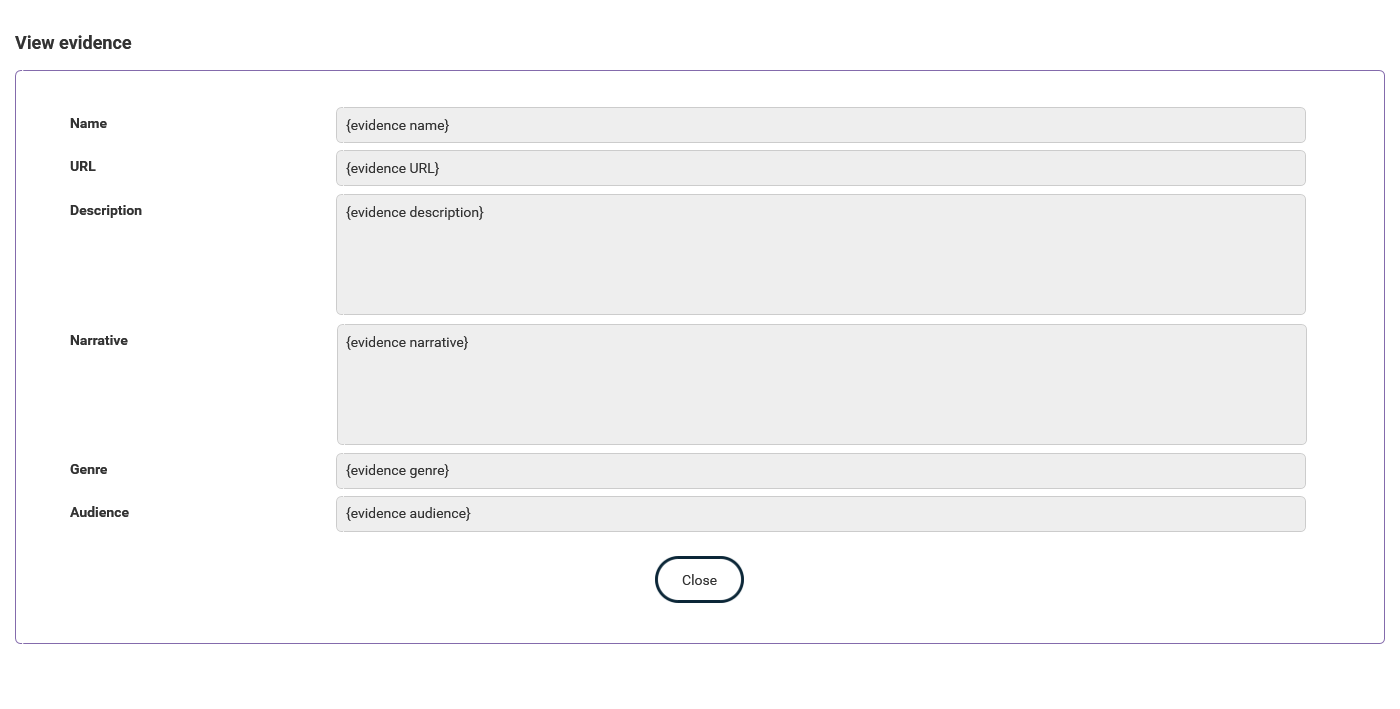
Once a piece of evidence has been created, this will appear in the table on the Manage Evidence page.
Clicking the view button will open a form at the top with the completed fields of the evidence that had been selected. The fields within this form are read only.
Clicking "Close" will close the form.
Manage badge issuing - Pending - Manage evidence - Edit
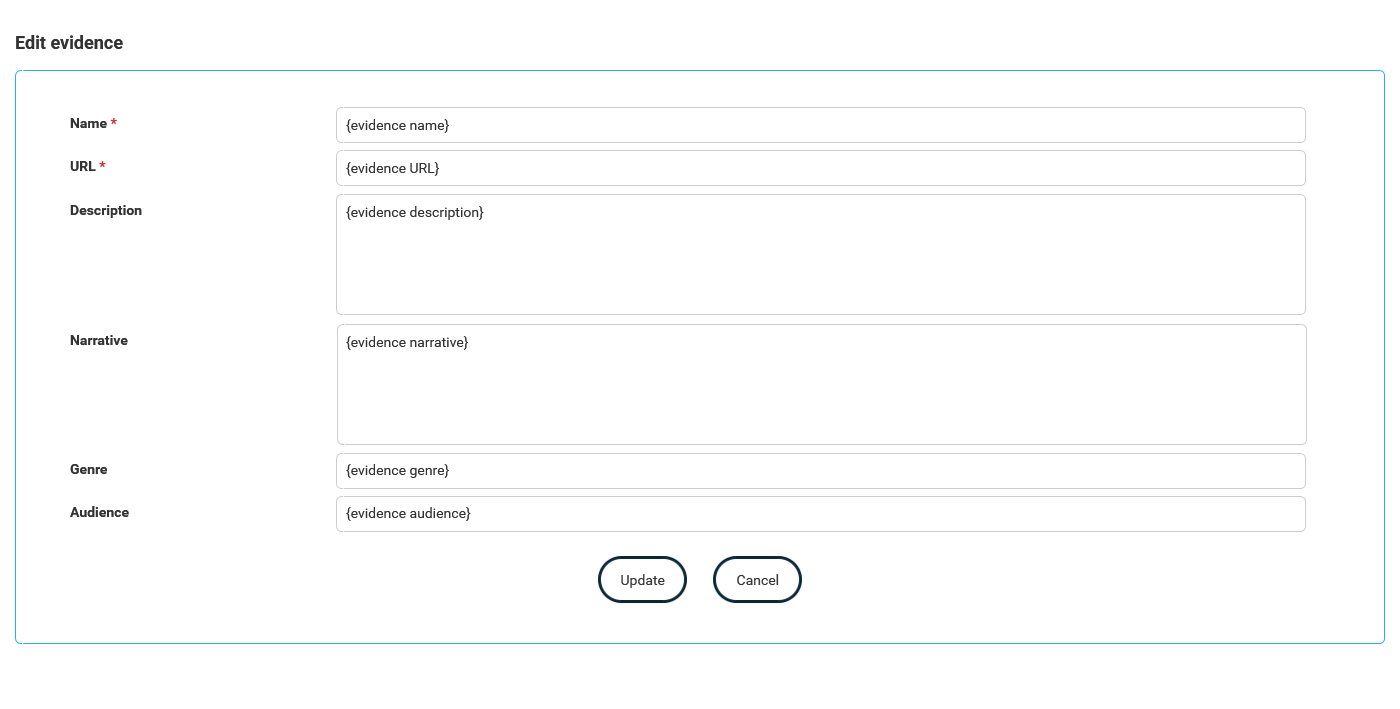
Once a piece of evidence has been created, this will appear in the table on the Manage Evidence page.
Clicking the edit button will open a form at the top with the completed fields of the evidence that had been selected.
Clicking "Update Evidence" will update the record against the pending issued badge. "Cancel" will close the form.
Manage badge issuing - Pending - Manage evidence - Delete
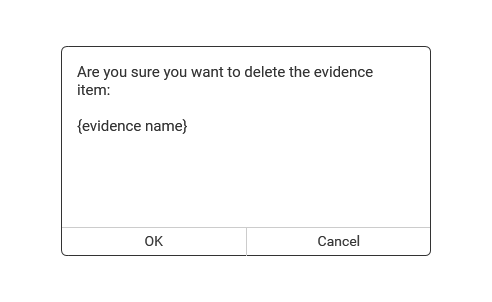
Once a piece of evidence has been created, this will appear in the table on the Manage Evidence page.
Clicking the delete button will open pop up, asking the issuer to confirm if they want to delete the selected evidence.
Clicking "OK" will delete the evidence selected. "Cancel" will close the dialogue.
Manage badge issuing - Pending - Edit
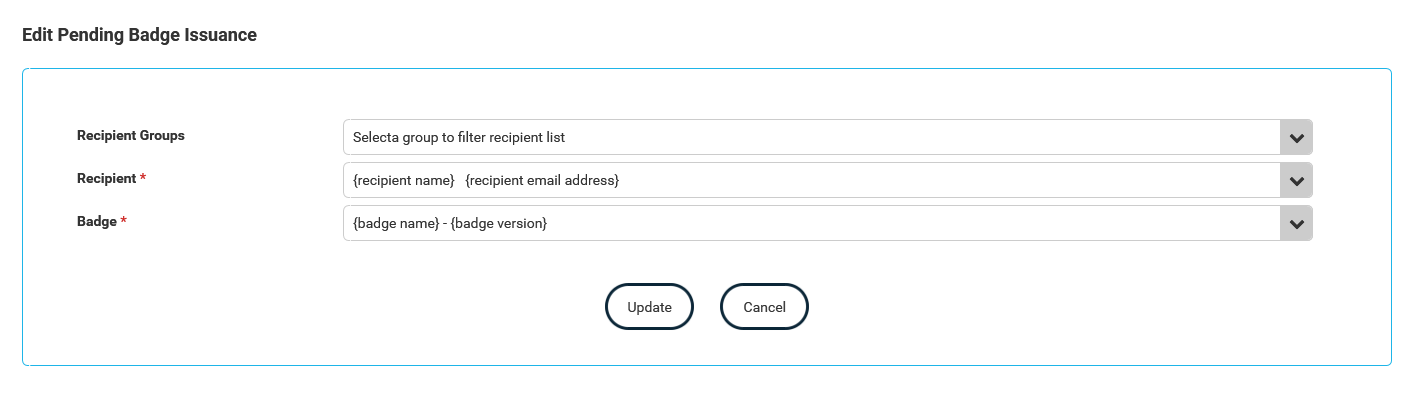
A pending issuance can be edited by clicking the edit button . This will change the form at the top of the page to be the edit form. From here the issuer can change the recipient name or the badge that has been issued.
A dropdown at the top of the form will allow the issuer to select a group, which will filter the recipient name list to only show recipients within that group; narrowing down the list rather than having to scroll through all the active recipients.
Clicking "Update" will update the record, whilst clicking "Cancel" will close the form.
Manage badge issuing - Pending - Issue
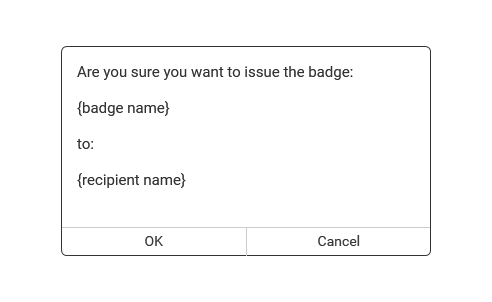
Clicking the issue button against a pending item on the Manage Badge Issuing will open a pop up to confirm issuing a badge to the recipient.
Clicking "OK" will issue the badge, clicking "Cancel" will close the pop up with no further action.
In the background this will be writing data to the blockchain, as well as sending an email to the recipient so this may take up to 30 seconds to complete the action.
Manage badge issuing - Pending - Delete
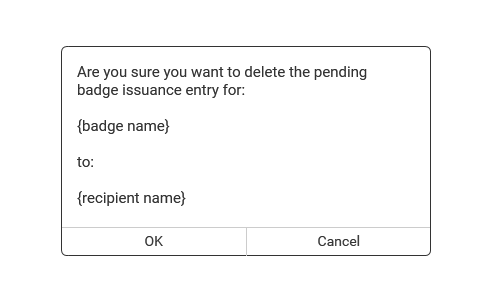
Clicking the delete button against a pending item on the Manage Badge Issuing will open a pop up to confirm deleting a badge for the selected recipient.
Clicking "OK" will delete the badge, clicking "Cancel" will close the pop up with no further action.
The badge can be reissued if needed.
Manage badge issuing - Issued
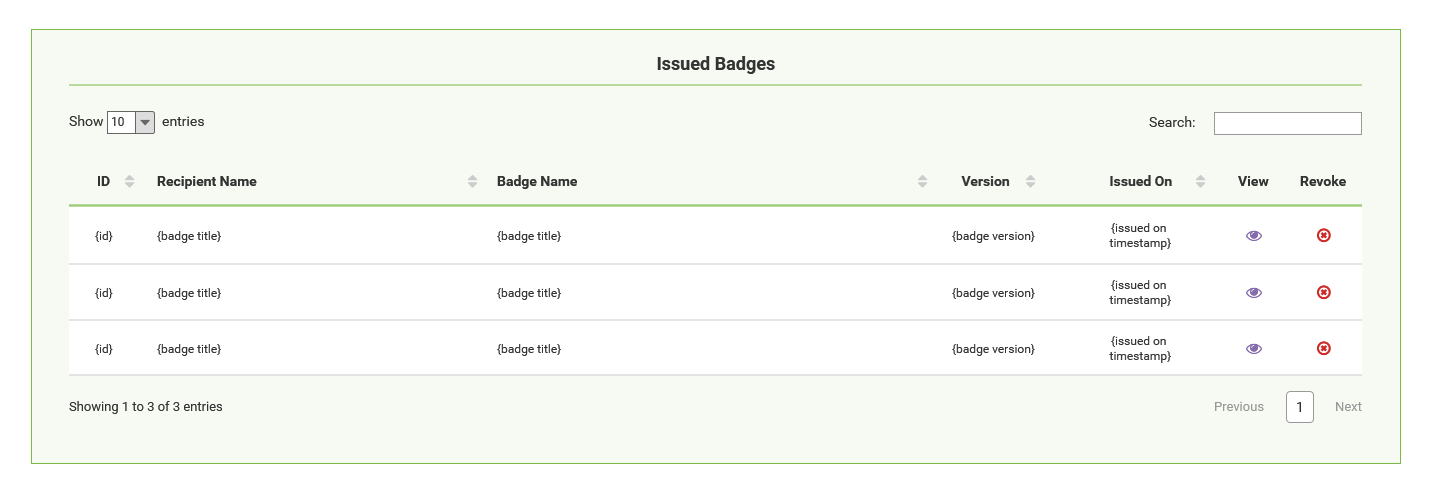
This section on the Manage badge issuing page displays all the badges that have been issued.
Manage badge issuing - Issued - View
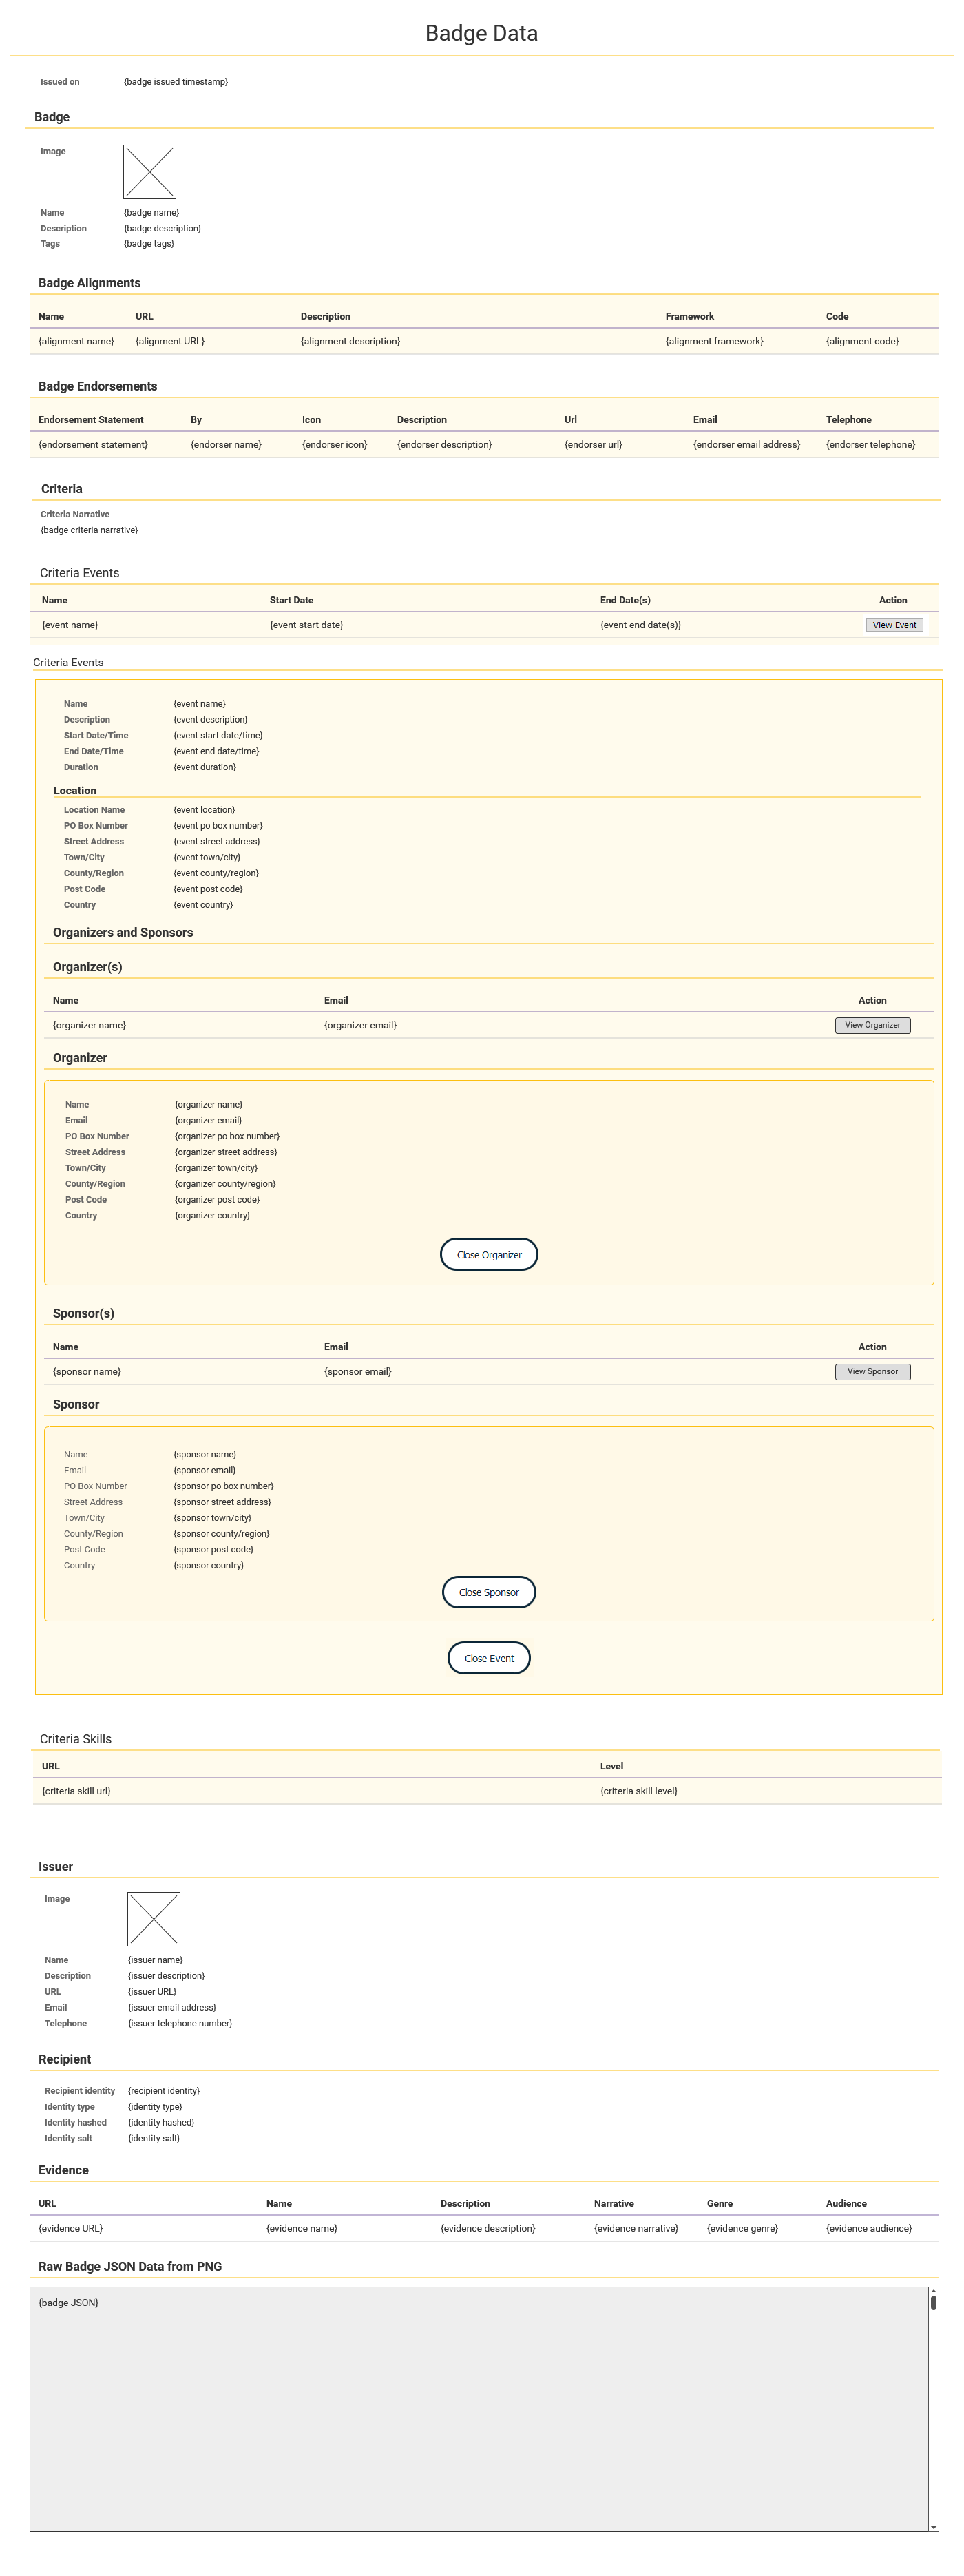
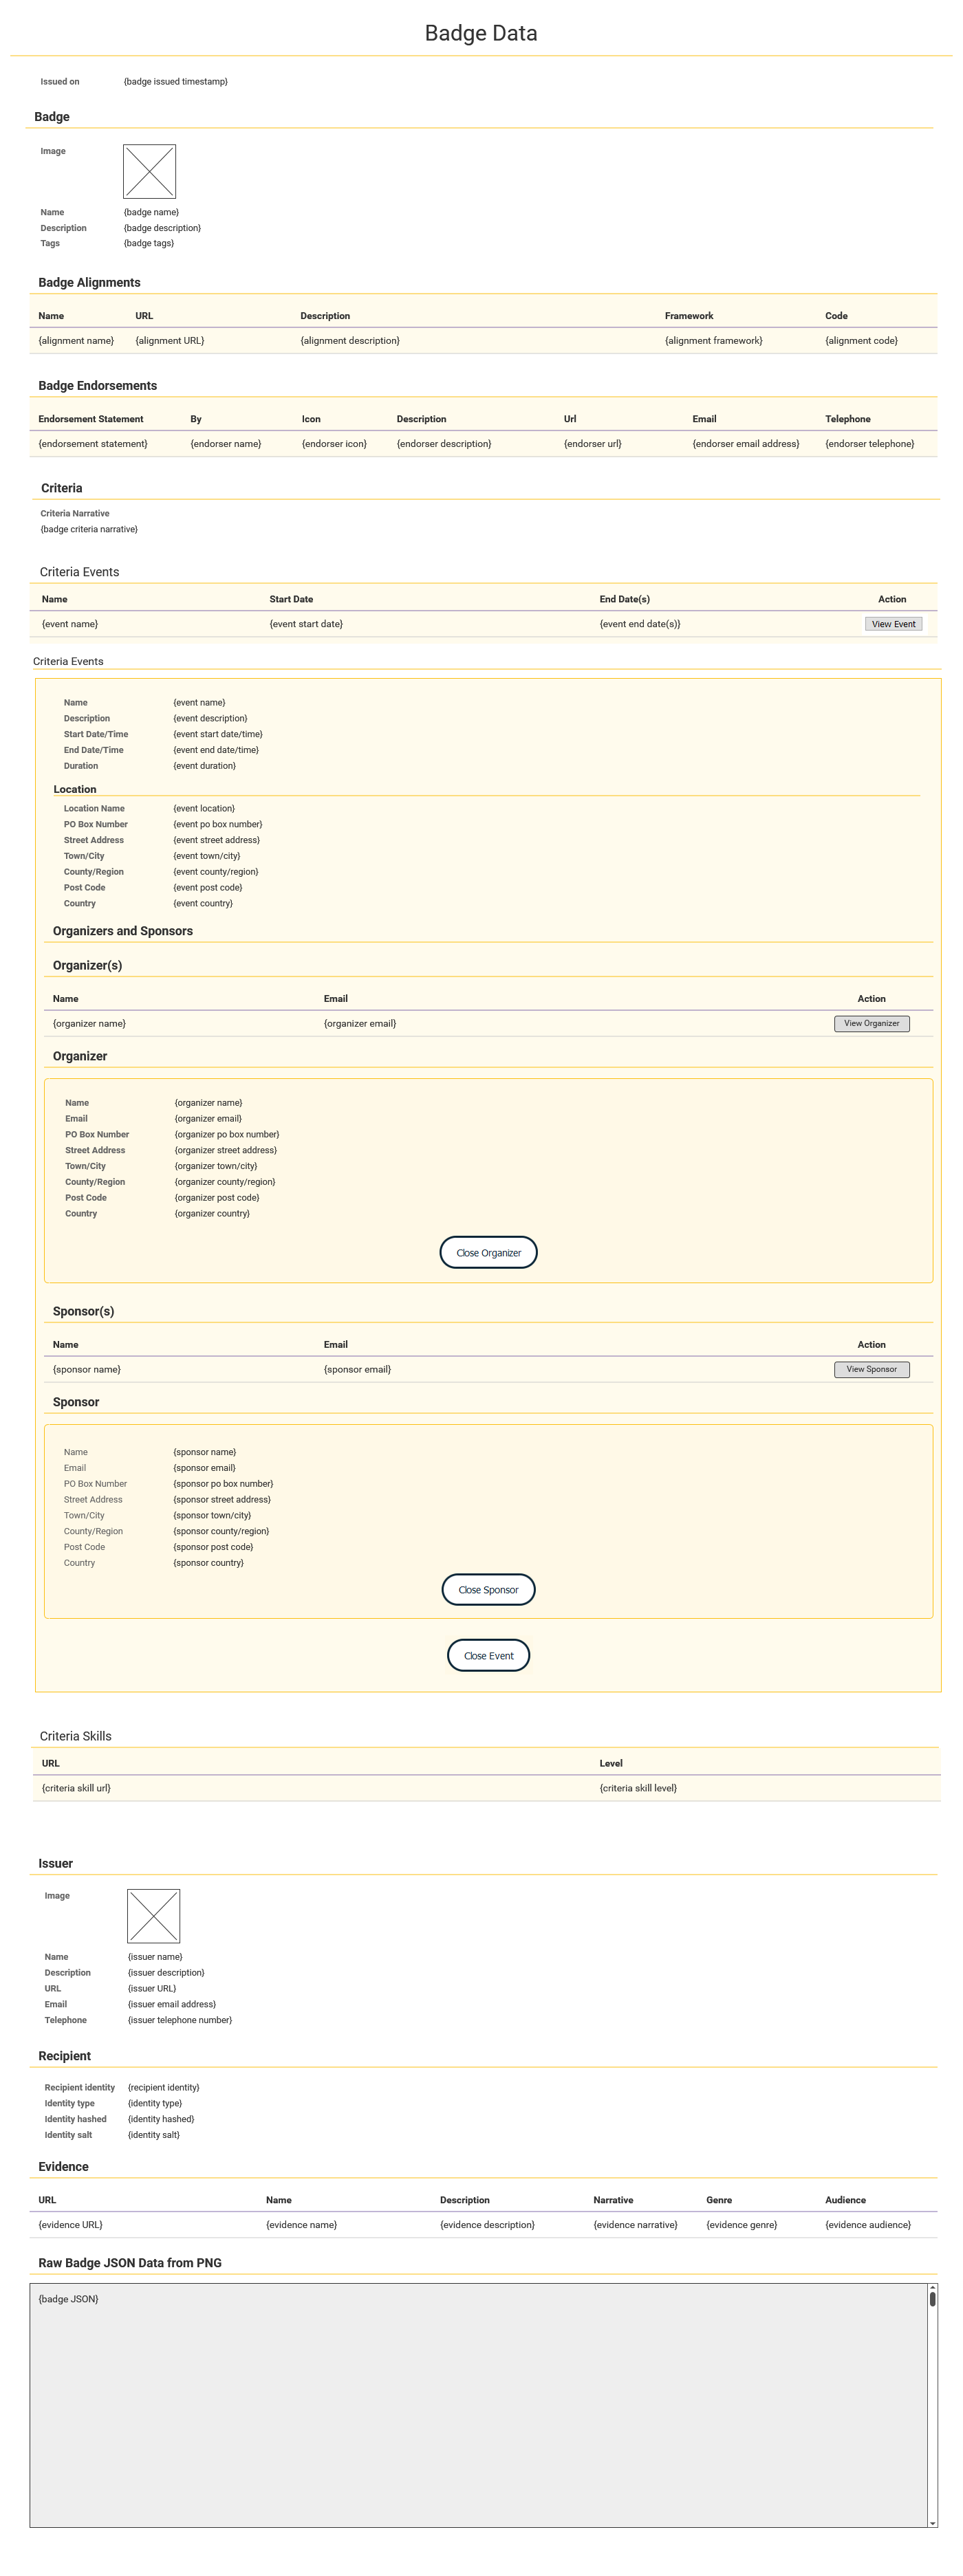
Clicking the view button against an issued item on the Manage Badge Issuing will load a page with the details of the badge that has been issued.
There is also a section at the bottom of the page with the raw JSON data from the badge .png file. The content above is a friendly format of that information, displayed in tables.
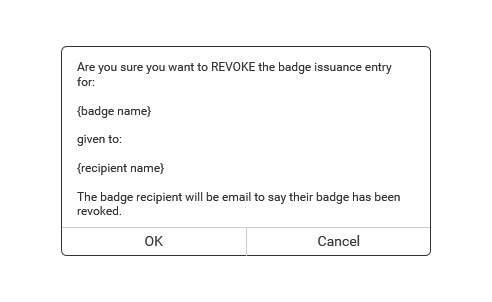
Manage badge issuing - Issued - Revoke

Clicking the revoke button against an issued item on the Manage Badge Issuing will load a pop up. Which will ask the user to confirm that they wish to revoke the badge for that recipient.
Clicking "OK" will take them to the next step where the issuer is required to provide a reason for revoking the badge, clicking "Cancel" will close the pop up with no further action.
Note: Revoking the badge will mean the badge recipient, while they will still have the badge file they were emailed, they or anyone else they share it with, will no longer be able to verify the badge through the verification process/interface. The blockchain verification of that badge will have been revoked. In addition, the same recipient cannot be reissued the same badge again. A new version of the badge would need to be entered onto the system to be issued to them. So, revoking a badge should not be done lightly.
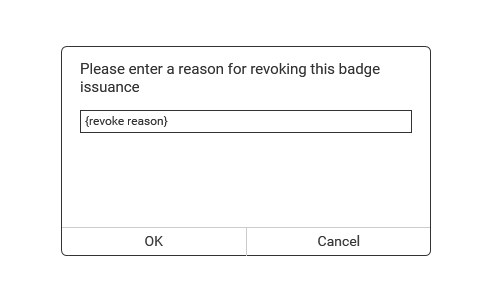
Manage badge issuing - Issued - Revoke reason
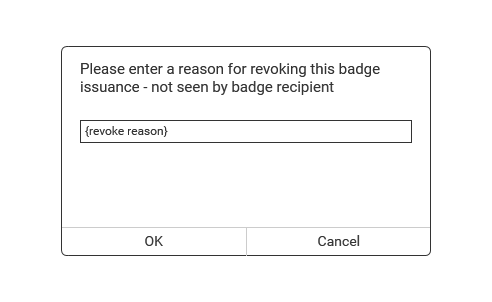
The pop up will ask for the issuer to provide a reason for revoking the badge. This will not be visible to the recipient, but instead will be stored against the badge for future reference.
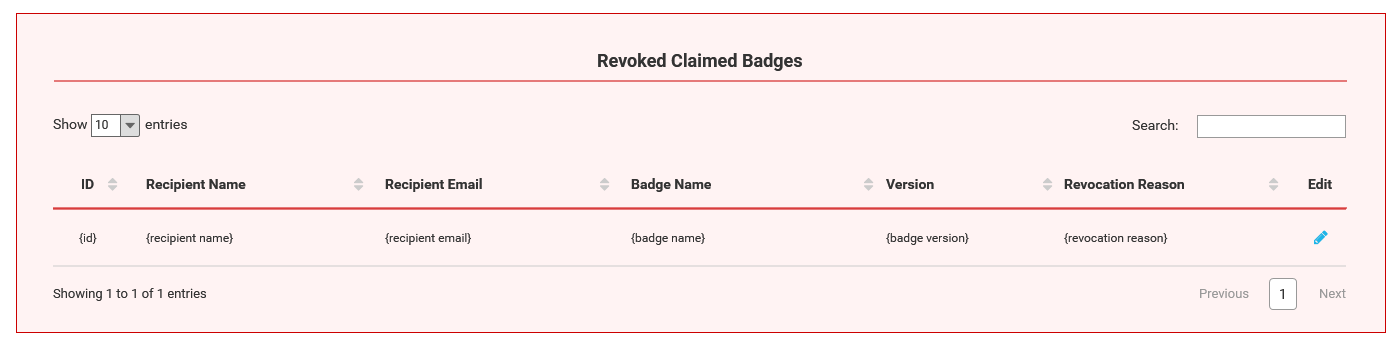
Manage badge issuing - Revoked
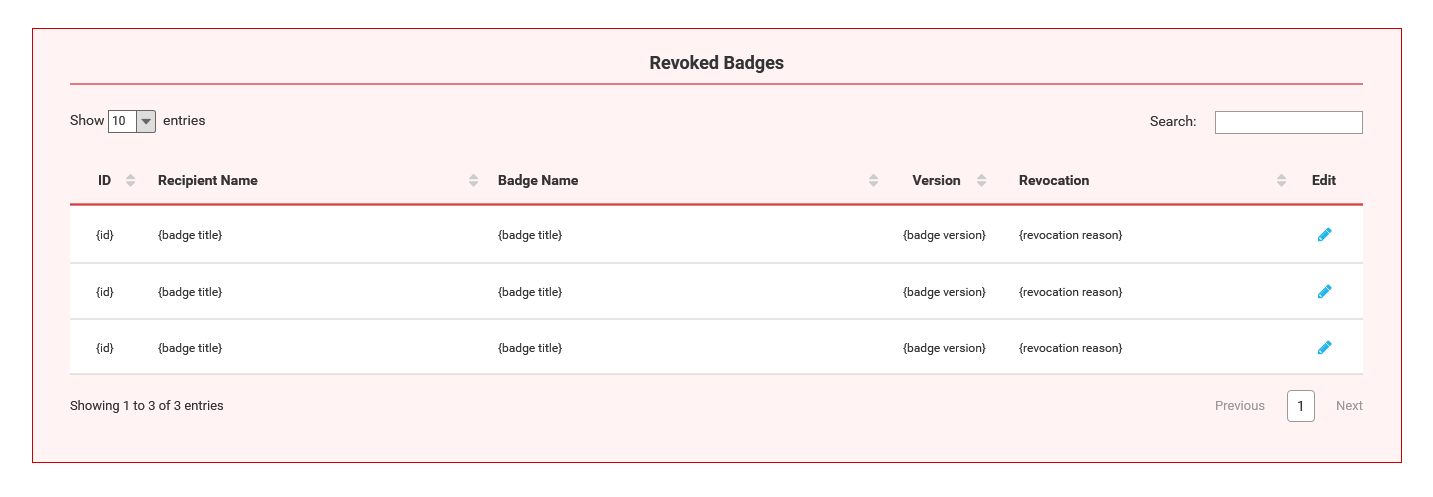
This section on the Manage badge issuing page displays all the badges that have been revoked.
The only action available in this table is to edit a reason against a badge that has been revoked.
Manage badge issuing - Revoke - Edit

When a badge has been revoked it is possible to amend the revoke reason for it.
To do this the issuer needs to click the edit button against a revoked badge. Which will then open a pop up, with a field to amend the reason.
Clicking "OK" will update the reason, clicking "Cancel" will close the pop up with no further action.
Manage Claimed Badges
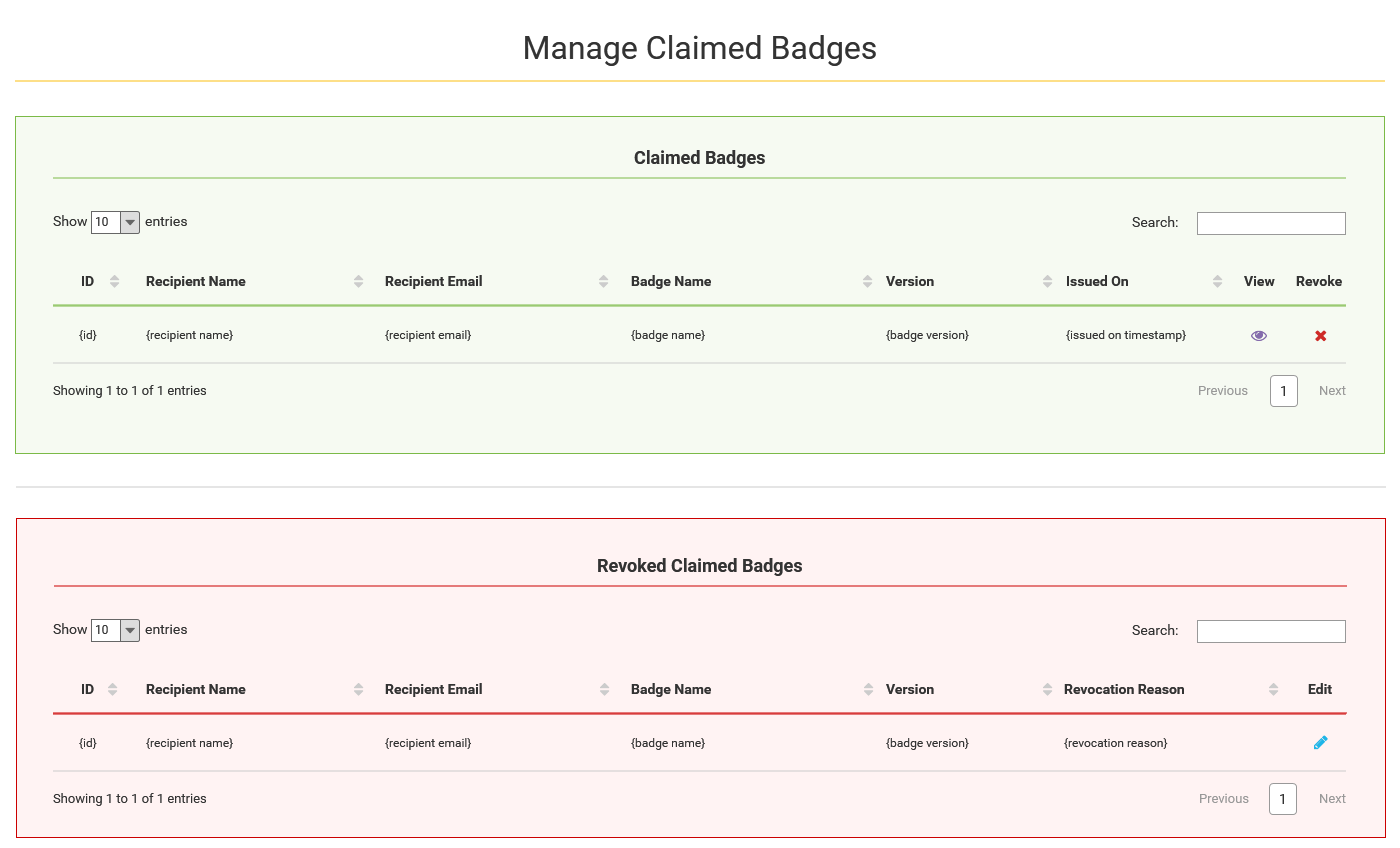
Some IoC badges can be setup as badges that can be automatically claimed a user who has the correct externally awarded qualifying badge.
If any users have claimed any of the Issuer's claimable badges, the claimed badge details will be display here. The issuer can see the information for a particular badge or revoke it if required.
Manage Claimed Badges - Claimed Badges
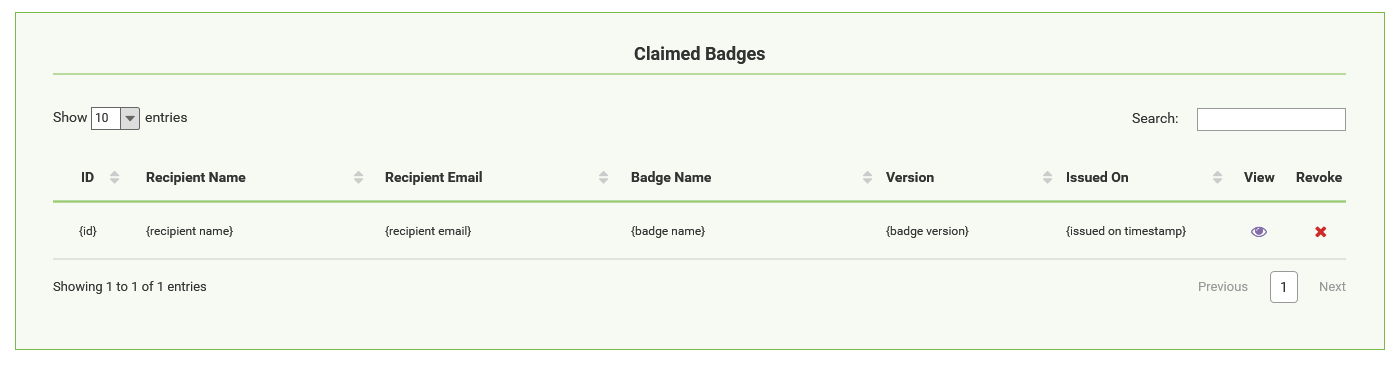
This table shows the details of badges that have been automatically claimed by users with the correct qualifying badges.
Manage Claimed Badges - Claimed Badges - View
Clicking the view button against a claimed badge on the Manage Claimed Badges will show the details of the badge that has been claimed in a new tab.
There is also a section at the bottom of the page with the raw JSON data from the badge .png file. The content above is a friendly format of that information, displayed in tables.
Manage Claimed Badges - Claimed Badges - Revoke

Clicking the revoke button against a claimed badge on the Manage Claimed Badges will load a pop up. This will ask the user to confirm that they wish to revoke the badge for that badge recipient.
Clicking "OK" will take them to the next step where the issuer is required to provide a reason for revoking the badge, clicking "Cancel" will close the pop up with no further action.
The pop up will ask for the issuer to provide a reason for revoking the badge. This will not be visible to the badge recipient, but instead will be stored against the badge for future reference.
Note: Revoking the badge will mean the recipient, while they will still have the badge file they were emailed, they or anyone else they share it with will no longer be able to verify the badge through the verification process/interface. The verification of that badge will have been revoked. In addition, the recipient cannot be reissued the same badge again. A new version of the badge would need to be entered onto the system to be issued to them. So, revoking a badge should not be done lightly.
Manage Claimed Badges - Revoked Claimed Badges
This table will show a list of the claimed badges that have been previously revoked.
Manage Claimed Badges - Revoked Claimed Badges - Edit
When a badge has been revoked it is possible to amend the revoke reason for it.
To do this the issuer needs to click the edit button against a revoked badge. This will then open a pop up, with a field to amend the reason.
Clicking "OK" will update the reason, clicking "Cancel" will close the pop up with no further action.